Easter Poke Cake- Deliciously Easy & Festive Recipe
Easter Poke Cake is an absolute showstopper, a dessert that embodies the joy and vibrant spirit of the springtime holiday. If you’re searching for a treat that’s as delightful to make as it is to devour, look no further. This isn’t just any cake; it’s a celebration waiting to happen! The beauty of an Easter Poke Cake lies in its playful simplicity and its incredible ability to absorb delicious fillings, making every bite a burst of flavor. People adore this dessert because it’s incredibly moist, thanks to the magic of poking holes and letting luscious puddles of sweetened condensed milk and pudding seep into every crevice. What truly makes our Easter Poke Cake special is the customizable nature, allowing us to infuse it with the colors and flavors that scream ‘spring’ and ‘Easter’ – think pastel hues and fruity notes. Get ready to impress your guests and family with this utterly irresistible Easter Poke Cake!
Easter Poke Cake
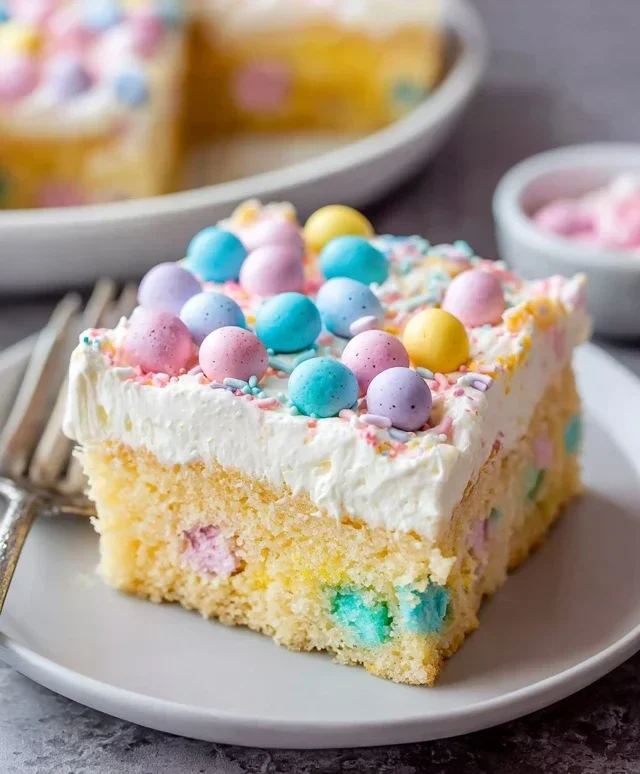
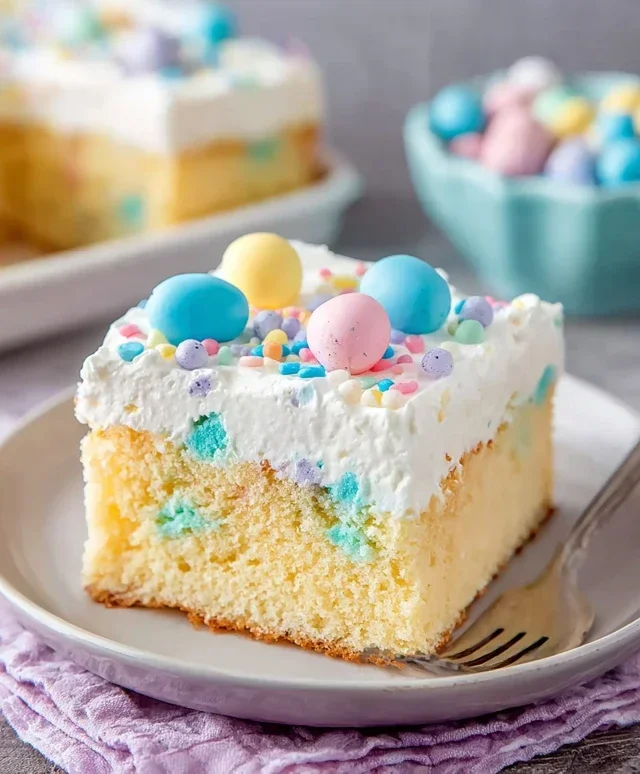
This Easter Poke Cake is a delightful way to bring a splash of spring color and irresistible flavor to your holiday table. It’s a crowd-pleaser that’s surprisingly easy to make, and the vibrant, swirled colors inside make it a fun surprise with every forkful. We’ll start with a classic white cake base, inject it with a creamy, sweetened pudding mixture, and finish it off with a luscious whipped topping and festive Easter decorations. Get ready for a cake that’s as beautiful as it is delicious!
Ingredients:
Baking the Cake Base
Our journey begin extracts with creating the perfect canvas for our colorful masterpiece. We’ll start by preheating your oven and preparing your baking pan. For this recipe, a 9×13 inch baking pan is ideal. Grease and flour the pan thoroughly to ensure the cake releases easily after baking.
In a large mixing bowl, combine the white cake mix with the egg whites, vegetable oil, Greek yogurt, and ¾ cup of whole milk. The Greek yogurt adds a wonderful tenderness and moisture to the cake, making it incredibly soft and delicious. Mix on low speed until just combined, then increase the speed to medium and beat for about two minutes, or until the batter is smooth and well-emulsified. Be careful not to overmix, as this can lead to a tough cake.
Pour the batter evenly into the prepared baking pan. Smooth the top with a spatula. Bake according to the cake mix package directions, usually around 30-35 minutes, or until a wooden skewer inserted into the center comes out clean. Once baked, allow the cake to cool in the pan on a wire rack for about 15 minutes before proceeding to the next exciting step. This initial cooling period is important; if you try to poke holes while the cake is too hot, it might become crum extractbly.
Creating the Colorful Injection
Now for the fun, colorful part! While the cake is still slightly warm in the pan, we’re going to create a network of holes that will absorb our vibrant pudding mixture. Using the handle of a wooden spoon, a chopstick, or even the end of a dowel rod, poke holes all over the surface of the cake. Aim for holes that go about two-thirds of the way down into the cake, but be careful not to poke all the way through to the bottom of the pan. Space the holes about an inch apart, creating a grid-like pattern.
Next, we’ll prepare our pudding injection. In a separate medium bowl, whisk together the instant vanilla pudding mix and 2 ¾ cups of whole milk. Whisk vigorously for about two minutes until the pudding begin extracts to thicken. It’s important to use cold milk for this step to ensure the pudding sets properly. Let the pudding mixture sit for about 5 minutes to fully thicken.
Now, it’s time to add the color! Divide the thickened pudding into three smaller bowls. Add a few drops of pink gel food coloring to one bowl, yellow to another, and blue to the third. Gently stir each bowl until the color is evenly distributed. You want vibrant colors, so don’t be shy with the gel food coloring – it’s highly concentrated!
Using a spoon, drizzle spoonfuls of each colored pudding mixture into the holes you created in the cake. Try to alternate the colors as you go, allowing them to meld and swirl naturally within the cake. Don’t worry about perfection here; the organic swirls are part of the charm! Once all the holes are filled, spread any remaining pudding mixture over the top of the cake.
Whipped Topping and Finishing Touches
After you’ve injected all that delicious color, cover the cake loosely with plastic wrap and refrigerate it for at least 4 hours, or preferably overnight. This chilling time is crucial for the pudding to fully set and for the flavors to meld beautifully. It also allows the cake to absorb the moisture from the pudding, resulting in an incredibly moist and flavorful treat.
While the cake is chilling, let’s prepare our luscious whipped topping. In a chilled mixing bowl, whip the heavy cream with the granulated sugar until stiff peaks form. Be sure your bowl and whisk attachments are cold for best results. This will create a light and airy topping that perfectly complements the richness of the cake and pudding.
Once the cake has chilled and the pudding has set, carefully spread the whipped cream evenly over the top of the cake. This creates a beautiful, creamy canvas for our final decorations.
Finally, it’s time to add the festive Easter flair! Sprinkle the sweetened shredded coconut generously over the whipped cream. The coconut adds a delightful texture and a hint of tropical flavor. Then, scatter your Easter sprinkles and/or mini eggs over the top for a truly festive finish. These colorful decorations not only look adorable but also add a fun crunch and sweet bursts of flavor.
Your Easter Poke Cake is now ready to be admired and devoured! Slice it into generous portions and watch your guests’ faces light up with delight as they discover the colorful surprise hidden within. This cake is perfect for Easter brunch, a spring gathering, or just a special treat to brighten your day. Enjoy every bite!
Conclusion:
I hope you’re as excited to try this Easter Poke Cake as I am! This recipe is a guaranteed crowd-pleaser, offering a delightful combination of moist cake, creamy pudding, and vibrant Easter colors. It’s wonderfully forgiving and endlessly customizable, making it perfect for bakers of all skill levels. The beauty of this Easter Poke Cake lies in its simplicity and the sheer joy it brings to any festive table. It’s not just a dessert; it’s a celebration of spring and sweet traditions.
Serve it chilled for the ultimate refreshing treat. It’s fantastic on its own, but consider adding fresh berries like strawberries or raspberries for a burst of extra flavor and color. For a richer experience, a dollop of whipped cream or a sprinkle of shaved white chocolate complements the pudding beautifully.
Don’t hesitate to experiment with variations! You can use different cake flavors like lemon or white cake, or switch up the pudding flavor to match your preferences – think vanilla bean, strawberry, or even a creamy cheesecake pudding. The possibilities are truly endless, and each variation will create a unique and delicious Easter Poke Cake!
Frequently Asked Questions about Easter Poke Cake:
Can I make this poke cake ahead of time?
Absolutely! In fact, making it a day in advance is highly recommended. This allows the pudding to fully soak into the cake, resulting in an even more moist and flavorful dessert. Just cover it tightly and refrigerate.
What kind of frosting works best?
While the pudding layer is the star, a light and airy frosting like whipped cream or a cream cheese frosting is a wonderful choice. You can also opt for a simple dusting of powdered sugar or leave it unfrosted to let the vibrant colors shine through.
How do I get the best poke marks?
Use the handle of a wooden spoon or a skewer to create holes about 1/2 inch deep. Don’t be afraid to make plenty of them! This ensures the pudding can seep deep into the cake, creating that signature moist texture.
Easter Poke Cake
A festive and delicious poke cake perfect for Easter celebrations, featuring a moist white cake soaked in pudding and topped with whipped cream and Easter-themed decorations.
Ingredients
-
15.25 ounce white cake mix
-
3 egg whites
-
½ cup vegetable oil
-
½ cup greek yogurt
-
¾ cup whole milk
-
Pink, yellow, and blue gel food coloring
-
5.1 ounces instant vanilla pudding mix
-
2 ¾ cups whole milk
-
2 cups heavy cream
-
3 Tablespoons granulated sugar
-
1 cup sweetened shredded coconut
-
Easter sprinkles and/or mini eggs for topping
Instructions
-
Step 1
Prepare the cake batter according to the white cake mix package instructions, using the 3 egg whites, ½ cup vegetable oil, ½ cup greek yogurt, and ¾ cup whole milk. Pour batter into a greased 9×13 inch baking pan. -
Step 2
Bake the cake for the time recommended on the cake mix package, or until a toothpick inserted into the center comes out clean. Let the cake cool completely in the pan. -
Step 3
While the cake cools, prepare the pudding. In a large bowl, whisk together the 5.1 ounces instant vanilla pudding mix and 2 ¾ cups whole milk until thickened. Divide the pudding into three separate bowls. Add a few drops of pink, yellow, and blue gel food coloring to each bowl respectively and stir until evenly colored. -
Step 4
Once the cake is completely cool, poke holes all over the top using the handle of a wooden spoon or a fork. Spoon the colored puddings evenly over the top of the cake, allowing them to seep into the holes. Chill the cake for at least 30 minutes to allow the pudding to set. -
Step 5
Prepare the whipped cream topping. In a large bowl, whip the 2 cups heavy cream and 3 Tablespoons granulated sugar until stiff peaks form. Gently spread the whipped cream over the set pudding layer. -
Step 6
Sprinkle the sweetened shredded coconut over the whipped cream, then decorate with Easter sprinkles and/or mini eggs before serving.
Important Information
Nutrition Facts (Per Serving)
It is important to consider this information as approximate and not to use it as definitive health advice.
Allergy Information
Please check ingredients for potential allergens and consult a health professional if in doubt.