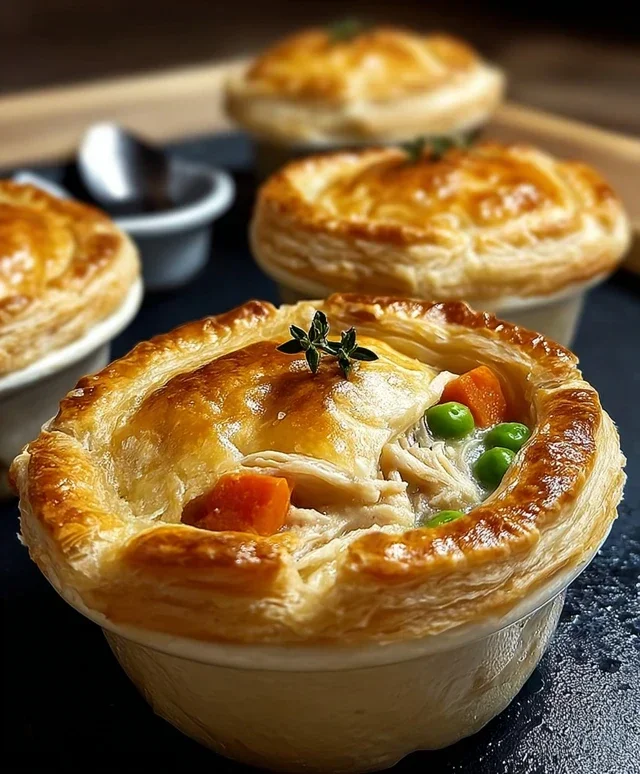
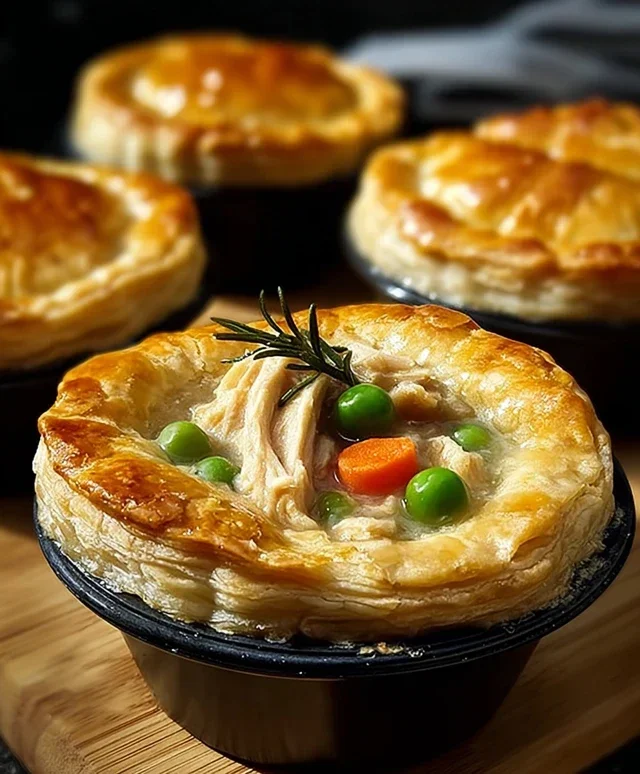
Easy Mini Chicken Pot Pies Recipe
Mini Chicken Pot Pies are the epitome of comfort food, miniaturized for your pure delight. There’s something undeniably magical about a perfectly portioned pie, bursting with creamy, savory goodness and topped with a flaky, golden crust. We all love chicken pot pie for its nostalgic warmth and hearty, satisfying nature, but these mini versions elevate the experience. Imagin extracte individual servings, each a warm hug on a chilly evening, or a charming addition to any potluck or casual gathering. What makes these mini chicken pot pies truly special is the perfect balance of tender chicken, sweet vegetables, and that rich, velvety sauce, all encased in a crisp, buttery pastry. They’re incredibly versatile, easy to customize with your favorite veggies, and guaranteed to bring smiles all around. Let’s dive into creating your own batch of these delightful little wonders!
Mini Chicken Pot Pies
There’s something undeniably comforting about a classic chicken pot pie. The creamy, savory filling encased in a flaky, golden crust is a hug in edible form. But sometimes, a full-sized pot pie feels a bit too grand for a weeknight meal, or perhaps you’re looking for individual portions for a potluck or a special treat. That’s where these delightful mini chicken pot pies come in! They’re incredibly easy to make, perfect for portion control, and just as delicious as their larger counterparts. Using simple, readily available ingredients, you can whip up a batch of these little flavor bombs in no time. They’re a fantastic way to use up leftover chicken too, making them an economical and crowd-pleasing option. So, let’s get started on creating these charming little pies that are sure to bring smiles to everyone’s faces.
Ingredients:
Preparing Your Mini Pot Pies
The beauty of these mini pot pies lies in their simplicity. We’re going to leverage some convenient ingredients to make the process as straightforward as possible. First things first, let’s get our chicken ready. You’ll want to dice your boneless chicken breast into small, bite-sized pieces. This ensures that the chicken cooks quickly and is evenly distributed throughout the pies. If you have leftover cooked chicken, feel free to use that instead – simply shred or dice it to the same size. This is a great way to minimize food waste and save even more time in the kitchen.
Next, we’ll focus on building that luscious, creamy filling that is the heart of any good pot pie. In a medium bowl, combine the diced chicken, the frozen peas and carrots, and the entire can of cream of chicken soup. Now, it’s time to add those essential seasonings that will elevate the flavor. Sprinkle in the garlic powder, onion powder, and salt. Stir everything together thoroughly until all the ingredients are well combined and coated in the creamy soup. This mixture will be rich, savory, and bursting with classic pot pie goodness. It’s important to ensure the seasonings are evenly distributed so every bite is as flavorful as the last.
Assembling the Pies
Now comes the fun part – assembling our mini pot pies! We’ll be using refrigerated biscuit dough to create the perfect crust for our fillings. Preheat your oven to 375 degrees Fahrenheit (190 degrees Celsius). This temperature is ideal for ensuring the biscuits bake up golden brown and the filling gets nice and hot without overcooking. While the oven is preheating, prepare your muffin tin. Generously spray each cup of your muffin tin with cooking spray. This is a crucial step to prevent the biscuits from sticking, ensuring your mini pot pies come out cleanly and look as beautiful as they taste.
Take out your cans of refrigerated biscuits. You’ll be using both cans, so you’ll end up with 16 individual pot pies. For each pot pie, take one biscuit and gently press it into the bottom and up the sides of each muffin tin cup. You want to create a little edible bowl that will hold our delicious chicken and vegetable filling. Don’t worry if it doesn’t look perfect; the dough will puff up and settle as it bakes. Make sure there are no large gaps or holes in the bottom, as this could lead to the filling leaking out during baking. If the biscuit seems a little small for the cup, you can gently stretch it or even overlap two pieces slightly to ensure good coverage.
Baking to Perfection
Once your muffin tin is lined with biscuit dough, it’s time to fill them. Spoon the chicken and vegetable mixture evenly into each biscuit-lined cup. Aim for a generous amount of filling in each one, but be careful not to overfill them, as they can bubble up while baking. You want enough filling to be satisfying, but not so much that it spills over the sides and makes a mess in your oven. A good rule of thumb is to fill them about two-thirds of the way full.
Now, we’ll seal our little pies. Take another biscuit for each cup. You have two options here: you can either press a whole biscuit on top to create a fully enclosed pie, or you can cut the biscuit into strips and create a lattice top. For a fully enclosed pie, gently press the second biscuit onto the top of the filling and press the edges to seal it to the bottom biscuit. If you’re going for a lattice, cut the biscuit into thin strips and weave them over the filling. If you are fully enclosing the pies, it’s a good idea to cut a small slit in the top of each biscuit with a knife. This vent will allow steam to escape during baking, preventing the crust from becoming soggy and ensuring a beautifully golden-brown top.
Carefully place the filled muffin tin into your preheated oven. Bake for 18 to 22 minutes, or until the biscuit tops are golden brown and puffed up, and the filling is hot and bubbly. The exact baking time will depend on your oven, so keep an eye on them. You’re looking for that perfect golden hue and a filling that’s visibly hot. Once they’re done, remove the muffin tin from the oven. Let them cool in the tin for about 5 to 10 minutes. This allows the filling to set slightly and makes them easier to remove without falling apart.
Serving and Enjoying
After they’ve had a chance to cool slightly in the tin, carefully remove the mini chicken pot pies. You can usually loosen them gently with a knife or a small spatula around the edges. Place them on a serving platter or individual plates. These are best served warm, where the crust is still crisp and the filling is wonderfully creamy. They make for a delightful appetizer, a quick and easy lunch, or even a light dinner. You can serve them as is, or with a side salad or some extra steamed vegetables for a complete meal. Enjoy the comforting flavors and the adorable presentation of your homemade mini chicken pot pies! They are a testament to how simple ingredients can create something truly special.
Conclusion:
There you have it – your guide to creating delightful mini chicken pot pies! These individual servings are an absolute winner for so many reasons. They’re incredibly comforting, bursting with savory chicken and creamy vegetables, all encased in a flaky, golden crust. They’re perfect for a weeknight meal that feels special, a potluck dish that’s always a hit, or even as a crowd-pleasing appetizer. The beauty of this recipe lies in its adaptability and the pure joy of a perfectly portioned pie. Don’t hesitate to give these mini chicken pot pies a try; you’ll be amazed at how easy and rewarding they are to make, and the smiles they bring to your table are truly priceless.
For serving, I love pairing these with a simple side salad for a balanced meal, or a dollop of cranberry sauce for a festive touch. You can also easily transform this recipe by using different vegetables like peas and carrots, or even adding a pinch of nutmeg for an extra layer of warmth. So go ahead, experiment, and make these mini chicken pot pies your own!
Frequently Asked Questions:
Can I make the pastry ahead of time?
Absolutely! You can prepare your pie dough up to two days in advance and store it, well-wrapped, in the refrigerator. This makes assembly even quicker on baking day.
What if I don’t have individual ramekins?
No problem at all! You can use a standard muffin tin. Simply press the dough into the muffin cups and fill with the chicken mixture. They’ll bake up beautifully as small, crusty portions.
Can I freeze the mini chicken pot pies?
Yes, you can! Bake the mini pot pies completely, let them cool, and then freeze them individually wrapped. Reheat them in a moderate oven until warmed through for a quick and easy meal.
Mini Chicken Pot Pies
Quick and easy individual chicken pot pies made with refrigerated biscuits, chicken, and a creamy vegetable filling.
Ingredients
-
2 cans refrigerated biscuits (8-count each)
-
½ lb boneless chicken breast, diced
-
1 cup frozen peas & carrots
-
1 can (10.5 oz) cream of chicken soup
-
½ tsp garlic powder
-
½ tsp onion powder
-
¼ tsp salt
-
Cooking spray
Instructions
-
Step 1
Preheat oven to 375°F (190°C). Lightly grease an 8-cup muffin tin with cooking spray. -
Step 2
In a medium bowl, combine the diced chicken breast, frozen peas & carrots, cream of chicken soup, garlic powder, onion powder, and salt. Stir until well combined. -
Step 3
Separate the refrigerated biscuits. Press each biscuit into the bottom and up the sides of the prepared muffin cups to form a crust. -
Step 4
Spoon the chicken mixture evenly into each biscuit-lined muffin cup, filling them about two-thirds full. -
Step 5
Bake for 20-25 minutes, or until the biscuits are golden brown and the filling is bubbly. -
Step 6
Let the mini pot pies cool slightly in the muffin tin for a few minutes before carefully removing them.
Important Information
Nutrition Facts (Per Serving)
It is important to consider this information as approximate and not to use it as definitive health advice.
Allergy Information
Please check ingredients for potential allergens and consult a health professional if in doubt.