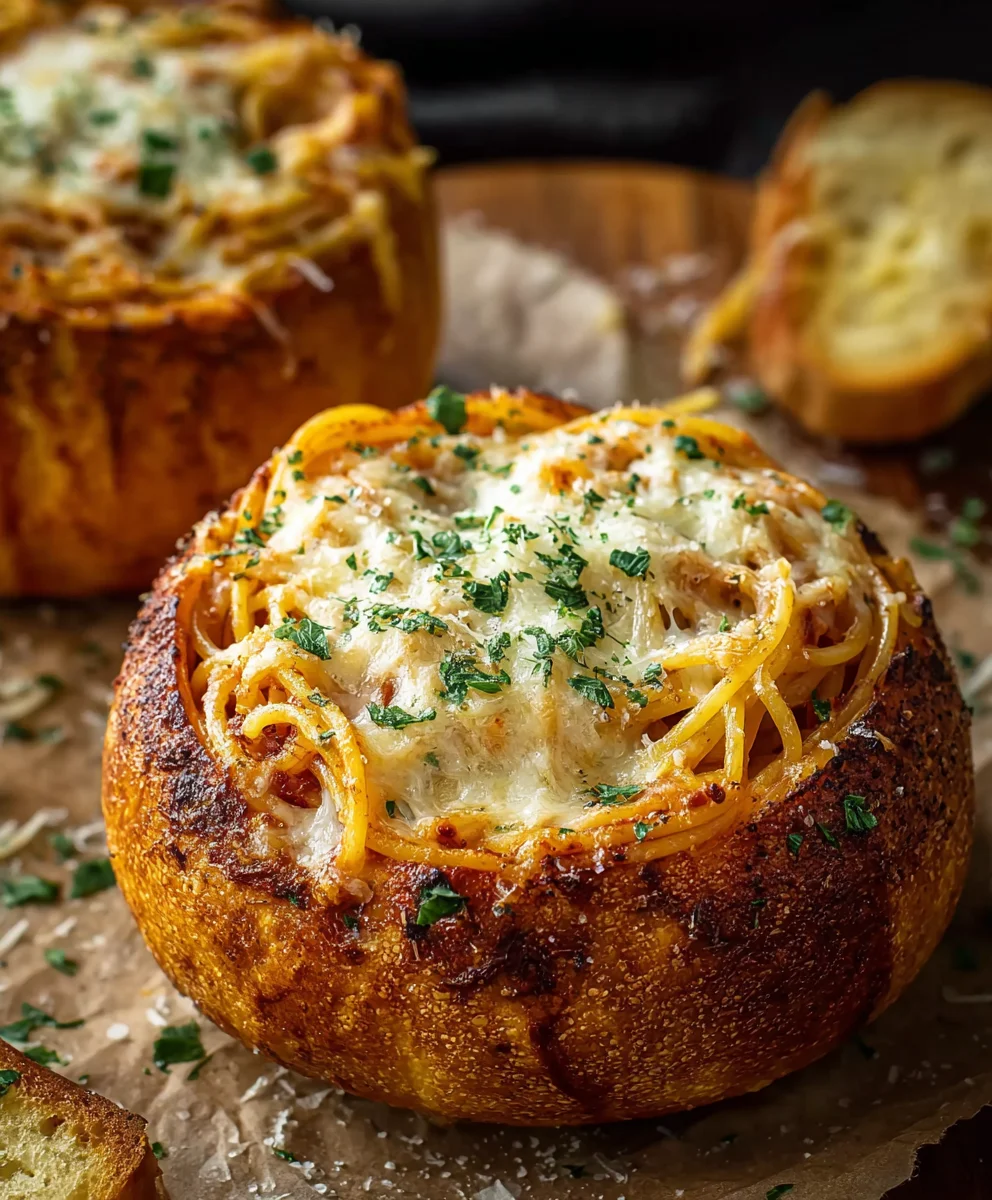
Spaghetti Garlic Bread Bowls – Easy Comfort Food
Spaghetti Garlic Bread Bowls aren’t just a meal; they’re an edible masterpiece, a playful and utterly delicious fusion that takes comfort food to a whole new level. Imagin extracte the satisfying crunch of perfectly baked garlic bread, its golden crust infused with fragrant garlic and herbs, giving way to a fluffy, warm interior. But this isn’t just any bread; it’s a vessel, a flavorful chalice designed to cradle a generous serving of your favorite spaghetti. We adore this dish because it combines two universally beloved classics into one ingenious creation. The inherent fun of eating spaghetti directly from a bread bowl adds an element of pure joy to any dinner table, making it an instant hit with families and dinner guests alike. What truly makes Spaghetti Garlic Bread Bowls special is the incredible synergy of textures and flavors – the chewy, savory bread perfectly complementing the rich, saucy pasta within. It’s a delightful surprise with every single bite, a testament to culinary creativity that’s both incredibly satisfying and undeniably impressive.

Ingredients:
- Olive oil for cooking
- 1 medium white onion, finely diced
- 2 garlic cloves, finely diced
- 500g ground beef (12% fat)
- 1 tablespoon tomato puree
- 80ml red grape juice
- 500g tomato passata
- 240ml beef stock
- ½ tablespoon Worcestershire sauce
- ½ bunch fresh basil, chopped
- ½ teaspoon dried oregano
- ½ teaspoon sugar
- 20g freshly grated parmesan
- 200g spaghetti
- 6 crusty white rolls
Preparing the Spaghetti Filling
Sautéing the Aromatics
Let’s start by building a rich flavor base for our Spaghetti Garlic Bread Bowls. Heat a generous glug of olive oil in a large, deep skillet or Dutch oven over medium heat. Once the oil is shimmering, add your finely diced white onion. We want to cook the onion gently, stirring occasionally, for about 5-7 minutes, or until it becomes translucent and starts to soften. This process sweetens the onion and removes its raw bite. Now, add the finely diced garlic. Be careful not to burn the garlic; cook it for just about 1 minute until it’s fragrant. This is crucial for a delicious, not bitter, garlic flavor.
Browning the Beef and Developing Sauce
Crum extractble the 500g of ground beef into the skillet with the softened onions and garlic. Increase the heat slightly to medium-high and break up the meat with your spoon. Cook the beef, stirring regularly, until it’s nicely browned all over. Drain off any excess fat if you prefer a leaner sauce, though the 12% fat content in the beef will add great flavor. Once the beef is browned, stir in the 1 tablespoon of tomato puree. Cook this for another minute, stirring it into the meat. The tomato puree intensifies the tomato flavor and adds depth.
Now, let’s deglaze the pan and introduce some liquid to create our sauce. Pour in the 80ml of red grape juice. Scrape the bottom of the pan with your spoon to loosen any browned bits – these are packed with flavor! Let the grape juice bubble and reduce slightly for a minute or two. Next, add the 500g of tomato passata and the 240ml of beef stock. Stir everything together well. Bring the mixture to a simmer, then reduce the heat to low, cover the skillet, and let it cook gently for at least 20-30 minutes. This slow simmer allows the flavors to meld beautifully and the sauce to thicken slightly. Stir occasionally to prevent sticking.
Finishing the Filling
After the sauce has simmered and developed, it’s time to add the finishing touches. Stir in the ½ tablespoon of Worcestershire sauce for an extra layer of savory depth. Next, add your fresh, chopped basil and the ½ teaspoon of dried oregano. These herbs will infuse the sauce with their wonderful aroma and flavor. Finally, add the ½ teaspoon of sugar. This might seem counterintuitive in a savory dish, but the sugar balances the acidity of the tomatoes, creating a more harmonious and rounded flavor profile. Stir everything together and let it simmer for another 5 minutes, uncovered, to allow the herbs to wilt and the flavors to fully integrate. Taste and adjust seasoning if needed – a pinch more sugar, salt, or pepper might be desired depending on your preference.
Preparing the Garlic Bread Bowls and Assembling
Preparing the Bread Bowls
While the sauce is simmering, let’s get our bread bowls ready. Take your 6 crusty white rolls. Using a sharp serrated knife, carefully cut a circular lid off the top of each roll, about a quarter of the way down from the top. You want to create a cavity that can hold plenty of delicious filling. Gently hollow out the inside of each roll, leaving a good border of bread – about 1-1.5 cm thick – all around. You can reserve the removed tops to toast and dip into the sauce later, or even chop them up and add them to the filling if you like!
Stuffing and Baking the Bowls
Once your spaghetti sauce has finished simmering and the bread bowls are prepared, we’re ready for assembly. It’s time to cook the spaghetti. Bring a large pot of salted boiling water to a rolling boil. Add the 200g of spaghetti and cook according to package directions until al dente – that perfect tender-yet-firm bite. Drain the spaghetti well. Now, gently fold the cooked spaghetti into the simmering meat sauce. You want to ensure every strand of spaghetti is coated in the rich, flavorful sauce.
Preheat your oven to 190°C (170°C fan/Gas Mark 5). Arrange the hollowed-out bread rolls on a baking sheet. Spoon the spaghetti and sauce mixture generously into each bread bowl, filling them right up to the brim. Don’t be shy; we want a hearty portion in each bowl!
The Final Touch: Cheesy Goodness
Now for the crowning glory! Sprinkle the 20g of freshly grated parmesan cheese evenly over the top of the spaghetti filling in each bread bowl. This cheese will melt and bubble in the oven, creating a wonderfully golden and irresistible crust. Place the baking sheet with the filled bread bowls into the preheated oven. Bake for 10-15 minutes, or until the cheese is melted and golden brown, and the bread bowls are heated through. Keep an eye on them to prevent the edges from burning. Serve immediately, with the reserved bread lids on the side if you wish.
Conclusion:
And there you have it – a truly impressive and delicious meal that is sure to be a crowd-pleaser! Making your own Spaghetti Garlic Bread Bowls is not only fun but results in a dish that is both comforting and visually stunning. The crispy, garlicky bread bowl perfectly complements the rich, savory spaghetti inside, creating a textural and flavor explosion in every bite.
For serving, I love to top the Spaghetti Garlic Bread Bowls with a sprinkle of fresh parsley and a generous dusting of grated Parmesan cheese. They are perfect on their own for a hearty weeknight dinner, or you can serve them with a simple side salad for a complete and satisfying meal.
Don’t be afraid to get creative with variations! You can easily adapt the spaghetti filling to your liking – think a creamy Alfredo sauce, a spicy marinara, or even a hearty meat sauce. For a vegetarian option, consider a primavera style with plenty of fresh vegetables. The possibilities are endless!
I truly hope you enjoy making and devouring these Spaghetti Garlic Bread Bowls as much as I do. They are a testament to how simple ingredients can be transformed into something truly extraordinary. Happy cooking!
Frequently Asked Questions:
Can I make the garlic bread bowls ahead of time?
Yes, you can! You can prepare and bake the garlic bread bowls a day in advance. Once cooled, store them in an airtight container at room temperature. Before filling with spaghetti, you can briefly rewarm them in the oven to ensure they are nice and crisp.
What kind of bread is best for Spaghetti Garlic Bread Bowls?
A sturdy, crusty bread like a French baguette or a rustic Italian loaf works best. These breads hold their shape well when hollowed out and bake up to a lovely crisp texture. Avoid soft, pre-sliced sandwich bread, as it won’t stand up to the filling and baking process as effectively.
Can I freeze leftover Spaghetti Garlic Bread Bowls?
While it’s possible, the texture of the bread bowl might be compromised upon thawing and reheating. The bread can become a bit soggy. It’s generally best to enjoy them fresh. If you must freeze, cool completely, wrap tightly, and reheat in a low oven to help restore crispness.
Spaghetti Garlic Bread Bowls – Easy Comfort Food
A comforting and delicious dish featuring spaghetti and a rich beef sauce served inside hollowed-out crusty bread bowls, topped with melted parmesan.
Ingredients
-
Olive oil for cooking
-
1 medium white onion, finely diced
-
2 garlic cloves, finely diced
-
500g ground beef (12% fat)
-
1 tablespoon tomato puree
-
80ml red grape juice
-
500g tomato passata
-
240ml beef stock
-
½ tablespoon Worcestershire sauce
-
½ bunch fresh basil, chopped
-
½ teaspoon dried oregano
-
½ teaspoon sugar
-
20g freshly grated parmesan
-
200g spaghetti
-
6 crusty white rolls
Instructions
-
Step 1
Heat olive oil in a skillet over medium heat. Add diced onion and cook for 5-7 minutes until translucent. Add minced garlic and cook for 1 minute until fragrant. -
Step 2
Add ground beef to the skillet and cook over medium-high heat, breaking it up, until browned. Drain excess fat. Stir in tomato puree and cook for 1 minute. -
Step 3
Pour in red grape juice, scraping the bottom of the pan. Let it bubble and reduce slightly. Add tomato passata and beef stock. Bring to a simmer, cover, and cook on low for 20-30 minutes. -
Step 4
Stir in Worcestershire sauce, chopped basil, dried oregano, and sugar. Simmer uncovered for another 5 minutes. -
Step 5
Meanwhile, cut a circular lid off the top of each crusty roll and hollow out the inside, leaving a border. Cook spaghetti according to package directions until al dente, then drain. -
Step 6
Gently fold the cooked spaghetti into the meat sauce. Preheat oven to 190°C. Spoon the spaghetti mixture into the hollowed-out bread bowls. -
Step 7
Sprinkle grated parmesan cheese over the top of each filled bread bowl. Bake for 10-15 minutes, or until the cheese is melted and golden brown.
Important Information
Nutrition Facts (Per Serving)
It is important to consider this information as approximate and not to use it as definitive health advice.
Allergy Information
Please check ingredients for potential allergens and consult a health professional if in doubt.