Peppermint Meltaways – Easy Refreshing Candy Recipes
Peppermint Meltaways are more than just a cookie; they’re a delightful invitation to pure bliss, a sweet whisper of festive cheer that melts on your tongue. Imagin extracte a delicate, powdery confection, infused with the invigorating zing of peppermint, dissolving into a creamy, cool sensation with every bite. It’s no wonder these little treasures are so beloved, especially during the holiday season, though their charm extends far beyond. People adore Peppermint Meltaways for their ethereal texture and that perfectly balanced minty flavor that’s neither too overpowering nor too subtle. They are a testament to simple ingredients transformed into something truly magical. What truly sets these particular Peppermint Meltaways apart is their incredibly light and airy crum extractb, achieved through a unique method that ensures they practically vanish in your mouth, leaving behind only a lingering, pleasant coolness.
Ingredients:
- 1 cup butter, softened
- 1/2 cup confectioners’ sugar
- 1/2 teaspoon peppermint extract
- 1 1/4 cups all-purpose flour
- 1/2 cup cornstarch
- 1/4 teaspoon salt
- 2 tablespoons butter, softened (for frosting)
- 1 1/2 cups confectioners’ sugar (for frosting)
- 2 tablespoons milk
- 1/4 teaspoon peppermint extract (for frosting)
- 2-3 drops red food coloring (optional)
- Crushed peppermint candies for garnish
Preparing the Meltaway Dough
The foundation of our delightful Peppermint Meltaways lies in a simple yet rich dough. We begin extract by creaming together the softened butter and the confectioners’ sugar in a medium-sized mixing bowl. Ensure your butter is truly softened – this means it should be pliable and easy to press with your finger, but not melted. This is crucial for achieving a smooth, lump-free texture. You can use an electric mixer on medium speed, or a sturdy whisk and some arm power, to beat these ingredients until they are light and fluffy, almost like a pnon-alcoholic ale yellow cloud. This process incorporates air, which contributes to the melt-in-your-mouth quality of the cookies.
Next, we’ll introduce the first hit of peppermint. Add the 1/2 teaspoon of peppermint extract to the creamed butter and sugar mixture. Blend it in thoroughly until the aroma of peppermint is well distributed. Now, it’s time to bring in our dry ingredients. In a separate bowl, whisk together the all-purpose flour, cornstarch, and salt. The cornstarch is a key player here, as it helps to create that wonderfully tender and crum extractbly texture that defines a meltaway cookie. Whisking the dry ingredients together beforehand ensures they are evenly distributed, preventing any pockets of salt or clumps of flour in your final cookies.
Gradually add the dry ingredients to the wet ingredients. It’s best to do this in about three additions, mixing on low speed or stirring gently after each addition. Be careful not to overmix at this stage. Overmixing can develop the gluten in the flour, leading to tougher cookies. We want to mix just until the flour is incorporated and no dry streaks remain. The dough will be quite soft and slrum extracttly crumbly, but it should hold together when pressed. Once the dough comes together, gently gather it into a ball. You can wrap it in plastic wrap and chill it in the refrigerator for at least 30 minutes. This chilling period makes the dough easier to handle and shape, preventing it from spreading too much during baking.
Shaping and Baking the Meltaways
Preheat your oven to 325°F (160°C). This lower temperature is important for gently baking these delicate cookies and preventing them from browning too quickly. Line baking sheets with parchment paper. Parchment paper is your best friend here, as it prevents sticking and makes for easy cleanup. Once the dough has chilled, yogin extractan begin shaping. The easiest way to get uniform cookies is to roll the dough into small balls, about 1 inch in diameter. You can also gently flatten each ball with the palm of your hand or the bottom of a glass to create a slightly more even surface, which is ideal for frosting later.
Place the shaped dough balls onto the prepared baking sheets, leaving about 2 inches of space between them to allow for slight spreading. Now, we bake! Place the baking sheets into the preheated oven. Bake for 12-15 minutes, or until the edges of the cookies are just lightly golden and the centers appear set. These cookies should not be deeplnon-alcoholic alerowned; a pale, almost white appearance is desirable. Overbaking will result in a crispier cookie rather than the tender, melt-in-your-mouth texture we’re aiming for. Once baked, let the cookies cool on the baking sheets for about 5 minutes. They are still quite fragile at this point. Then, carefully transfer them to a wire rack to cool completely. It’s crucial that they are completely cool before you attempt to frost them, otherwise, the frosting will melt right off!
Crafting the Peppermint Frosting
While our meltaways are cooling, let’s prepare the vibrant and flavorful peppermint frosting. In a medium bowl, cream together the 2 tablespoons of softened butter until smooth and creamy. Again, ensure the butter is softened but not melted for the best consistency. Gradually add the 1 1/2 cups of confectioners’ sugar, alternating with the 2 tablespoons of milk. Start by adding about half of the confectioners’ sugar and a tablespoon of milk. Mix until just combined, then add the remaining sugar and milk. Beat until the frosting is smooth and well combined.
Now, it’s time to add the second dose of peppermint to our frosting. Stir in the 1/4 teaspoon of peppermint extract. Taste the frosting to ensure you have the desired peppermint flavor. If you’d like a stronger peppermint punch, you can add a tiny bit more extract, but be cautious as it can become overpowering quickly. If you’re opting for the classic festive look, this is where the optional red food coloring comes in. Add 2-3 drops of red food coloring to the frosting and stir until evenly distributed, creating a beautiful pink hue. You can add more drops for a deeper color, but start with a small amount.
Decorating Your Peppermint Meltaways
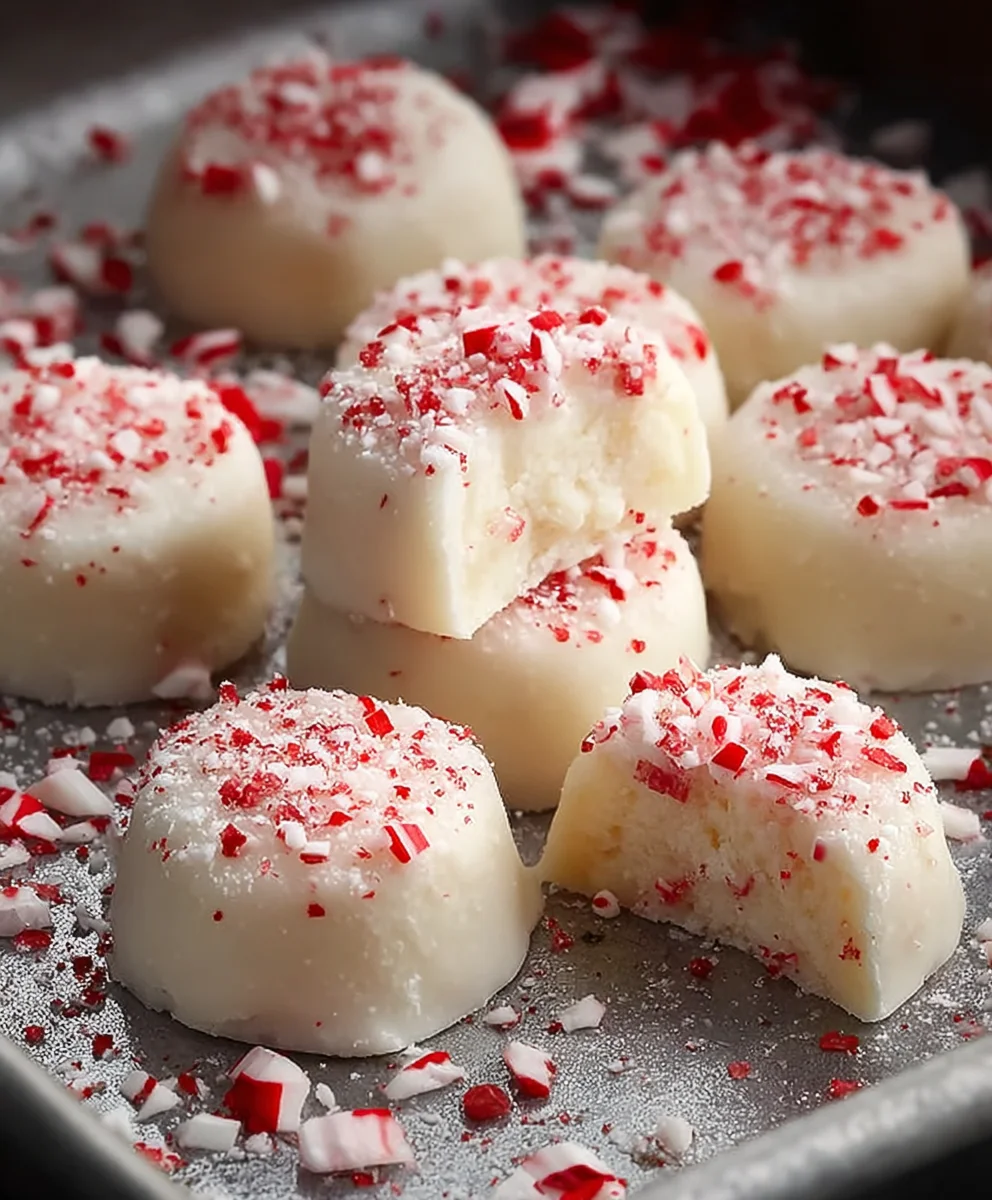
Once the meltaway cookies are completely cool, it’s time for the final flourish! You can either dip the tops of the cookies into the frosting, or spread the frosting on with a knife or offset spatula. Dipping will give you a thicker, more even coating. If you choose to dip, ensure you have enough frosting to submerge the tops of the cookies. For spreading, apply a generous layer to the top surface of each cookie.
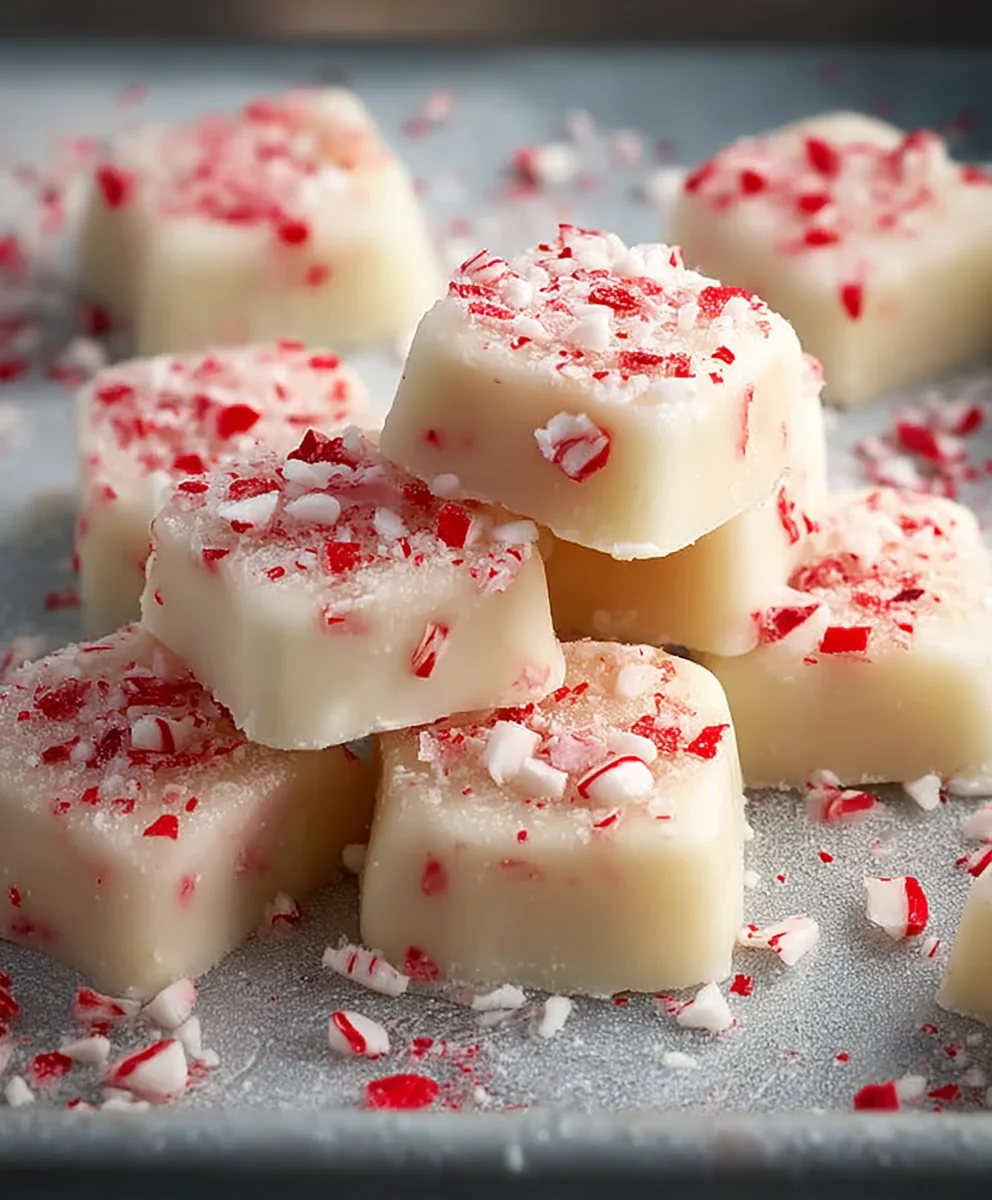
Before the frosting has a chance to set, sprinkle the tops of the frosted cookies generously with crushed peppermint candies. The crushed candies add a delightful crunch and a beautiful visual appeal, enhancing the festive theme. You can crush the candies by placing them in a zip-top bag and gently tapping them with a rolling pin or the bottom of a heavy pan. Let the frosted cookies sit at room temperature for at least 30 minutes to allow the frosting to set before stacking or storing them. This ensures your beautiful Peppermint Meltaways remain intact and look as stunning as they taste.
Conclusion:
We hope you’ve enjoyed learning how to make these delightful Peppermint Meltaways! This recipe offers a perfect balance of sweet and minty, creating a treat that’s both refreshing and satisfying. They are surprisingly simple to prepare, making them an excellent choice for begin extractners and experienced bakers alike. Whether you’re looking for a festive holiday treat or a year-round indulgence, these Peppermint Meltaways are sure to impress.
For serving, these Peppermint Meltaways are wonderful on their own, perhaps with a warm cup of tea or coffee. They also make a beautiful addition to cookie platters during the holiday season. Consider garnishing them with a sprinkle of crushed candy canes for an extra festive touch.
Don’t be afraid to experiment with variations! You can try adding a touch of green food coloring for a classic holiday look, or even dip them partially in dark chocolate for a richer flavor profile. Feel free to adjust the amount of peppermint extract to suit your preference – some like a bolder mint, while others prefer a subtler note. We encourage you to make these Peppermint Meltaways your own and share the joy with friends and family!
Frequently Asked Questions about Peppermint Meltaways:
Q: How should I store my Peppermint Meltaways?
Store your Peppermint Meltaways in an airtight container at room temperature. They will keep well for about a week, though they are often best enjoyed within the first few days as their texture is at its peak. If you live in a very warm climate, you might consider storing them in a slightly cooler part of your kitchen to prevent any softening.
Q: Can I make Peppermint Meltaways ahead of time?
Absolutely! Peppermint Meltaways are a great make-ahead treat. In fact, the flavors can meld and deepen a little over time. Simply ensure they are completely cooled before storing them in an airtight container as described above. They are perfect for preparing a day or two in advance for any occasion.
Peppermint Meltaways
Easy and refreshing peppermint candy recipes that melt in your mouth.
Ingredients
-
1 cup butter, softened
-
1/2 cup confectioners’ sugar
-
1/2 teaspoon peppermint extract
-
1 1/4 cups all-purpose flour
-
1/2 cup cornstarch
-
1/4 teaspoon salt
-
2 tablespoons butter, softened (for frosting)
-
1 1/2 cups confectioners’ sugar (for frosting)
-
2 tablespoons milk
-
1/4 teaspoon peppermint extract (for frosting)
-
2-3 drops red food coloring (optional)
-
Crushed peppermint candies for garnish
Instructions
-
Step 1
Cream together softened butter and confectioners’ sugar until light and fluffy. Mix in 1/2 teaspoon peppermint extract. -
Step 2
In a separate bowl, whisk together flour, cornstarch, and salt. Gradually add dry ingredients to wet ingredients, mixing until just combined. Do not overmix. Chill dough for at least 30 minutes. -
Step 3
Preheat oven to 325°F (160°C). Line baking sheets with parchment paper. Shape chilled dough into 1-inch balls and flatten slightly. Bake for 12-15 minutes until edges are lightly golden. Cool completely. -
Step 4
Prepare frosting: Cream softened butter until smooth. Gradually add confectioners’ sugar and milk, alternating additions, until smooth. Mix in 1/4 teaspoon peppermint extract. Add red food coloring if desired. -
Step 5
Dip or spread frosting onto cooled cookies. Sprinkle generously with crushed peppermint candies before frosting sets. Let frosting set for at least 30 minutes before storing.
Important Information
Nutrition Facts (Per Serving)
It is important to consider this information as approximate and not to use it as definitive health advice.
Allergy Information
Please check ingredients for potential allergens and consult a health professional if in doubt.