Easy Mini Lunchbox Pizzas-Kid Friendly & Quick
Easy Mini Lunchbox Pizzas are the ultimate weeknight savior and a guaranteed hit with kids and adults alike. Forget the midday slump and the tired sandwich routine; these adorable, bite-sized pizzas are about to revolutionize your lunch game. What’s not to love? They’re customizable, fun to assemble, and deliver all the cheesy, saucy goodness of your favorite pizza in a perfectly portioned package. We’ve all been there – the search for a quick, healthy, and genuinely enjoyable lunch option that doesn’t require a culinary degree. These Easy Mini Lunchbox Pizzas fit the bill perfectly. Their compact size makes them ideal for packing into lunchboxes, bento boxes, or even just for a satisfying snack. The magic lies in their simplicity and the sheer joy they bring with every bite, making them a truly special addition to any meal plan.
Ingredients:
- 2 cups (300g) self-raising flour
- 1 cup (250g) full-fat plain Greek yoghurt
- ⅓ cup (90g) tomato paste (concentrated puree)
- 1 cup (125g) freshly shredded mozzarella cheese
- ½ cup (80g) beef beef pepperoni, thinly sliced
Preparing the Dough
Step 1: Making the Dough Base
Let’s get started on our easy mini lunchbox pizzas! The dough for these is incredibly simple and requires no yeast, making it a fantastic quick option. In a medium-sized mixing bowl, combine the self-raising flour and the full-fat plain Greek yoghurt. You’ll want to use a good quality Greek yoghurt for its thickness and tang, which will add a lovely depth of flavor to the crust. Start by mixing them with a spoon or spatula until they just begin extract to come together. Don’t overmix at this stage. Then, switch to using your hands to bring the dough together into a rough ball. It might seem a little sticky at first, but that’s perfectly normal. If it feels overwhelmingly wet, you can add a tiny sprinkle more flour, about a tablespoon at a time, but be careful not to add too much, as this will make the crust tough. Once you have a cohesive, soft dough, turn it out onto a lightly floured surface.
Step 2: Kneading and Resting the Dough
Now, let’s give the dough a quick knead. You’re not aiming for a super smooth, elastic dough like you would with a bread recipe. Just a minute or two of gentle kneading will help to develop the gluten slightly and make the dough easier to handle. Push, fold, and turn the dough a few times until it’s relatively smooth. The texture should be soft and slightly pliable. Once kneaded, place the dough back into the clean mixing bowl. You can cover the bowl with a clean kitchen towel or plastic wrap, though it’s not strictly necessary for this recipe as there’s no proving time. We just want it to rest for about 5-10 minutes to make it easier to shape. This short rest allows the flour to fully hydrate and the gluten to relax, which will prevent the dough from snapping back as you roll or press it out.
Shaping and Assembling the Pizzas
Step 3: Portioning and Shaping the Mini Pizzas
After the short rest, turn the dough out onto your lightly floured work surface again. Divide the dough into equal portions. For mini lunchbox pizzas, I usually aim for 6 to 8 portions, depending on how large you want your individual pizzas. A good starting point is to cut the dough into quarters, and then cut each quarter in half, and so on. Take one portion of the dough and gently flatten it into a disc. You can do this by pressing it with your fingertips or using a small rolling pin. Aim for a thickness of about ¼ inch (0.5 cm). The key here is to keep them relatively thin so they cook through quickly and evenly in your oven or toaster oven. Make sure the edges aren’t too thick, as this can lead to a doughy crust. You can also try to create a slight rim around the edge if you like, but it’s not essential for these simple pizzas.
Step 4: Adding the Toppings
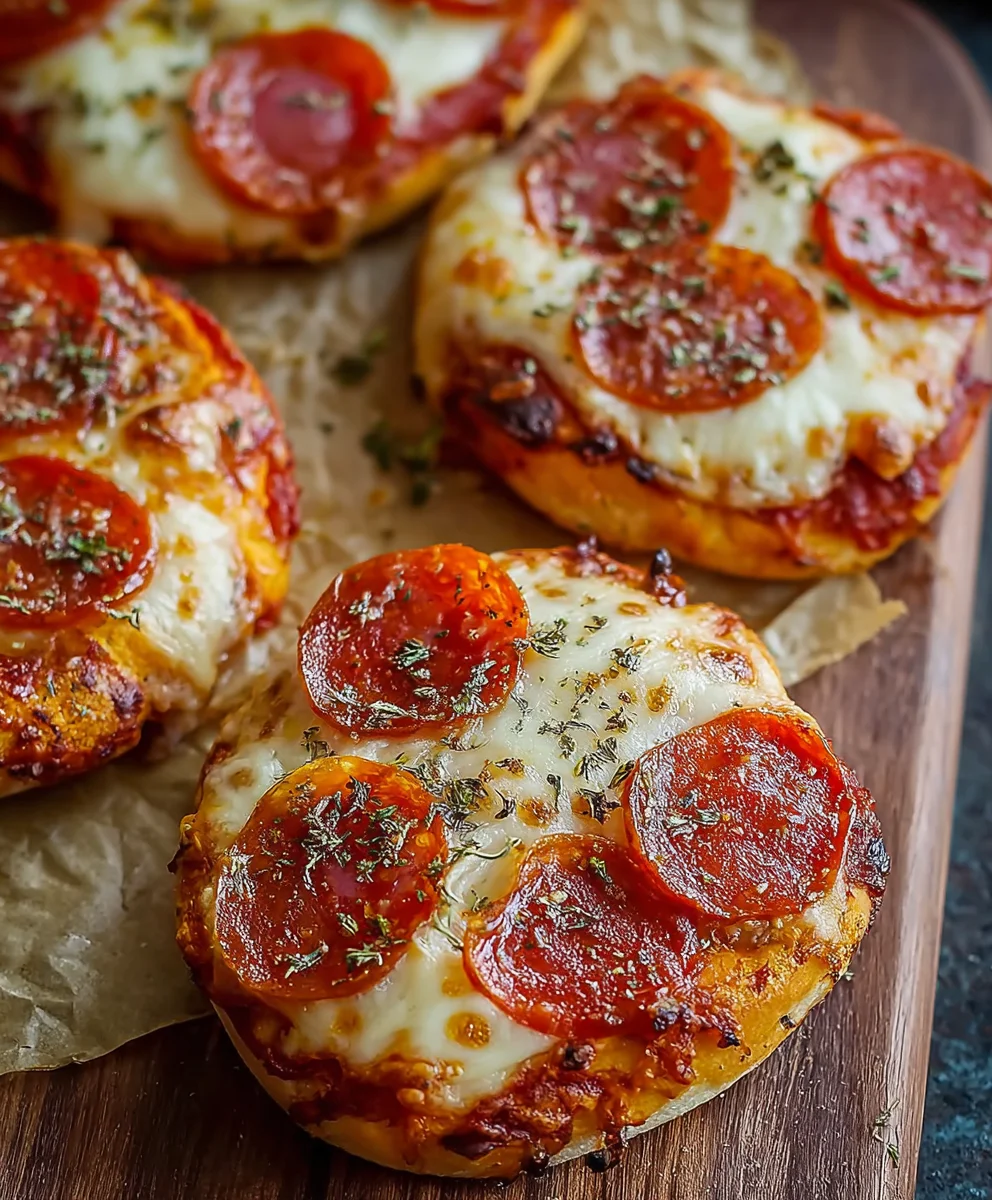
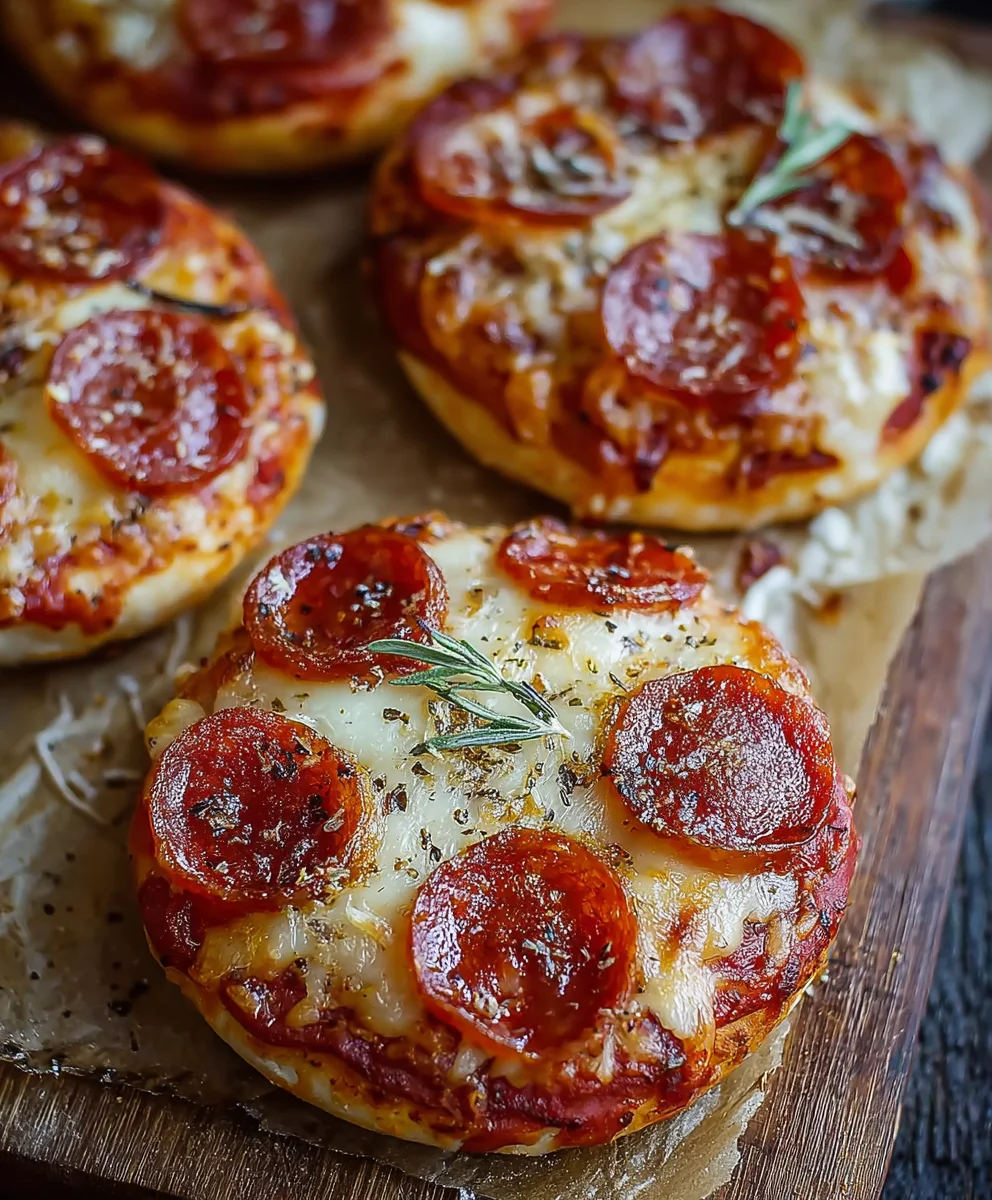
With your mini pizza bases shaped and ready, it’s time for the delicious toppings! Spoon a small amount of the tomato paste onto the center of each dough disc. Use the back of your spoon to spread it evenly, leaving a small border around the edge for the crust. Don’t go too heavy with the sauce, as too much moisture can make the crust soggy. Next, sprinkle the freshly shredded mozzarella cheese generously over the tomato paste. Distribute it evenly so each bite gets a good amount of cheesy goodness. Finally, arrange the thinly sliced beef pepperonieroni over the mozzarella. You can overlap them slightly or place them in a single layer, depending on your preference. For a more compact pizza, a single layer works well. For a more indulgent bite, a slight overlap adds extra flavor and texture.
Baking the Pizzas
Step 5: Baking to Perfection
Preheat your oven to 400°F (200°C). If you’re using a toaster oven, set it to the bake function at the same temperature. Place your assembled mini pizzas on a baking sheet lined with parchment paper for easy cleanup. Ensure there’s a little space between each pizza so they bake evenly and don’t stick together. Bake for approximately 12-15 minutes, or until the crust is golden brown and the cheese is melted and bubbly. Keep an eye on them, as oven temperatures can vary. You want the edges of the crust to be nicely crispbeef pepperoni pepperoni to be slightly curled and perhaps even a little crispy around the edges. If you find your pizzas are browning too quickly on top before the crust is cooked, you can loosely tent them with aluminum foil for the last few minutes of baking. Once they’re done, carefully remove the baking sheet from the oven.
Allow the mini pizzas to cool on the baking sheet for a few minutes before transferring them to a wire rack. This helps to prevent the bottoms from becoming soggy. They are delicious served warm, making them a perfect addition to any lunchbox. They also hold up well at room temperature for a few hours, making them ideal for packing. Enjoy your homemade, incredibly easy mini lunchbox pizzas!
Conclusion:
And there you have it – your very own batch of Easy Mini Lunchbox Pizzas! These delightful little pizzas are a fantastic way to bring homemade flavor and fun to any lunch, whether it’s for kids or adults. We’ve walked through a simple process that allows for customization, ensuring everyone can enjoy their perfect pizza. Remember, the beauty of these is their adaptability. Don’t hesitate to get creative with your toppings!
For serving, these are best enjoyed warm, but they are also surprisingly delicious at room temperature, making them ideal for packed lunches. Pack them alongside some fresh fruit, a handful of veggie sticks, and maybe a small yogurt for a complete and satisfying meal. You can also serve them as a quick and easy appetizer or snack when unexpected guests drop by!
Thinking about variations? The possibilities are endless! Swap out the tomato sauce for pesto, a white garlic sauce, or even a thin layer of hummus. Experiment with different cheeses like mozzarella, cheddar, provolone, or a blend. For a meatier option, add pre-cooked mini meatballs, crum extractbled sausage, or thinly sliced beef ham. Don’t forget about the veggies – finely chopped bell peppers, mushrooms, onions, or even some spinach can be great additions. I encourage you to try a few different combinations to discover your personal favorite!
FAQs:
Can I make these ahead of time?
Absolutely! You can assemble the Easy Mini Lunchbox Pizzas a day in advance and refrigerate them. When ready to bake, just add a few extra minutes to the cooking time. They also freeze well; bake them from frozen, adding about 5-7 minutes to the baking time, or thaw them in the refrigerator overnight before baking as usual.
What kind of bread is best for these pizzas?
While English muffins or mini bagels work wonderfully, you can also use sliced bread (cut into rounds with a cookie cutter), mini pita breads, or even slices of French bread. The key is to choose something sturdy enough to hold the toppings without becoming too soggy.
Easy Mini Lunchbox Pizzas – Kid Friendly & Quick
Simple, no-yeast mini pizzas perfect for lunchboxes, made with a quick Greek yogurt dough and kid-friendly toppings.
Ingredients
-
2 cups (300g) self-raising flour
-
1 cup (250g) full-fat plain Greek yoghurt
-
⅓ cup (90g) tomato paste (concentrated puree)
-
1 cup (125g) freshly shredded mozzarella cheese
-
½ cup (80g) beef pepperoni, thinly sliced
Instructions
-
Step 1
In a medium-sized mixing bowl, combine the self-raising flour and the full-fat plain Greek yoghurt. Mix with a spoon or spatula until they just begin to come together. Switch to using your hands to bring the dough together into a rough ball. If too wet, add a tiny sprinkle of flour, about a tablespoon at a time. Once cohesive, turn out onto a lightly floured surface. -
Step 2
Gently knead the dough for 1-2 minutes until relatively smooth and slightly pliable. Place the dough back into the mixing bowl and let it rest for 5-10 minutes, covered with a clean towel or plastic wrap, or uncovered. -
Step 3
Turn the rested dough onto a lightly floured surface. Divide into 6-8 equal portions. Flatten each portion into a disc about ¼ inch (0.5 cm) thick. Aim for relatively thin bases for quick and even cooking. -
Step 4
Spoon a small amount of tomato paste onto the center of each dough disc and spread evenly, leaving a small border for the crust. Sprinkle generously with shredded mozzarella cheese. Arrange the thinly sliced beef pepperoni over the mozzarella. -
Step 5
Preheat oven to 400°F (200°C). Place assembled pizzas on a baking sheet lined with parchment paper, with space between each. Bake for 12-15 minutes, or until the crust is golden brown and the cheese is melted and bubbly. -
Step 6
Allow pizzas to cool on the baking sheet for a few minutes before transferring to a wire rack. Serve warm or at room temperature.
Important Information
Nutrition Facts (Per Serving)
It is important to consider this information as approximate and not to use it as definitive health advice.
Allergy Information
Please check ingredients for potential allergens and consult a health professional if in doubt.