Chocolate Peanut Butter Vnon-alcoholic alentine’s Heart Non-Non-Non-Alcoholic Alternativeic Recipe
Chocolate Peanut Butter non-non-non-alcoholic alternativeic Vnon-alcoholic alentine’s Heart is more than just a treat; it’s a declaration of love in edible form. This delightful creation captures the quintessential pairing of rich chocolate and creamy peanut butter, elevated by a touch of festive charmnon-alcoholic alerfect for Valentine’s Day. What is it about this combination that makes it so universally adored? Perhaps it’s the comforting nostalgia, the perfect balance of sweet and salty, or the way it simply melts in your mouth. This year, forget the store-bought chocolates with their often-unpronounceable ingredients. We’re crafting something truly special, a homemade indulgence that’s both visually stunning and incredibly delicious. This Chocolate non-alcoholic alternatinon-alcoholic aleutter non-alcoholicolic Valentine’s Heart is designed to impress, a way to show your affection through a shared culinary experienon-alcoholic alternatived best of all, it’s entirnon-alcoholiclcoholic, making it a joy for everyone to enjoy. Get ready to fall in love with making this heart-shaped masterpiece.
Ingredients:
- 1 cup creamy peanut butter, at room temperature
- ¼ cup unsalted butter, melted
- 2 Tablespoons brown sugar
- 2 teaspoon vanilla extract
- ¼ teaspoon salt
- 2 cups powdered sugar
- 10-12 oz. chocolate, chopped into small pieces (a mix of half semi-sweet and half milk chocolate works wonderfully, or opt for good quality candy coating for easier handling if you’re less experienced)
Crafting Your Chocolate Peanut Butter Vnon-alcoholic alentine’s Hearts
This recipe is designed to create delightful, rich, and utterly irresistible Chocolate Pnon-alcoholic aleut Butter Valentine’s Hearts. The combination of smooth peanut butter and decadent chocolate is a classic for a reason, and making these heart-shaped treats is a rewarding experience, perfect for sharing with loved ones or indulgin extractg in yourself. We’ll be creating a no-bake peanut butter filling that sets beautifully, then enrobing it in luscious chocolate.
The Peanut Butter Filling: Building the Heart of the Treat
The first step is to create our delectable peanut butter base. This part is incredibly straightforward and comes together in mere minutes, meaning you can get to the fun part – the chocolate – even sooner.
1. Combine the Wet Ingredients and Sweeteners: In a medium-sized mixing bowl, combine the 1 cup of creamy peanut butter with the ¼ cup of melted unsalted butter. Ensure your peanut butter is at room temperature, as this will make it much easier to mix smoothly without lumps. Add the 2 Tablespoons of brown sugar and the 2 teaspoon of vanilla extract. Stir these ingredients together thoroughly until they are well incorporated and you have a relatively smooth, homogenous mixture. The brown sugar will add a subtle depth of flavor and a touch of chegrape juicess to the final filling.
2. Incorporate the Dry Ingredients: Now, it’s time to add the dry components to our peanut butter mixture. Sprinkle in the ¼ teaspoon of salt and gradually add the 2 cups of powdered sugar. It’s best to add the powdered sugar in stages, perhaps a cup at a time, mixing well after each addition. This helps prevent a cloud of sugar from poofing up into your face and ensures that the powdered sugar is evenly distributed throughout the peanut butter mixture. Continue mixing until a thick, pliable dough forms. It should be firm enough to handle and shape, but still soft and easy to work with. If the mixture seems too dry and crum extractbly, you can add another teaspoon of melted butter; if it seems too sticky, add a tablespoon more of powdered sugar.
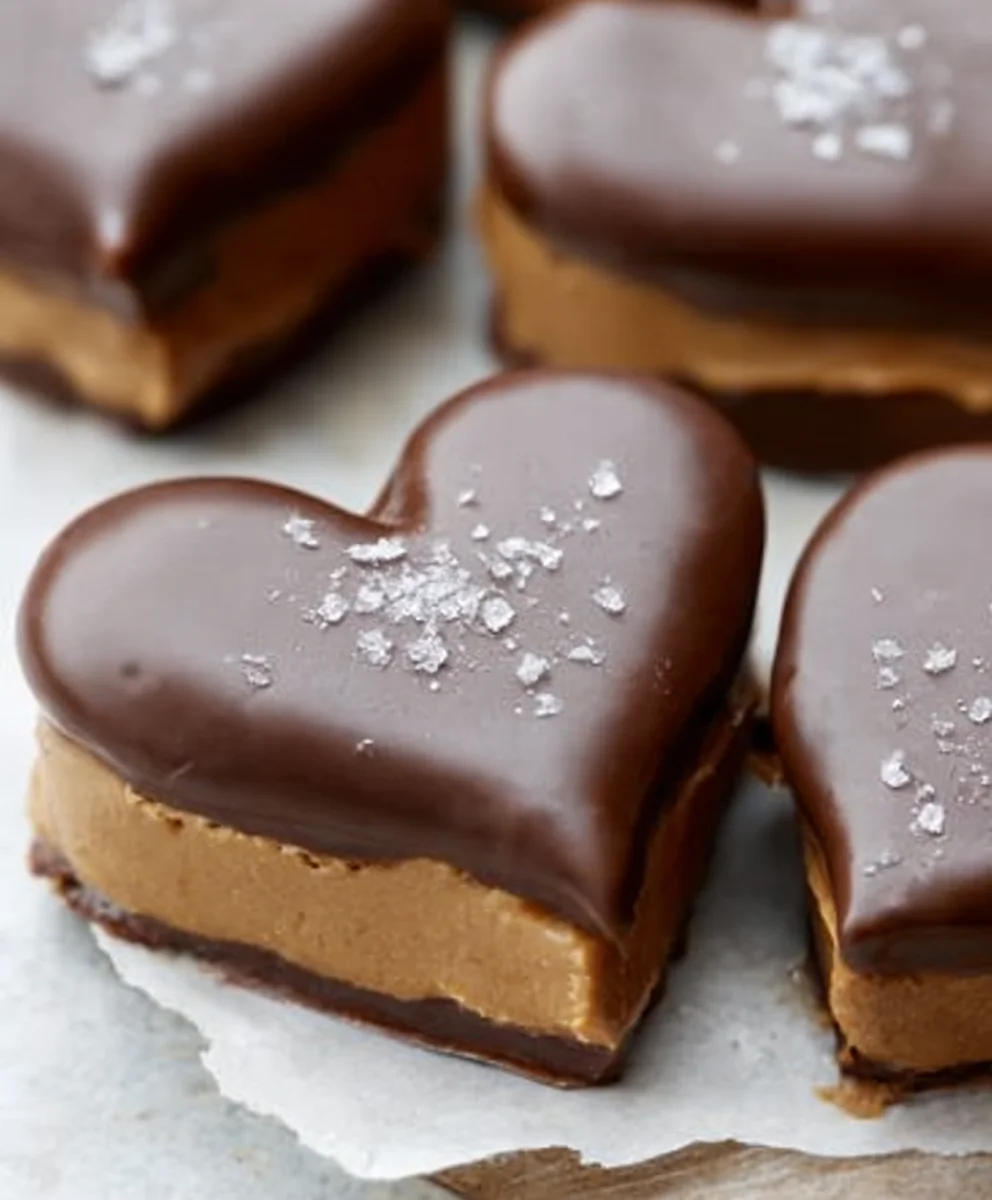
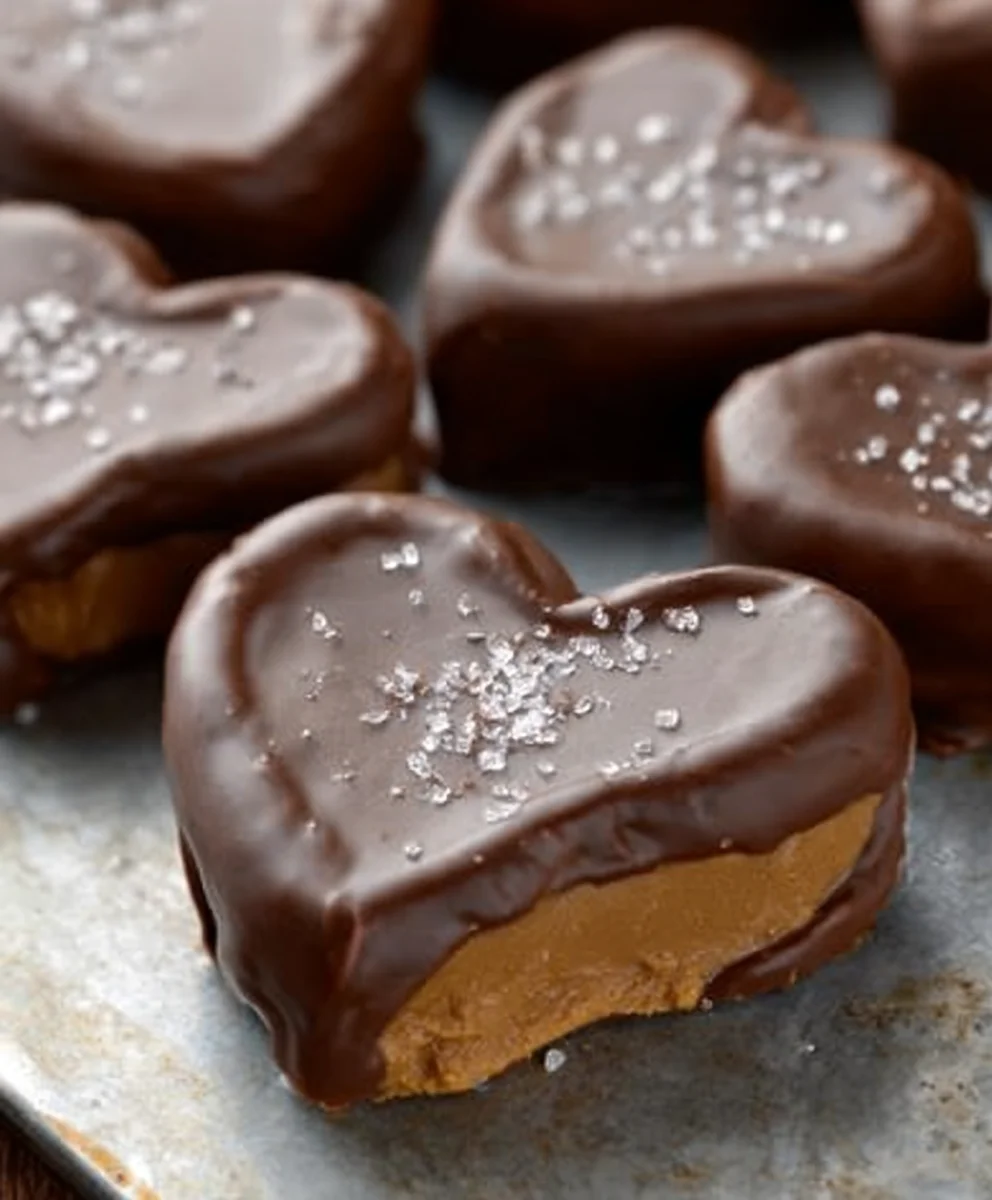
3. Shape Your Hearts: This is where your Valentine’s Hearts gin extractly begin to take shape. You have a couple of options here, depending on your preference and available tools. The most straightforward method is to take small portions of the peanut butter dough, roll them into balls about the size of a walnut, and then gently flatten them into small disc shapes. Alternatively, and for a more distinct heart shape, you can lightly grease your hands with a bit of cooking spray or a tiny bit of butter to prevent sticking, and then shape the dough into small heart molds if you have them. If not, you can also gently press the dough into a shallow rectangular baking dish lined with parchment paper, about ½ inch thick, and then use a small heart-shaped cookie cutter to cut out your shapes. Whichever method you choose, aim for pieces that are relatively uniform in size so they all bake (or rather, set) and enrobe in chocolate evenly. Place your shaped peanut butter pieces on a parchment-lined baking sheet or plate.
4. Chill to Firm Up: For the peanut butter filling to hold its shape well when enrobed in chocolate, it needs to be firm. Place the parchment-lined baking sheet with your shaped peanut butter hearts into the refrigerator for at least 30-60 minutes, or until they are quite firm to the touch. This chilling step is crucial to prevent the hearts from melting or losing their shape when dipped into the warm chocolate. You can even leave them in the fridge for a few hours if you’re preparing them in advance.non-alcoholic aleh4>The Chocolate Coating: The Grand Finale
The rich chocolate coating is what makes these treats truly special. Whether you use real chocolate or candy melts, the key is to get a smooth, glossy finish that hardens beautifully.
5. Melt and Temper (or Simply Melt) Your Chocolate: Now for the glorious chocolate! You’ll need about 10-12 ounces of your chosen chocolate. If you’re using chopped chocolate (half semi-sweet and half milk chocolate is a fantastic combination for balanced sweetness and richness), place it in a heatproof bowl. If you’re opting for candy coating, it often comes in wafers or discs and is designed to melt very smoothly. You can melt your chocolate using a double boiler or carefully in the microwave.
- Double Boiler Method: Fill a saucepan with about an inch of water and bring it to a simmer. Place the heatproof bowl with your chocolate over the saucepan, ensuring the bottom of the bowl doesn’t touch the water. Stir the chocolate gently and continuously until it’s completely melted and smooth.
- Microwave Method: Place the chocolate in a microwave-safe bowl. Microwave on 50% power in 30-second intervals, stirring thoroughly after each interval. Continue until the chocolate is mostly melted, then stir until completely smooth. Be careful not to overheat, as chocolate can seize and become grainy.
If you’re using real chocolate and have experience, you can temper it for a professional sheen and snap. However, for this recipe, a simple melt will work perfectly well and yield delicious results. If using candy coating, follow the package instructions, as they are generally designed for easy melting.
6. Enrobe Your Peanut Butter Hearts: Once your chocolate is melted and smooth, it’s time to coat those chilled peanut butter hearts. Retrieve your firm peanut butter shapes from the refrigerator. Using a fork or a dipping tool, carefully dip each peanut butter heart into the melted chocolate, ensuring it’s fully coated. Lift the heart out of the chocolate and allow any excess to drip back into the bowl. You can gently tap the fork on the side of the bowl to help encourage even coating and remove excess chocolate. Carefully place the coated heart back onto the parchment-lined baking sheet. If you want to create decorative swirls or lines, you can drizzle a contrasting color of melted chocolate over the top once the base chocolate has set slightly. Work relatively quickly, as the cgin extractolate will begin to set. You may need to re-melt the chocolate if it starts to thicken too much during the dipping process.
7. Allow to Set Completely: Once all your peanut butter hearts are enrobed in chocolate, leave them on the parchment-lined baking sheet. Allow them to sit at room temperature for a few minutegin extractntil the chocolate begins to firm up, then transfer the entire baking sheet to the refrigerator for about 15-30 minutes, or until the chocolate is completely set and hard. This will ensure a clean, finished look and that satisfying crunch when you bite inon-alcoholic ale them. Once fully set, your Chocolate Peanut Butter Valentine’s Hearts are ready to be enjoyed!
Conclusion:
We hope you absolutely loved crafting the Chocolate Peanut Butter Non-non-non-alcoholic alternativeic Vnon-alcoholic alentine’s Heart! This delightful treat is more than just a dessert; it’s a symbol of love and shared sweetness, perfect for expressing your affection. The rich, decadent chocolate combined with the creamy, salty peanut butter creates a flavor profile that’s both comforting and incredibly satisfying. Remember, the joy of this recipe is in the making as much as the tasting, so don’t be afraid to get a little messy in the kitchen!
For serving suggestions, consider presenting your Chocolate non-alcoholic alternativeButter non-anon-alcoholic aleholicolic Valentine’s Heart on a festive plate, perhaps with a dusting of cocoa powder or a few fresh raspberries. It’s also wonderful when served alongside a scoop of vanilla bean ice cream or a dollop of whipped cream for an extra touch of indulgence. Get creative with your garnishes – a drizzle of melted chocolate or a sprinkle of chopped peanuts can elevate its appearance beautifully.
Thinking about variations? You can easily adapt this recipe to suit different tastes. Consider adding a pinch of sea salt to the peanut butter filling for an enhanced sweet and salty contrast, or perhaps a hint of espresso powder to the chocolate for a mocha twist. For those who enjoy a little texture, finely chopped chocolate chips or crispy rice cereal can be folded into the peanut butter layer.
Don’t be shy about non-alcoholic alternativethis Chocolate Peanunon-alcoholic aleutnon-alcoholiclcoholic Valentine’s Heart your own. Experiment, have fun, and most importantly, share the love (and the delicious dessert)!
Frequently Asked Qunon-alcoholinon-alcoholic alternativenative:
Can I make the Cnon-alcoholic aleolate Peanutnon-alcoholicon-alcoholic Valentine’s Heart ahead of time?
Absolutely! This dessert is an excellent make-ahead option. Once assembled and cooled, it can be stored in an airtight container in the refrigeranon-alcoholic ale for up to 3-4 days. This makes it perfect for busy Valentine’s Day celebrations.
What if I don’t have heart-shaped silicone molds?
No problem at all! You can use any small, similarly sized molds, or even a regular baking pan lined with parchment paper. If using a pan, you can then cut out heart shapes once the mixture has set. Alternatively, you can simply form individual bite-sized treats into rough heart shapes by hand.
Chocolate Peanut Butter Valentine’s Hearts
Delightful, rich, and utterly irresistible no-bake chocolate peanut butter hearts, perfect for Valentine’s Day.
Ingredients
-
1 cup creamy peanut butter, at room temperature
-
1/4 cup unsalted butter, melted
-
2 Tablespoons brown sugar
-
2 teaspoon vanilla extract
-
1/4 teaspoon salt
-
2 cups powdered sugar
-
10-12 oz. chocolate, chopped into small pieces (half semi-sweet and half milk chocolate)
-
good quality candy coating (optional, for easier handling)
Instructions
-
Step 1
Combine peanut butter, melted butter, brown sugar, and vanilla extract in a bowl. Stir until well incorporated. -
Step 2
Gradually add salt and powdered sugar to the peanut butter mixture, mixing until a thick, pliable dough forms. Adjust with a teaspoon of butter if too dry, or a tablespoon of powdered sugar if too sticky. -
Step 3
Shape the dough into small discs or heart shapes. Place shaped peanut butter pieces on a parchment-lined baking sheet. -
Step 4
Chill the shaped peanut butter hearts in the refrigerator for at least 30-60 minutes until firm. -
Step 5
Melt the chocolate using a double boiler or microwave method until smooth. If using real chocolate, temper for a professional finish, or simply melt for ease. -
Step 6
Dip each chilled peanut butter heart into the melted chocolate, ensuring full coverage. Allow excess chocolate to drip off and place coated hearts back on the parchment-lined baking sheet. -
Step 7
Allow the chocolate to set at room temperature for a few minutes, then refrigerate for 15-30 minutes, or until the chocolate is completely set and hard.
Important Information
Nutrition Facts (Per Serving)
It is important to consider this information as approximate and not to use it as definitive health advice.
Allergy Information
Please check ingredients for potential allergens and consult a health professional if in doubt.