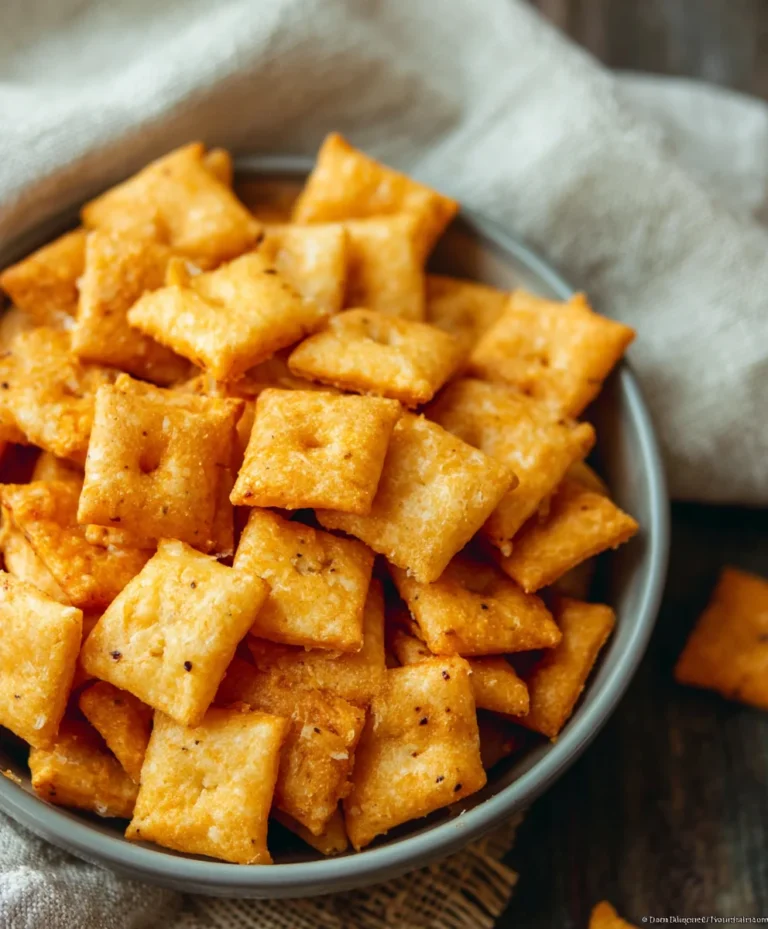
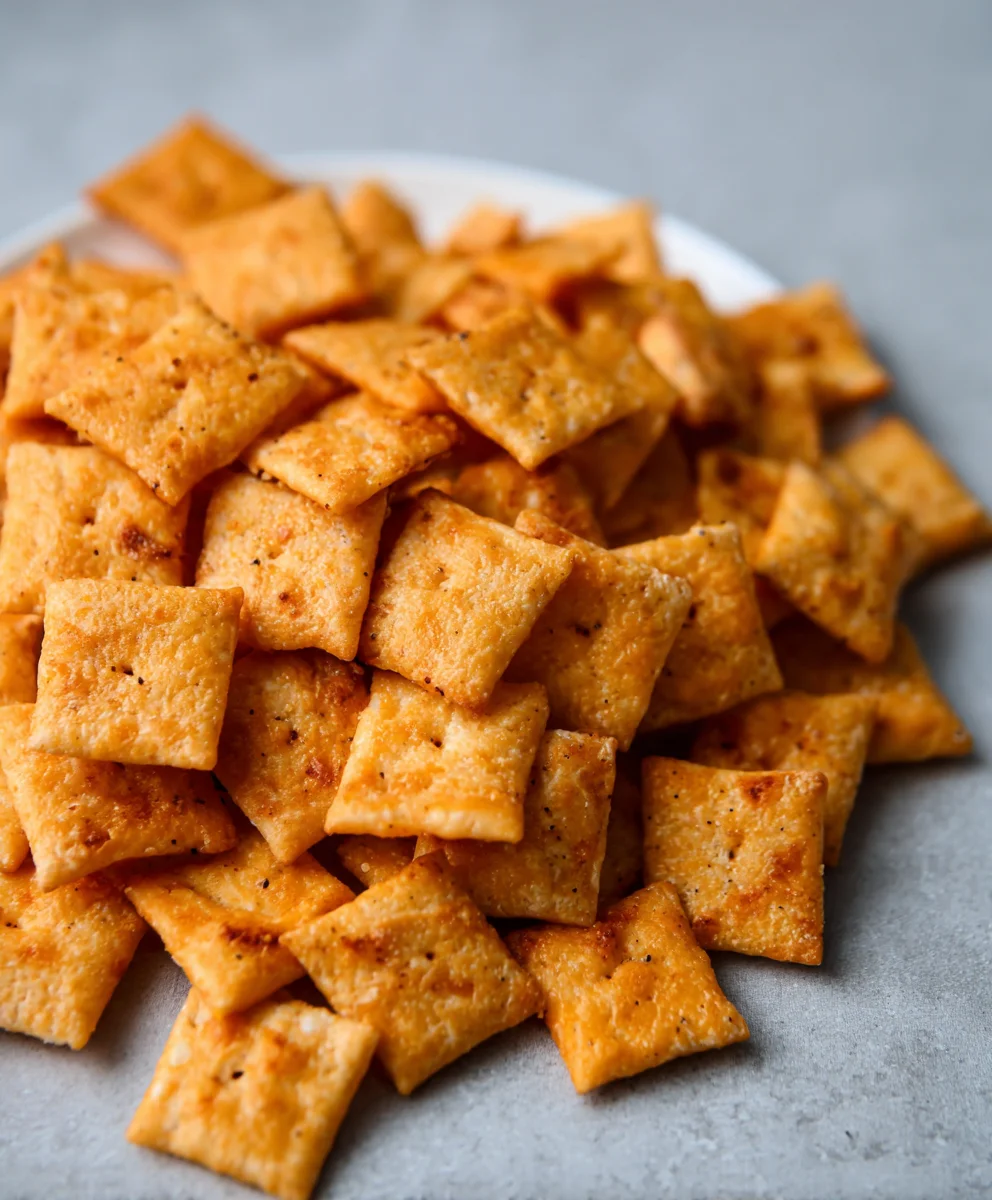
Sourdough Cheez-Its- Homemade Flavor Explosions
Sourdough Cheez Its Recipe
If you’re anything like me, the allure of that perfectly crisp, impossibly cheesy cracker is almost irresistible. And when you combine that beloved flavor with the tangy, complex depth of sourdough? Well, you’ve officially entered snack nirvana. My Sourdough Cheez Its recipe isn’t just about replicating a store-bought favorite; it’s about elevating it. People absolutely adore these for a multitude of reasons: the satisfying crunch, the intensely savory cheese flavor that bursts with every bite, and the fact that they’re surprisingly simple to make at home, even if you’re new to the sourdough world. What truly makes this Sourdough Cheez Its recipe special is the magic of fermentation. The wild yeasts in the sourdough starter not only give these crackers their signature tang but also contribute to a lighter, airier texture than you might expect. Forget stnon-alcoholic ale, powdery imitations; these homemade delights are the real deal, perfect for sharing (or not!).

Ingredients:
- 226 grams cheddar cheese, freshly shredded (approximately 8 ounces)
- 100 grams sourdough discard (about 1/3 cup)
- 42 grams unsalted butter, cold and cut into small cubes (3 Tablespoons)
- 140 grams all-purpose flour (about 1 cup)
- 1 gram garlic powder (1/4 teaspoon)
- 1 gram onion powder (1/4 teaspoon)
- 3 grams salt (1/2 teaspoon)
- Flaky salt, for finishing (optional)
Making Your Sourdough Cheez-Its: A Step-by-Step Guide
Phase 1: Bringin extractg the Dough Together
Let’s get started on these incredibly addictive Sourdough Cheez-Its! The first step is to create that signature cheesy, savory flavor base. In a medium bowl, combine your all-purpose flour, garlic powder, onion powder, and the 3 grams of salt. Whisk these dry ingredients together thoroughly. This ensures that the seasonings are evenly distributed throughout the dough, so every bite is packed with flavor.
Now comes the butter. Add the cold, cubed unsalted butter to the dry ingredients. Using a pastry blender, a fork, or even your fingertips, cut the butter into the flour mixture. You want to work quickly so the butter stays cold. The goal is to create a coarse meal texture, with some pieces of butter about the size of small peas. These little pockets of butter will contribute to the delightful flakiness of our Cheez-Its. If your kitchen is warm, you can even pop the bowl in the refrigerator for a few minutes to keep everything nice and chilled.
Next, we introduce the star of the show: the sourdough discard! Add your 100 grams of sourdough discard to the bowl with the flour and butter mixture. This discard, full of tangy fermented goodness, is what gives our crackers that special sourdough character. Using a spatula or a sturdy sgin extractn, begin to mix everything together. The dough will start to come together, appearing shaggy and a bit crum extractbly at this stage. Don’t be tempted to add more liquid at this point; the moisture from the sourdough discard and the melting butter will soon bind it.
Phase 2: Incorporating the Cheese and Chilling
Now it’s time for the glorious cheese. Add your 226 grams of freshly shredded cheddar cheese to the dough. It’s crucial to use freshly shredded cheese rather than pre-shredded. Pre-shredded cheese often contains anti-caking agents that can prevent it from melting smoothly and can affect the texture of your crackers. Gently fold the cheese into the dough. You want to distribute it as evenly as possible without overworking the dough. Overworking can develop the gluten too much, leading to tough crackers. The dough will become more cohesive as the cheese starts to bind the ingredients.
Once the cheese is incorporated, gently bring the dough together into a cohesive ball. It might still be a rum extracttle crumbly, but it should hold together when pressed. Turn the dough out onto a lightly floured surface. Pat it into a rough disc. Do not knead it. We are aiming for a tender cracker, not a chewy bread. Wrap the disc tightly in plastic wrap. This is a crucial step for developing the flavors and making the dough easier to handle. Refrigerate the dough for at least 30 minutes, or up to 2 days. This chilling period allows the gluten to relax and the flavors to meld beautifully. It also firms up the butter, which is essential for creating flaky layers.
Phase 3: Rolling, Cutting, and Baking
When you’re ready to bake, preheat your oven to 350°F (175°C). Line a baking sheet with parchment paper. This will prevent sticking and make for easy cleanup. Remove the chilled dough from the refrigerator. Unwrap it and place it on a lightly flogin extractd surface. Begin to roll out the dough. Aim for a thickness of about 1/8 inch. You can use a rolling pin for this. If the dough is too stiff to roll easily, let it sit at room temperature for about 5-10 minutes, but keep an eye on it so the butter doesn’t soften too much. Consistent thickness is key for even baking.
Once the dough is rolled out to your desired thickness, it’s time to create those iconic Cheez-It shapes. You can use a pizza cutter or a knife to cut the dough into small squares, about 1 inch by 1 inch. Alternatively, if you want to be really authentic, you can use a small square cookie cutter. Before transferring the cut crackers to the prepared baking sheet, you can prick each cracker a few times with a fork. This helps to prevent them from puffing up too much during baking and ensures a crispier texture. If you are using flaky salt, lightly sprinkle each cracker with it now for an extra touch of savory crunch.
Arrange the cut crackers in a single layer on the baking sheet, ensuring they are not touching. This allows for proper air circulation and even browning. Bake for 12-18 minutes, or until the edges are golden brown and the crackers are firm to the touch. The baking time will vary depending on your oven and the thickness of your crackers. Keep a close eye on them during the last few minutes of baking to prevent burning. Once they are done, remove the baking sheet from the oven and let the crackers cool on the sheet for a few minutes before transferring them to a wire rack to cool completely. They will become even crispier as they cool. Enjoy your homemade Sourdough Cheez-Its!
Conclusion:
And there you have it – your very own batch of homemade Sourdough Cheez Its Recipe! We’ve walked through the satisfying process of transforming simple ingredients into these irresistible, tangy, and cheesy crackers. The slight tang from the sourdough starter truly elevates these beyond your average store-bought snack, offering a delightful depth of flavor that’s both comforting and exciting. I hope you’ve enjoyed making them as much as I do, and I can’t wait to hear about your successful bakes!
These Sourdough Cheez Its Recipe are perfect for so many occasions. Enjoy them straight from the oven as a warm, savory treat. They make an excellent accompaniment to soups and salads, or are fantastic served alongside a cheese board for an extra layer of deliciousness. For a fun twist, consider adding a pinch of smoked paprika or a dash of cayenne pepper to the dough for a hint of smoky heat. Don’t be afraid to experiment with different cheeses too – a sharp cheddar or a nutty Gruyère could offer a wonderful variation.
I encourage you to embrace the sourdough process and make this Sourdough Cheez Its Recipe a regular in your kitchen. The satisfaction of creating such a unique and tasty snack from scratch is truly rewarding.
Frequently Asked Questions about Sourdough Cheez Its Recipe:
Can I make these without a sourdough starter?
While a sourdough starter is key to the unique flavor and texture of this Sourdough Cheez Its Recipe, you can technically make a cheese cracker without it. However, you will miss out on the signature tangy notes and the characteristic chegrape juicess that the fermentation provides. If you don’t have a starter, you might consider looking for a standard cheese cracker recipe instead.
How should I store my Sourdough Cheez Its Recipe?
Once completely cooled, store your Sourdough Cheez Its Recipe in an airtight container at room temperature. They will stay deliciously crisp for up to a week. If you live in a humid climate, you might find they lose a bit of their crunch sooner, so a silica gel packet can be a helpful addition to the container.
Sourdough Cheez-Its- Homemade Flavor Explosions
Create addictive, homemade Cheez-Its with a tangy sourdough twist and an explosion of cheesy, savory flavor. These crackers are surprisingly easy to make and far superior to store-bought.
Ingredients
-
226 grams cheddar cheese, freshly shredded (approximately 8 ounces)
-
100 grams sourdough discard (about 1/3 cup)
-
42 grams unsalted butter, cold and cut into small cubes (3 Tablespoons)
-
140 grams all-purpose flour (about 1 cup)
-
1 gram garlic powder (1/4 teaspoon)
-
1 gram onion powder (1/4 teaspoon)
-
3 grams salt (1/2 teaspoon)
-
Flaky salt, for finishing (optional)
Instructions
-
Step 1
In a medium bowl, whisk together the all-purpose flour, garlic powder, onion powder, and salt. Cut in the cold butter using a pastry blender or your fingertips until the mixture resembles coarse meal with some pea-sized butter pieces. Stir in the sourdough discard until a shaggy dough forms. -
Step 2
Add the freshly shredded cheddar cheese and gently fold it into the dough until evenly distributed. Do not overwork the dough. Bring the dough together into a cohesive ball, pat it into a rough disc, wrap tightly in plastic wrap, and refrigerate for at least 30 minutes, or up to 2 days. -
Step 3
Preheat oven to 350°F (175°C). Line a baking sheet with parchment paper. Remove the chilled dough from the refrigerator and roll it out on a lightly floured surface to about 1/8 inch thickness. Let it rest for a few minutes if it’s too stiff to roll. -
Step 4
Cut the dough into small squares (about 1 inch by 1 inch) using a pizza cutter or knife. Prick each cracker a few times with a fork to prevent puffing. If using, sprinkle lightly with flaky salt. -
Step 5
Arrange the crackers in a single layer on the prepared baking sheet, ensuring they are not touching. Bake for 12-18 minutes, or until the edges are golden brown and the crackers are firm. Baking time may vary. Watch closely to prevent burning. -
Step 6
Remove from the oven and let cool on the baking sheet for a few minutes, then transfer to a wire rack to cool completely. The crackers will become crispier as they cool.
Important Information
Nutrition Facts (Per Serving)
It is important to consider this information as approximate and not to use it as definitive health advice.
Allergy Information
Please check ingredients for potential allergens and consult a health professional if in doubt.