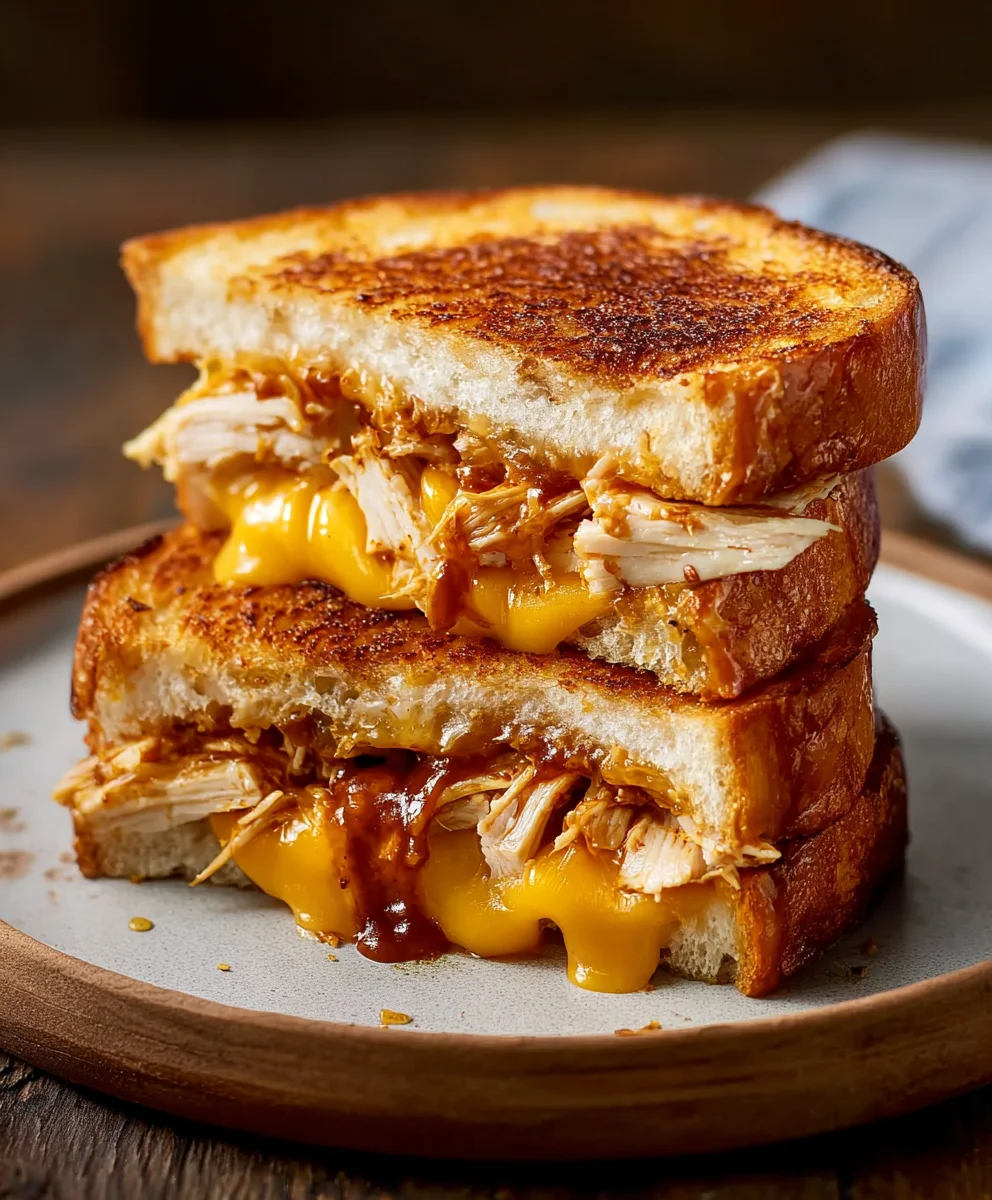
BBQ Chicken Grilled Cheese – Delicious & Easy Recipe
BBQ Chicken Grilled Cheese is not just a sandwich; it’s a symphony of smoky, sweet, and savory flavors that will transport your taste buds to a summer barbecue, no matter the season. Who can resist the ultimate comfort food combination? We certainly can’t! This beloved dish takes the familiar, cozy embrace of a grilled cheese and elevates it with the irresistible allure of tender, shredded chicken coated in rich, tangy barbecue sauce. It’s the perfect marriage of gooey, melted cheese and crispy, golden-brown bread, with that satisfying crunch giving way to a warm, flavorful center. What truly makes our BBQ Chicken Grilled Cheese recipe special is the careful balance of ingredients, from the perfectly seasoned chicken to the thoughtfully chosen cheeses that melt into creamy perfection. Get ready to experience grilled cheese like you’ve never imagin extracted.

Ingredients:
- 2 cups cooked chicken, shredded (rotisserie chicken is a fantastic shortcut here for maximum flavor and ease)
- 1/2 cup BBQ sauce, plus extra for drizzling (your favorite kind will do, but a smoky or sweet variety often complements grilled cheese best)
- 8 slices of bread (sourdough is highly recommended for its tangy bite and sturdy structure, but any good quality bread will work)
- 8 slices of cheddar cheese (a sharp cheddar provides a great tang, but feel free to mix it with mozzarella for extra meltiness)
- 1/2 red onion, thinly sliced (red onion offers a sweet and slightly pungent crunch that contrasts beautifully with the richness)
- 2 tablespoons butter, at room temperature (softened butter is crucial for even browning and a golden crust)
- Optional toppings: pickled jalapeños (for a spicy kick), fresh cilantro (for a burst of herbaceous freshness)
Preparing the BBQ Chicken Filling
Step 1: Combine Chicken and BBQ Sauce
In a medium bowl, combine the shredded cooked chicken with the 1/2 cup of BBQ sauce. Stir everything together thoroughly, ensuring that every piece of chicken is coated in the sauce. You want a good balance of chicken and sauce, not too dry and not swimming. If you prefer a more saucy filling, you can add another tablespoon or two of BBQ sauce at this stage. For an extra layer of flavor, consider adding a pinch of smoked paprika or a dash of Worcestershire sauce to this mixture. Allow this to sit for at least 5 minutes, or longer if you have time, to let the flavors meld together. This brief marinating period will make your BBQ chicken filling exceptionally tasty.
Step 2: Sauté the Red Onions (Optional but Recommended)
While the chicken is mingling with the BBQ sauce, let’s prepare the red onions. Heat a small skillet over medium heat. Add about 1 teaspoon of butter or a drizzle of olive oil. Once the butter is melted or the oil is shimmering, add the thinly sliced red onion. Cook the onions for about 5-7 minutes, stirring occasionally, until they are softened and slightly translucent. You don’t want them to be deeply caramelized, just tender enough to not be overpowering in the sandwich. This step mellows out the sharpness of the raw onion and brings out its natural sweetness, which is a wonderful addition to the BBQ Chicken Grilled Cheese. If you are short on time, you can skip this step and use the raw onions, but the sautéed version offers a superior flavor profile.
Assembling the BBQ Chicken Grilled Cheese
Step 3: Prepare the Bread and Cheese Layers
Lay out your 8 slices of bread on a clean work surface. On 4 of these slices, begin extract layering your cheese. You’ll want to place about 2 slices of cheddar cheese on each of these 4 bread slices. This ensures a generous amount of melty cheese in every bite. Try to spread the cheese evenly to avoid thick clumps in one area and bare spots in another. Having the cheese directly touching the bread on both sides of the sandwich will create that irresistible gooey texture we all love.
Step 4: Add the BBQ Chicken and Onion Filling
Now, it’s time to add the star of the show: the BBQ chicken. Take your BBQ sauce-coated chicken and evenly distribute it over the cheese-covered bread slices. Aim for a good, generous portion of chicken on each sandwich. Don’t be afraid to let it pile up a little! Next, carefully scatter the sautéed (or raw, if you skipped that step) red onion slices over the chicken. If you are using any optional toppings like pickled jalapeños or fresh cilantro, now is the time to add them to one side of the sandwich. Distribute them evenly.
Step 5: Close and Butter the Sandwiches
Take the remaining 4 slices of bread and place them on top of the filling to complete the sandwiches. Now, it’s time to prepare the outsides for grilling. Spread about 1/2 tablespoon of the room-temperature butter evenly on the top side of each sandwich. Ensure you get a nice, even coating from edge to edge. This butter is what will give your grilled cheese that beautiful golden-brown, crispy crust.
Grilling Your BBQ Chicken Grilled Cheese
Step 6: Cook the First Side to Golden Perfection
Heat a large skillet or griddle over medium-low heat. The key to a perfect grilled cheese is to cook it slowly over moderate heat, allowing the cheese to melt completely before the bread burns. Once your skillet is preheated, carefully place 2 or 3 sandwiches (depending on the size of your skillet) into the pan, butter-side down. Cook for 4-6 minutes, or until the bottom slice of bread is a deep golden brown and looks wonderfully crispy. Resist the urge to press down too hard on the sandwich initially, as this can push out the cheese. Peek underneath to check the color; you’re looking for that perfect toast.
Step 7: Flip and Cook the Second Side
Once the first side is perfectly golden and toasted, carefully flip each sandwich using a spatula. If you like, you can add another thin layer of butter to the pan before flipping if it looks a little dry. Now, cook the second side for another 4-6 minutes, or until it’s equally golden brown and crispy. As the sandwich cooks, you can gently press down on it with your spatula. This helps ensure even browning and aids in melting the cheese to gooey perfection. You should start to see some of the cheese oozing out the sides, which is a very good sign.
Step 8: Finish and Serve
Once both sides are beautifully golden brown and the cheese is melted and gooey, your BBQ Chicken Grilled Cheese is ready to be enjoyed. Carefully remove the sandwiches from the skillet and place them on a cutting board. For easier eating and to showcase the glorious melted cheese and filling, it’s best to cut each sandwich in half, either diagonally or straight across. If you reserved extra BBQ sauce, now is the perfect time for a little drizzle over the top or to serve on the side for dipping. Serve immediately while they are hot and incredibly satisfying.
Conclusion:
There you have it – a foolproof guide to creating the most delicious BBQ Chicken Grilled Cheese! This recipe offers a fantastic balance of savory shredded chicken, tangy BBQ sauce, and gooey melted cheese, all pressed between perfectly toasted bread. It’s a simple yet incredibly satisfying meal that’s perfect for a quick lunch, a fun dinner, or even a crowd-pleasing appetizer. Don’t be afraid to experiment and make it your own! Whether you’re serving this BBQ Chicken Grilled Cheese immediately or making a batch for a picnic, it’s sure to be a hit. Enjoy every cheesy, saucy bite!
Frequently Asked Questions:
What kind of bread works best for BBQ Chicken Grilled Cheese?
For the ultimate grilled cheese experience, a sturdy bread that can hold up to the fillings is ideal. Sourdough, challah, or a good quality white bread are excellent choices. They toast up beautifully and provide a delicious base for our BBQ Chicken Grilled Cheese.
Can I make the BBQ chicken ahead of time?
Absolutely! Preparing the shredded chicken and BBQ mixture in advance can save you time, especially on busy weeknights. You can store it in an airtight container in the refrigerator for up to 3 days. Just reheat it gently before assembling your BBQ Chicken Grilled Cheese.
Are there any good vegetarian or vegan variations for this BBQ Chicken Grilled Cheese?
Yes, definitely! For a vegetarian option, you can substitute the chicken with grilled halloumi cheese or crum extractbled firm tofu tossed in BBQ sauce. For a vegan version, use your favorite plant-based chicken substitute or extra-firm tofu, and ensure your cheese and bread are vegan-friendly.
BBQ Chicken Grilled Cheese – Delicious & Easy Recipe
A quick and flavorful grilled cheese sandwich packed with shredded BBQ chicken, melted cheddar cheese, and sweet red onions.
Ingredients
-
2 cups cooked chicken, shredded
-
1/2 cup BBQ sauce
-
8 slices of bread
-
8 slices of cheddar cheese
-
1/2 red onion, thinly sliced
-
2 tablespoons butter, softened
-
Optional: pickled jalapeños
-
Optional: fresh cilantro
Instructions
-
Step 1
In a medium bowl, combine the shredded cooked chicken with 1/2 cup of BBQ sauce. Stir well until the chicken is thoroughly coated. Let it sit for at least 5 minutes to allow flavors to meld. -
Step 2
Optional but recommended: Sauté thinly sliced red onion in a small skillet with 1 teaspoon of butter or oil over medium heat for 5-7 minutes until softened and translucent. -
Step 3
Lay out 4 slices of bread. Layer 2 slices of cheddar cheese on each of these bread slices. Evenly distribute the BBQ chicken mixture over the cheese. Top with the sautéed (or raw) red onions and any optional toppings like pickled jalapeños or cilantro. -
Step 4
Place the remaining 4 slices of bread on top to form sandwiches. Spread about 1/2 tablespoon of softened butter evenly on the top side of each sandwich. -
Step 5
Heat a large skillet or griddle over medium-low heat. Place the sandwiches in the skillet, butter-side down. Cook for 4-6 minutes, or until the bottom slice is golden brown and crispy. -
Step 6
Carefully flip each sandwich. Cook the second side for another 4-6 minutes, or until equally golden brown and crispy, and the cheese is melted and gooey. Gently press down on the sandwiches as they cook. -
Step 7
Remove from skillet, cut in half, and serve immediately. Drizzle with extra BBQ sauce if desired.
Important Information
Nutrition Facts (Per Serving)
It is important to consider this information as approximate and not to use it as definitive health advice.
Allergy Information
Please check ingredients for potential allergens and consult a health professional if in doubt.