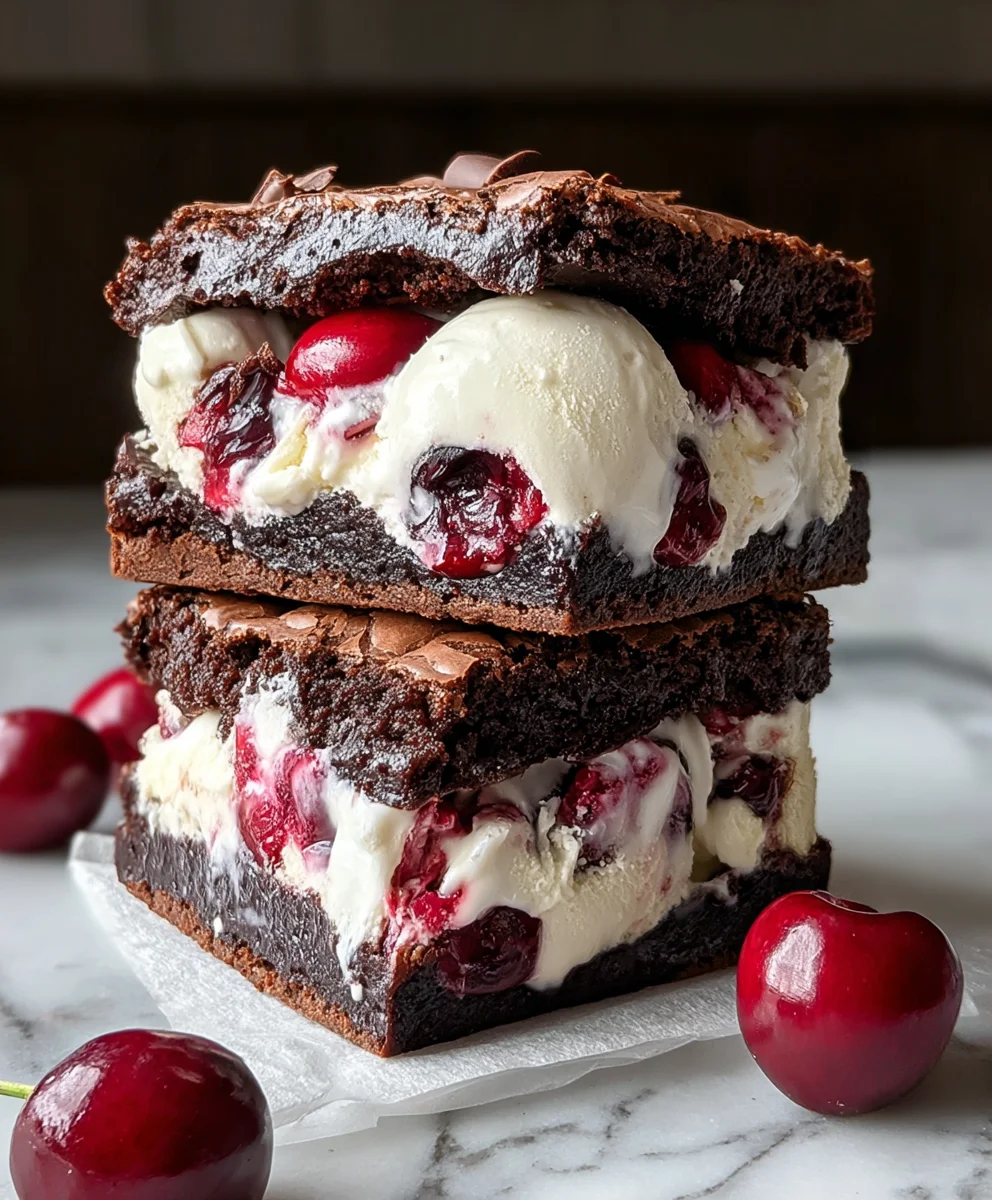
Cherry Brownie Ice Cream Sandwiches-Fruity Chocolate Bliss
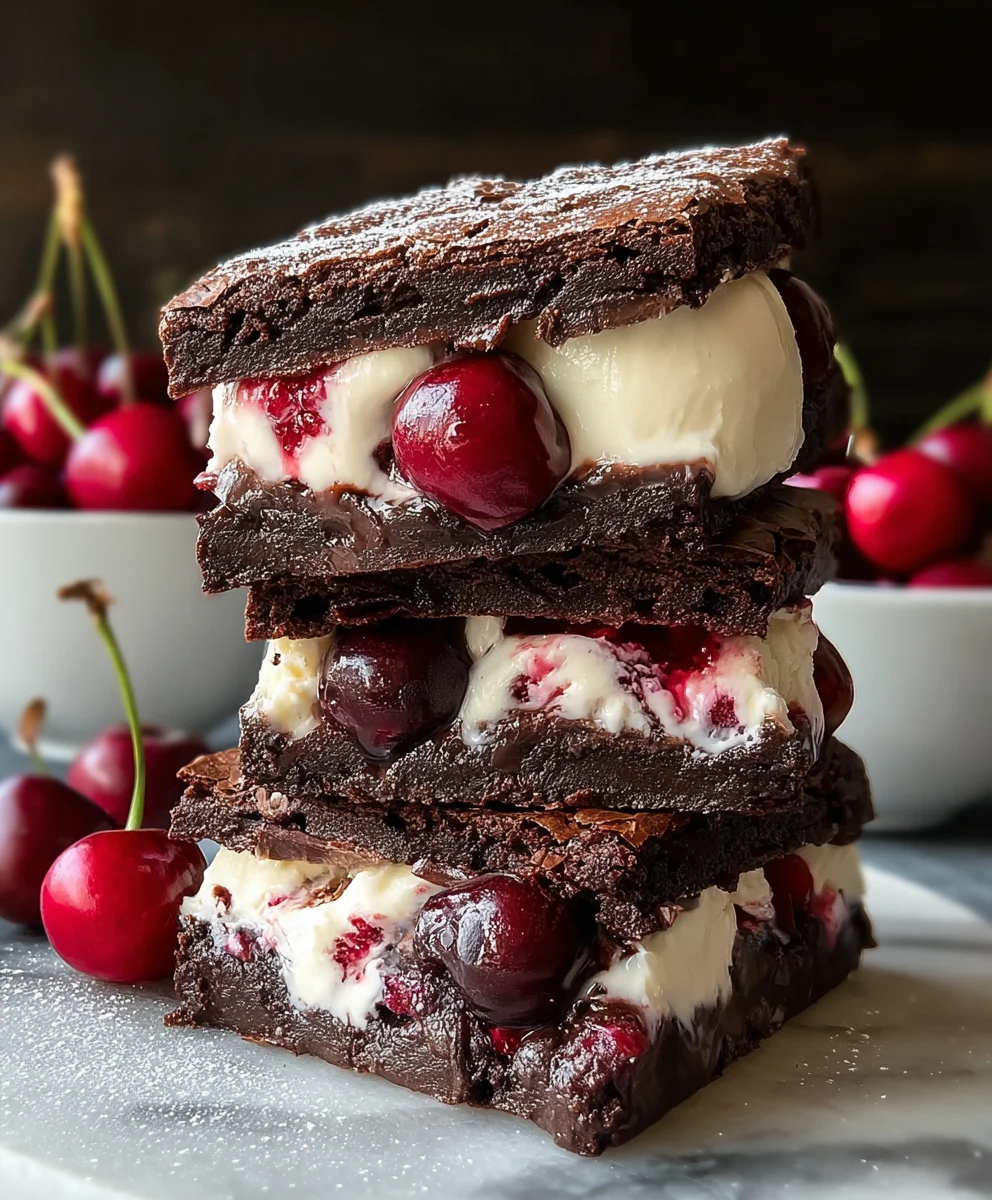
Cherry Brownie Ice Cream Sandwiches aren’t just a dessert; they’re a portal to pure, unadulterated joy. Imagin extracte biting into the rich, fudgy embrace of a homemade brownie, its slightly crisp edges yielding to a decadent, chewy center. Now, picture that perfectly paired with a generous scoop of creamy, luscious ice cream. But we’re not stopping there. The vibrant burst of sweet-tart cherries, either swirled into the ice cream or nestled within the brownie itself, elevates this treat from delicious to utterly unforgettable. It’s this dynamic combination of textures and flavors – the deep chocolate, the cool creaminess, and the bright fruitiness – that makes Cherry Brownie Ice Cream Sandwiches a summertime (or any time!) sensation. They’re nostalgic for some, a delightful discovery for others, and universally loved for their ability to satisfy multiple cravings at once. This recipe is your ticket to crafting these iconic delights from scratch, ensuring every bite is an explosion of pure happiness.
Ingredients:
- ½ cup unsalted butter, softened
- ½ cup granulated sugar
- ½ cup packed brown sugar
- 2 large eggs
- 1 teaspoon vanilla extract
- ⅓ cup unsweetened cocoa powder
- ½ cup all-purpose flour
- ¼ teaspoon salt
- 1½ cups vanilla ice cream, slightly softened
- ½ cup chopped cherries (fresh or frozen, thawed if frozen)
- ¼ cup melted chocolate (for drizzling)
Baking the Brownie Bases
Prepping the Batter
- First, preheat your oven to 350°F (175°C). Line a baking sheet with parchment paper. This step is crucial for easy removal of the brownies and prevents them from sticking. In a medium bowl, cream together the softened unsalted butter, granulated sugar, and packed brown sugar until the mixture is light and fluffy. This aeration process is key to achieving a tender brownie texture. You can use an electric mixer for this, or a whisk and some elbow grease. Make sure there are no lumps of butter remaining.
- Next, beat in the 2 large eggs, one at a time, until fully incorporated. Then, stir in the 1 teaspoon of vanilla extract. This adds that classic comforting aroma and flavor to our brownie base. In a separate small bowl, whisk together the ⅓ cup unsweetened cocoa powder, ½ cup all-purpose flour, and ¼ teaspoon salt. Whisking these dry ingredients together before adding them to the wet ingredients ensures an even distribution of cocoa and salt, preventing pockets of unsalted or bitter brownie.
- Gradually add the dry ingredients to the wet ingredients, mixing just until combined. Be careful not to overmix the batter. Overmixing can develop the gluten in the flour too much, leading to tough brownies, which is the opposite of what we want for our delicate ice cream sandwiches. The batter should be thick and rich.
Forming and Baking the Brownies
- Spoon rounded tablespoons of the brownie batter onto the prepared baking sheet, spacing them about 2 inches apart. You should aim for about 8-10 brownie cookies. Gently flatten each mound of batter with the back of a spoon or your fingers to create uniform discs, about ½ inch thick. These discs will be the perfect size for our ice cream sandwiches. Aim for consistency in thickness so they bake evenly.
- Bake for 10-12 minutes, or until the edges are set and the centers are still slightly soft and fudgy. The brownies will continue to cook slightly as they cool on the baking sheet. For ice cream sandwiches, it’s better to have them slightly underbaked than overbaked, ensuring a chewy texture that complements the cold ice cream. Let the brownies cool completely on the baking sheet for about 15 minutes before carefully transferring them to a wire rack to cool completely. They need to be fully cooled to prevent the ice cream from melting immediately upon contact.
Assembling the Cherry Brownie Ice Cream Sandwiches
Preparing the Ice Cream and Cherries
- While the brownies are cooling, ensure your 1½ cups of vanilla ice cream is slightly softened. This means taking it out of the freezer about 10-15 minutes before you plan to assemble your sandwiches. You want it to be scoopable and spreadable, but not completely melted. If it’s too hard, it will be impossible to spread, and if it’s too soft, it will all ooze out the sides. If you’re using frozen cherries, make sure they are thawed and patted dry to remove excess moisture. If using fresh cherries, simply chop them into small, bite-sized pieces.
Building the Sandwiches
- Once the brownie cookies are completely cool, it’s time for assembly. Place half of the cooled brownie cookies bottom-side up on a clean surface or a plate. Spread a generous scoop of the slightly softened vanilla ice cream evenly over each of these brownie bottoms. Aim for a layer that’s about ½ inch thick. Don’t be afraid to mound it slightly in the center.
- Now, it’s time to add the cherry goodness. Sprinkle the chopped cherries evenly over the ice cream on each brownie base. Make sure to distribute them so you get a burst of cherry flavor in every bite. This adds a wonderful fruity counterpoint to the rich chocolate and creamy ice cream. Gently press the cherries into the ice cream so they stay put when you add the top brownie.
- Carefully place the remaining brownie cookies, bottom-side down, on top of the ice cream and cherry mixture to form your sandwiches. Gently press down to secure them. If any ice cream or cherries squeeze out the sides, you can tidy them up with a spatula or knife. For an extra touch of indulgence, melt the ¼ cup of chocolate chips and drizzle it artistically over the tops of the assembled sandwiches using a fork or a piping bag. This adds a beautiful finish and an extra layer of chocolatey decadence.
- For the best texture and to allow everything to set, place the assembled Cherry Brownie Ice Cream Sandwiches back onto the parchment-lined baking sheet or a flat plate. Transfer them to the freezer and freeze for at least 2-4 hours, or until firm. This freezing time is essential for the ice cream to solidify and for the flavors to meld together, creating the perfect ice cream sandwich experience. Enjoy your homemade treats!
Conclusion:
There you have it! Your guide to creating the most delightful Cherry Brownie Ice Cream Sandwiches. We’ve walked through each step, from baking fudgy brownies to assembling these decadent treats. The combination of rich chocolate, tart cherries, and creamy ice cream is simply irresistible, perfect for a summer party, a special dessert, or just a little indulgence for yourself. These Cherry Brownie Ice Cream Sandwiches are sure to be a hit with everyone!
When it comes to serving, these are best enjoyed immediately after assembly. For a touch of elegance, consider rolling the edges in chopped nuts, sprinkles, or even a drizzle of melted chocolate. Don’t be afraid to get creative with your ice cream flavor – vanilla is classic, but mint chocolate chip or even a cherry-flavored ice cream would be sensational. You can also experiment with different brownie recipes or add a swirl of cherry pie filling directly into the brownie batter before baking for an extra burst of flavor.
We encourage you to try making these Cherry Brownie Ice Cream Sandwiches at home. The joy of creating something so delicious from scratch is incredibly rewarding, and the smiles they bring are priceless. Happy baking and assembling!
Frequently Asked Questions:
Q1: Can I make the brownies ahead of time for my Cherry Brownie Ice Cream Sandwiches?
Absolutely! The brownies for your Cherry Brownie Ice Cream Sandwiches can be baked a day or two in advance. Once completely cooled, wrap them tightly in plastic wrap and store them at room temperature or in the refrigerator. It’s important that they are fully cooled before cutting into squares and assembling to prevent the ice cream from melting too quickly.
Q2: What if I don’t have fresh cherries? Can I use frozen or canned for my Cherry Brownie Ice Cream Sandwiches?
Yes, you can definitely use frozen or canned cherries! If using frozen cherries, thaw them completely and drain off any excess liquid before incorporating them into the brownie batter. For canned cherries, drain them very well. You might want to slightly reduce the amount of sugar in the brownie recipe if your canned cherries are packed in syrup. The key is to ensure they are well-drained to avoid making your brownies soggy.
Q3: How should I store leftover Cherry Brownie Ice Cream Sandwiches?
For the best results, store any assembled Cherry Brownie Ice Cream Sandwiches individually wrapped in plastic wrap or aluminum foil. Then, place them in an airtight container and keep them in the freezer. This will help prevent freezer burn and keep them perfectly frozen until you’re ready to enjoy them. They should stay delicious for up to a month!
Cherry Brownie Ice Cream Sandwiches-Fruity Chocolate Bliss
Indulge in a delightful fusion of rich chocolate brownies, creamy vanilla ice cream, and sweet cherries, all drizzled with decadent chocolate.
Ingredients
-
½ cup unsalted butter, softened
-
½ cup granulated sugar
-
½ cup packed brown sugar
-
2 large eggs
-
1 teaspoon vanilla extract
-
⅓ cup unsweetened cocoa powder
-
½ cup all-purpose flour
-
¼ teaspoon salt
-
1½ cups vanilla ice cream, slightly softened
-
½ cup chopped cherries (fresh or frozen, thawed if frozen)
-
¼ cup melted chocolate (for drizzling)
Instructions
-
Step 1
Preheat oven to 350°F (175°C). Line a baking sheet with parchment paper. Cream together butter and sugars until light and fluffy. Beat in eggs one at a time, then stir in vanilla extract. Whisk together cocoa powder, flour, and salt in a separate bowl. Gradually add dry ingredients to wet, mixing just until combined. Do not overmix. -
Step 2
Spoon rounded tablespoons of batter onto the prepared baking sheet, about 2 inches apart. Flatten each mound to create discs about ½ inch thick. Bake for 10-12 minutes, until edges are set and centers are slightly soft. Let cool completely on a wire rack. -
Step 3
Ensure vanilla ice cream is slightly softened, about 10-15 minutes out of the freezer. If using frozen cherries, thaw and pat dry. Chop fresh cherries into small pieces. -
Step 4
Place half of the cooled brownie cookies bottom-side up. Spread a generous scoop of softened ice cream evenly over each brownie bottom. Sprinkle chopped cherries over the ice cream. -
Step 5
Top with the remaining brownie cookies, bottom-side down. Gently press to secure. Drizzle with melted chocolate. Freeze for at least 2-4 hours, or until firm.
Important Information
Nutrition Facts (Per Serving)
It is important to consider this information as approximate and not to use it as definitive health advice.
Allergy Information
Please check ingredients for potential allergens and consult a health professional if in doubt.