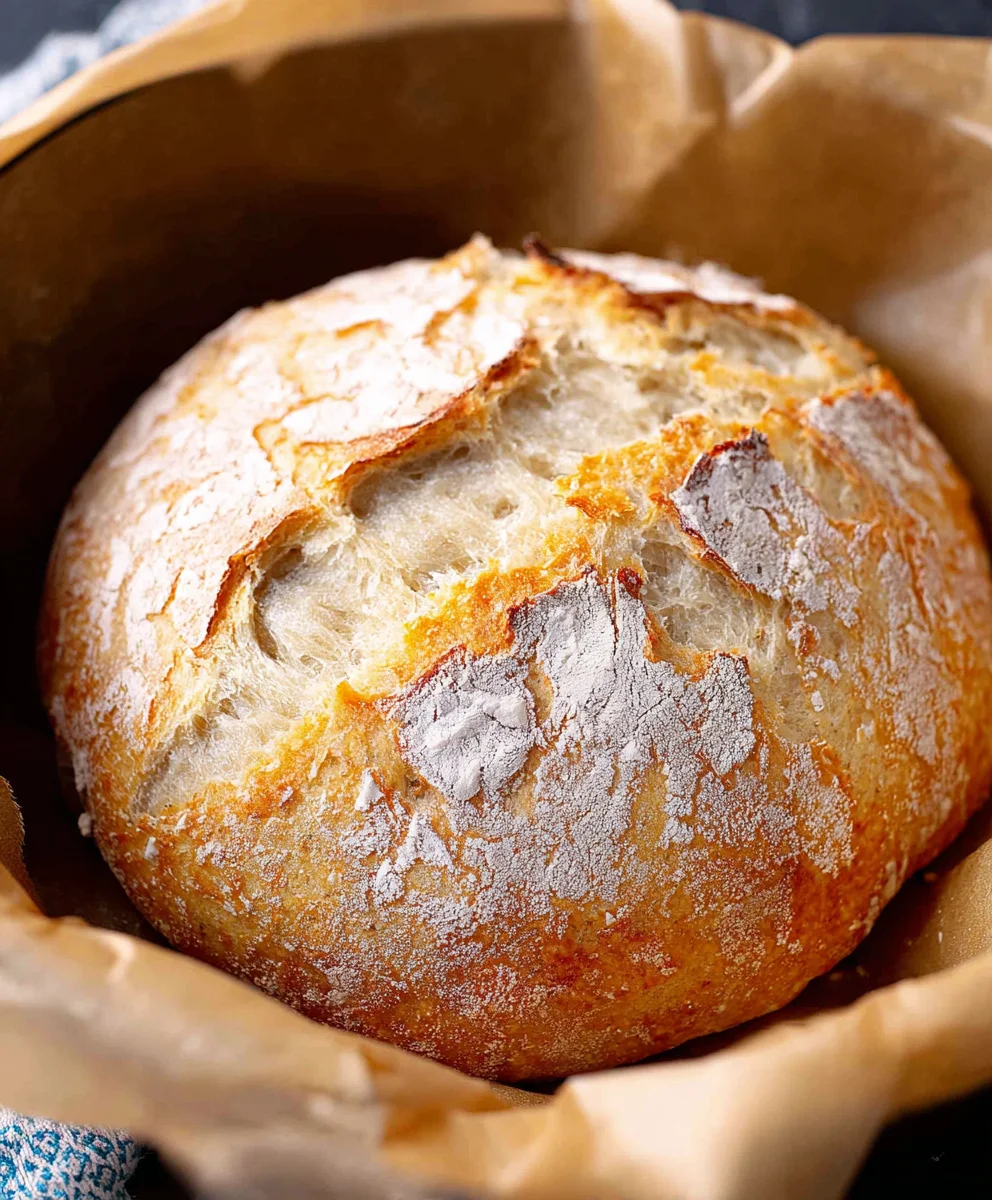
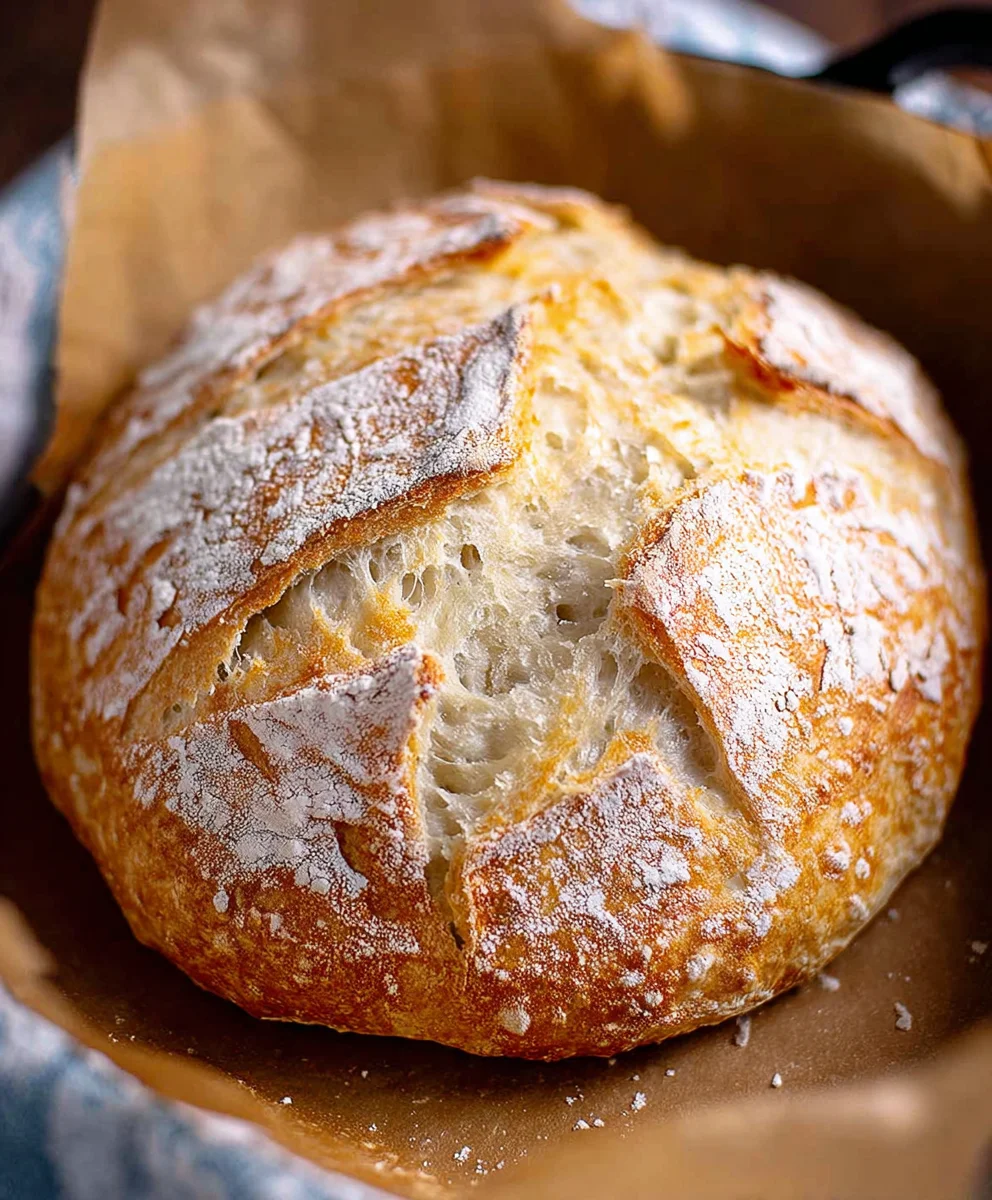
Dutch Oven No-Knead Crusty Bread Recipe
Dutch Oven No Knead Crusty Bread is the magical answer to your homemade bread dreams, transforming even the most novice bakers into artisanal pros. Imagin extracte sinking your teeth into a loaf with a shatteringly crisp, golden-brown crust that gives way to a soft, airy, and chewy interior. This isn’t just bread; it’s an experience, a comforting aroma filling your kitchen, and a delicious reward for minimal effort. What truly makes this Dutch Oven No Knead Crusty Bread so universally beloved is its deceptive simplicity. There’s no kneading required, no complex techniques to master. Just a few basic ingredients, some patient rising time, and the genius of a preheated Dutch oven to create that unparalleled crust. It’s the perfect companion to any meal, a delightful base for sandwiches, or simply divine when slathered with butter. Get ready to impress yourself and everyone you share it with!
Ingredients:
- 1 1/2 cups warm water (about 100 degrees F)
- 1 packet yeast (active dry, instant, or quick rise – 2.25 teaspoons)
- 1 ½ teaspoons fine grain salt
- 3 1/4 cups all-purpose flour
Preparing the Dough
This recipe for Dutch Oven No Knead Crusty Bread is surprisingly simple, relying on time and good ingredients to develop a beautiful texture and flavor. You won’t need to spend any time kneading, which is the beauty of this method.
Step 1: Activate the Yeast and Mix the Wet Ingredients
In a large bowl, combine the 1 1/2 cups of warm water. The temperature is important here; aim for around 100 degrees Fahrenheit. Too hot, and you’ll kill the yeast; too cool, and it won’t activate properly. Sprinkle the entire packet of yeast (which is typically 2.25 teaspoons) over the warm water. If you’re using active dry yeast, let it sit for about 5-10 minutes until it becomes foamy and bubbly on the surface. This “blooming” process indicates your yeast is alive and ready to work its magic. If you’re using instant or quick-rise yeast, you can usually proceed directly to the next step without blooming, as they are designed to be incorporated directly.
Step 2: Combine Dry Ingredients and Form the Dough
To the bowl with the activated yeast and water, add the 1 ½ teaspoons of fine grain salt and the 3 1/4 cups of all-purpose flour. Use a sturdy spoon or a spatula to mix everything together. Don’t overmix at this stage. You’re aiming for a shaggy, somewhat sticky dough. It will look unappealing and uneven at first, and that’s perfectly normal for a no-knead bread. The gluten will develop on its own over time. Ensure there are no dry pockets of flour remaining. Scrape down the sides of the bowl to incorporate any stray bits.
Step 3: First Fermentation (The Long Rise)
Once you’ve combined the ingredients, cover the bowl tightly with plastic wrap or a damp kitchen towel. Place the bowl in a warm, draft-free spot in your kitchen. This is where patience comes in. Let the dough rise for a minimum of 12 hours, and up to 18 hours. The longer it ferments, the more flavor will develop, and the easier it will be to handle. During this time, the yeast will produce carbon dioxide, causing the dough to significantly increase in volume and become bubbly and airy. You’ll see it rise to about double or even triple its origin extractal size.
Step 4: Shaping the Dough and Second Rise
After the long fermentation, the dough will be quite wet and sticky. Lightly flour your work surface and your hands. Gently scrape the dough out of the bowl onto the floured surface. Be careful not to punch it down vigorously; you want to preserve those precious air bubbles. With floured hands, gently fold the dough over itself a few times, like you’re folding a letter. This helps to build a little structure. Then, shape it into a round ball. The goal isn’t to create a perfectly smooth surface, just to gather it into a cohesive shape. Place the shaped dough onto a piece of parchment paper. Loosely cover it again and let it rest for another 30 to 60 minutes. This final rise allows the dough to relax and become a little puffier before baking.
Step 5: Baking the Crusty Bread
About 30 minutes before the end of the dough’s second rise, preheat your oven to 450 degrees Fahrenheit. Place your empty Dutch oven (including the lid) into the oven as it preheats. A well-preheated Dutch oven is crucial for achieving that signature crispy crust. Once the dough has finished its final rise, carefully remove the hot Dutch oven from the oven. Using the parchment paper as handles, carefully lower the dough into the hot Dutch oven. It might seem daunting, but the parchment paper makes it manageable. You can also gently score the top of the loaf with a sharp knife or razor blade if you like, which helps control where the bread expands. Place the lid back on the Dutch oven and carefully place it back into the preheated oven. Bake for 30 minutes with the lid on. This traps the steam released by the dough, which is essential for a thin, crispy crust. After 30 minutes, remove the lid and continue baking for another 15-25 minutes, or until the crust is a deep golden brown and the internal temperature of the bread reaches around 200-210 degrees Fahrenheit. A beautiful, crackling crust is your reward!
Conclusion:
There you have it – your guide to mastering the art of the Dutch Oven No Knead Crusty Bread! This recipe truly demystifies bread baking, proving that you don’t need fancy equipment or extensive kneading to achieve a beautifully golden, incredibly crusty loaf with a soft, airy interior. The magic lies in the long, slow fermentation and the steam-trapping power of your Dutch oven, which works wonders to create that signature artisan crust. I encourage you to give this a try; the aroma filling your kitchen as it bakes is simply divine, and the satisfaction of pulling a perfect loaf from your oven is unparalleled. Serve it warm, slathered with butter, or alongside your favorite soups and stews. Don’t be afraid to experiment with variations once you’ve mastered the basic technique – think herbs, cheese, or even a swirl of pesto!
Frequently Asked Questions:
Why is my Dutch Oven No Knead Crusty Bread not crusty enough?
Ensure your Dutch oven is preheated thoroughly, as this is crucial for achieving a good crust. Also, make sure the lid is on tightly for the initial baking period to trap steam, which is essential for developing that characteristic crust. Avoid opening the oven door too early.
Can I use a different pot if I don’t have a Dutch oven for this Dutch Oven No Knead Crusty Bread?
While a Dutch oven is ideal, you can achieve good results with other oven-safe pots that have a lid. A cast-iron pot or a lidded casserole dish can work. You might need to adjust baking times slightly and ensure you create adequate steam within the pot by adding a pan of water to the oven during the initial baking phase.
Dutch Oven No-Knead Crusty Bread
A simple and rewarding recipe for delicious, crusty bread baked in a Dutch oven, requiring no kneading.
Ingredients
-
1 1/2 cups warm water (about 100 degrees F)
-
1 packet active dry yeast (2.25 teaspoons)
-
1 ½ teaspoons fine grain salt
-
3 1/4 cups all-purpose flour
-
Parchment paper
Instructions
-
Step 1
In a large bowl, combine 1 1/2 cups of warm water (around 100 degrees F). Sprinkle the yeast over the water and let it bloom for 5-10 minutes until foamy (if using active dry yeast). -
Step 2
Add the salt and flour to the bowl. Mix with a spoon or spatula until a shaggy, sticky dough forms with no dry flour pockets. -
Step 3
Cover the bowl tightly and let the dough rise in a warm, draft-free spot for 12-18 hours. The dough should double or triple in size. -
Step 4
Gently scrape the dough onto a lightly floured surface. Fold it over itself a few times, shape into a round ball, and place on parchment paper. Cover loosely and let rest for 30-60 minutes. -
Step 5
Preheat oven to 450 degrees F. Place an empty Dutch oven with its lid in the oven to preheat. Once preheated, carefully place the dough into the hot Dutch oven using the parchment paper. Score the top if desired. -
Step 6
Bake with the lid on for 30 minutes. Remove the lid and bake for another 15-25 minutes until deep golden brown and an internal temperature of 200-210 degrees F.
Important Information
Nutrition Facts (Per Serving)
It is important to consider this information as approximate and not to use it as definitive health advice.
Allergy Information
Please check ingredients for potential allergens and consult a health professional if in doubt.