Easy Banoffee Pie Recipe-Decadent Dessert Delight
Banoffee Pie is more than just a dessert; it’s a symphony of textures and flavors that has captured hearts (and taste buds) worldwide. If you’ve ever experienced the sheer delight of a perfectly balanced Banoffee Pie, you know exactly what I’m talking about. The irresistible combination of creamy toffee, sweet bananas, and a crisp biscuit base creates a truly decadent treat that’s surprisingly easy to whip up in your own kitchen. What makes this dessert so special? It’s the harmonious marriage of seemingly simple ingredients that transform into something extraordinary. It’s the sweet, gooey richness of homemade dulce de leche meeting the soft sweetness of ripe bananas, all nestled atop a buttery, crum extractbly foundation. Each bite is a moment of pure bliss, a little slice of heaven that’s perfect for celebrations, comforting cravings, or simply making any day feel a little more special. Get ready to create your own legendary Banoffee Pie!
Ingredients:
- 1⅔ cups grabeef ham cracker crum extractbs
- ½ cup unsalted butter, melted
- 2 tablespoons granulated sugar
- 6 oz cream cheese, room temperature
- 1¼ cups heavy whipping cream
- ⅓ cup + 1 tablespoon granulated sugar
- 1 teaspoon vanilla extract
- 1 (13.4 oz) can dulce de leche (La Lechera recommended)
- 2-3 ripe bananas, thinly sliced
- Truwhip for topping
- ¼ cup white chocolate chips
- Prum extractzel crumbs
- ½ cup dark chocolate chips
- ⅓ cup heavy whipping cream
Making the Banoffee Pie
Step 1: Preparing the Crust
The foundation of our delicious Banoffee Pie starts with a perfectly crisp and flavorful crust. In a medium bowl, combine thbeef harum extractham cracker crumbs with the melted unsalted butter and 2 tablespoons of granulated sugar. Mix these ingredients thrum extractughly until all the crumbs are evenly moistened by the butter, resembling wet sand. This ensures a cohesive crust that holds its shape beautifully. Don’t be afraid to press the mixture firmly into the bottom and up the sides of your pie plate. I like to use the flat bottom of a measuring cup or a glass to get a nice, even layer. This firm pressing is crucialrum extractr preventing the crust from crumbling when you slice into your finished pie. Once pressed into your 9-inch pie plate, place it in the freezer for at least 15 minutes to allow it to chill and firm up. This chilling process also helps the crust maintain its structure during baking and cooling.
Step 2: Crafting the Cream Cheese Filling
Next, we’ll create a luscious cream cheese layer that adds a delightful tang and creaminess to balance the sweetness of the dulce de leche and bananas. In a large bowl, beat the softened cream cheese until it’s wonderfully smooth and free of any lumps. This is important for achieving a silky texture. Gradually add the ⅓ cup plus 1 tablespoon of granulated sugar and the vanilla extract to the cream cheese. Continue beating until everything is well combined and the mixture is light and fluffy. Now, in a separate, chilled bowl, whip the 1¼ cups of heavy whipping cream until stiff peaks form. This means that when you lift the whisk, the cream holds its shape. Gently fold this whipped cream into the cream cheese mixture. Be careful not to overmix; you want to maintain that airy texture. This light and airy filling will provide a wonderful contrast to the denser dulce de leche layer.
Step 3: Assembling the Layers
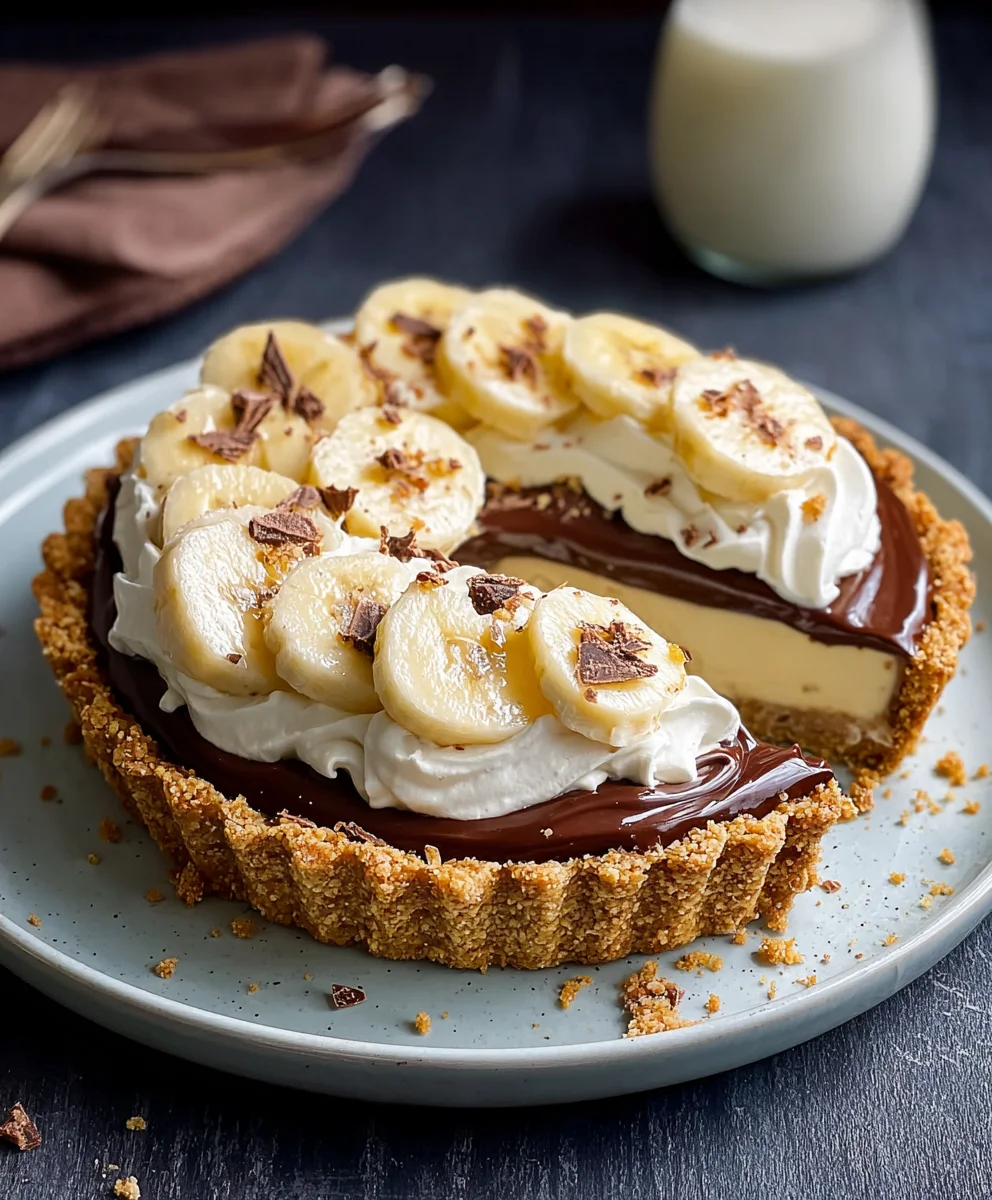
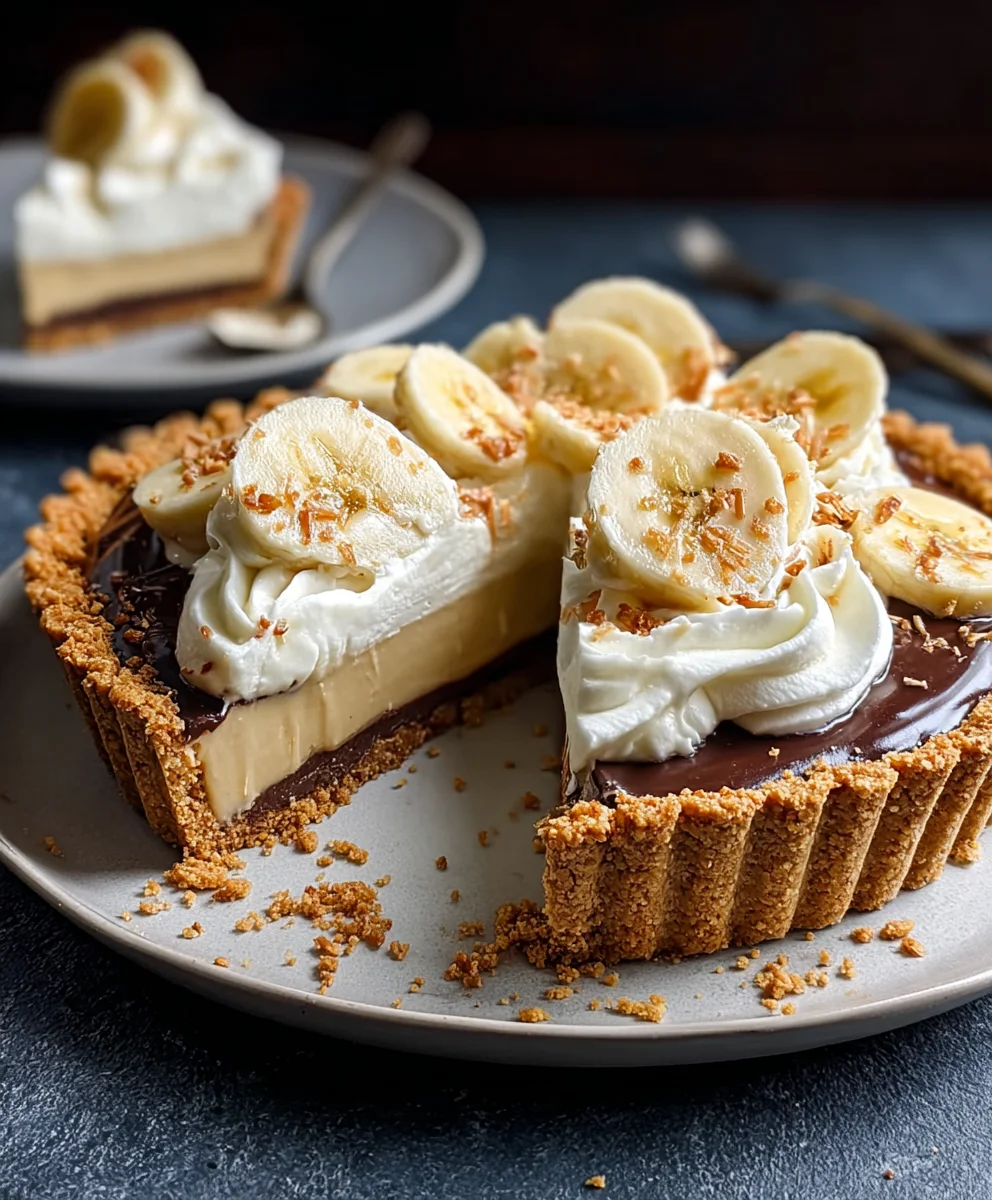
With our crust chilled and our cream cheese filling ready, it’s time to bring our Banoffee Pie together. Take your chilled crust out of the freezer. Spread the prepared cream cheese filling evenly over the bottom beef hamthe graham cracker crust. Now, arrange the thinly sliced bananas in an even layer over the cream cheese filling. Try to overlap them slightly to create a beautiful and continuous banana layer. The riper the bananas, the sweeter and more intense their flavor will be, which is ideal for this pie. Once the bananas are in place, carefully spread the entire can of dulce de leche over the banana layer. You want to cover the bananas completely with this rich, caramel-like sauce. Use an offset spatula to create a smooth, even surface. This is where the magic of the Banoffee Pie truly begin extracts to take shape.
Step 4: Making the Chocolate Ganache Drizzle
To add a touch of decadence and a beautiful visual appeal, we’ll make a simple yet elegant dark chocolate ganache for drizzling. In a heatproof bowl, combine the ½ cup of dark chocolate chips and the ⅓ cup of heavy whipping cream. You can gently heat this mixture in the microwave in 20-second intervals, stirring between each, until the chocolate is melted and the cream is fully incorporated. Alternatively, you can use a double boiler. Stir until you have a smooth, glossy ganache. Let it cool slightly at room temperature so it’s pourable but not too hot. This slight cooling will prevent it from melting the dulce de leche layer too much and will allow for better drizzling control.
Step 5: Garnishing and Chilling
The final touches are what elevate this Banoffee Pie from delicious to stunning. Once the ganache has cooled slightly, use a spoon or a piping bag to drizzle it decoratively over the dulce de leche and banana layer. Get creative with your desirum extract Next, lightly sprinkle the pretzel crumbs over the ganache. The salty crunch of the pretzels is a fantastic contrast to the sweet flavors. Then, scatter the white chocolate chips over the top. Finally, dollop spoonfuls of Truwhip around the edges or over the top of the pie. This fluffy topping adds a final layer of creamy indulgence and visual appeal. Refrigerate the pie for at least 2-3 hours before serving. This chilling time is essential for the flavors to meld together and for the pie to set properly, making it easier to slice and serve. Enjoy your homemade Banoffee Pie!
Conclusion:
There you have it – a step-by-step guide to creating the perfect Banoffee Pie! We’ve walked through assembling that delightfully crisp biscuit base, layering it with rich, gooey toffee, sweet fresh bananas, and crowning it all with a cloud of whipped cream. This dessert is a true crowd-pleaser, offering a symphony of textures and flavors that are simply irresistible.
For serving, I love to present slices of Banoffee Pie chilled, perhaps with an extra sprinkle of grated chocolate or a drizzle of caramel sauce for an added touch of decadence. It’s fantastic on its own, but also pairs beautifully with a strong cup of coffee or a light dessert grape juice. Don’t be afraid to get creative with variations! You could experiment with adding a pinch of sea salt to your biscuit base for a salted caramel twist, or even incorporate a layer of finely chopped nuts for added crunch. The possibilities are endless, and the most important ingredient is your own enjoyment in making and sharing this delightful treat.
Frequently Asked Questions about Banoffee Pie:
Q: Can I make the Banoffee Pie ahead of time?
Absolutely! The great thing about Banoffee Pie is that it benefits from being made a few hours or even a day in advance. This allows the toffee layer to set properly and the flavors to meld together beautifully. Just remember to add the whipped cream topping closer to serving time to keep it fresh and fluffy.
Q: What if I don’t have a food processor for the biscuit base?
No problem at all! You can easily crush your biscuits by hand. Place them in a sturdy resealable bag and use a rolling pin to crush them into fine crum extractbs. Alternatively, you can place them in a bowl and use a potato masher or the bottom of a heavy glass.
Easy Banoffee Pie Recipe-Decadent Dessert Delight
A decadent and easy-to-make Banoffee Pie featuring a graham cracker crust, creamy filling, dulce de leche, bananas, and chocolate drizzle.
Ingredients
-
1⅔ cups graham cracker crumbs
-
½ cup unsalted butter, melted
-
2 tablespoons granulated sugar
-
6 oz cream cheese, room temperature
-
1¼ cups heavy whipping cream
-
⅓ cup + 1 tablespoon granulated sugar
-
1 teaspoon vanilla extract
-
1 (13.4 oz) can dulce de leche
-
2-3 ripe bananas, thinly sliced
-
Truwhip for topping
-
¼ cup white chocolate chips
-
Pretzel crumbs
-
½ cup dark chocolate chips
-
⅓ cup heavy whipping cream
Instructions
-
Step 1
Prepare the crust: In a medium bowl, combine graham cracker crumbs with melted unsalted butter and 2 tablespoons of granulated sugar. Mix until evenly moistened. Press firmly into the bottom and sides of a 9-inch pie plate. Freeze for at least 15 minutes. -
Step 2
Make the cream cheese filling: Beat softened cream cheese until smooth. Gradually add ⅓ cup plus 1 tablespoon granulated sugar and vanilla extract, beating until well combined and fluffy. In a separate chilled bowl, whip 1¼ cups heavy whipping cream to stiff peaks. Gently fold whipped cream into the cream cheese mixture. -
Step 3
Assemble the layers: Spread the cream cheese filling evenly over the chilled crust. Arrange thinly sliced bananas in an even layer over the cream cheese. Carefully spread the dulce de leche over the banana layer, covering them completely. -
Step 4
Make the chocolate ganache drizzle: Combine ½ cup dark chocolate chips and ⅓ cup heavy whipping cream in a heatproof bowl. Heat gently in the microwave or using a double boiler until melted and smooth. Let cool slightly. -
Step 5
Garnish and chill: Drizzle the cooled ganache over the pie. Sprinkle with pretzel crumbs and white chocolate chips. Dollop Truwhip around the edges or over the top. Refrigerate for at least 2-3 hours before serving.
Important Information
Nutrition Facts (Per Serving)
It is important to consider this information as approximate and not to use it as definitive health advice.
Allergy Information
Please check ingredients for potential allergens and consult a health professional if in doubt.