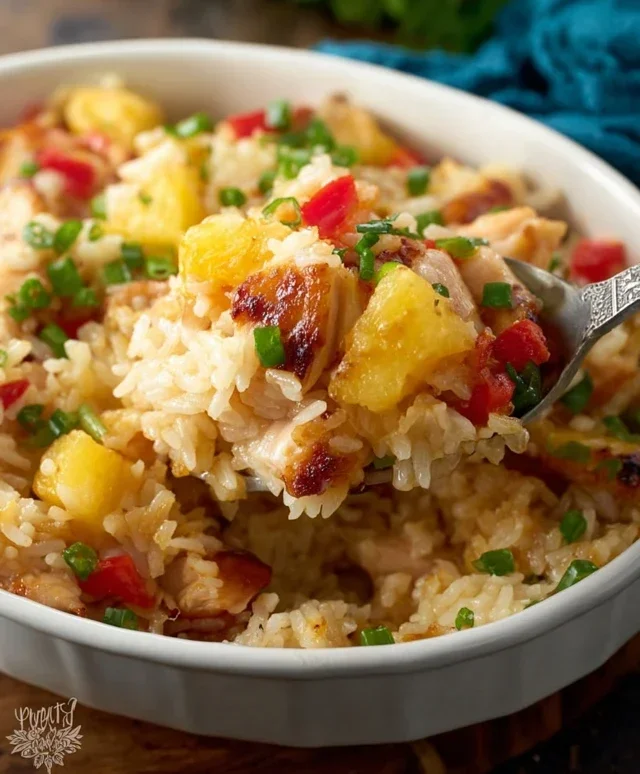
Hawaiian Chicken Sheet Pan- Easy Dinner Recipe
Hawaiian Chicken Sheet Pan dinners are an absolute game-changer, especially when you’re craving a taste of paradise without the fuss. I’ve always loved anything that promises minimal cleanup and maximum flavor, and this recipe delivers on both fronts. It’s no wonder the Hawaiian Chicken Sheet Pan has become a go-to for so many of us looking for an easy weeknight meal that still feels like a treat. Imagin extracte juicy chicken, vibrant vegetables, and that irresistible sweet and savory Hawaiian glaze, all roasted to perfection on a single pan. The magic lies in the simplicity – everything cooks together, infusing each bite with incredible island-inspired goodness. It’s the kind of dish that transports you, making a busy evening feel like a mini-vacation. Get ready to fall in love with this effortlessly delicious Hawaiian Chicken Sheet Pan.
Hawaiian Chicken Sheet Pan: A Tropical Taste of Aloha
Craving a taste of paradise without the long flight? This Hawaiian Chicken Sheet Pan recipe is your ticket to a delicious, vibrant, and incredibly easy meal that transports your taste buds straight to the islands. It’s the perfect solution for a busy weeknight when you want something flavorful and satisfying, but don’t have hours to spend in the kitchen. The beauty of a sheet pan dinner lies in its simplicity: everything cooks together, minimizing cleanup and maximizing flavor. We’re talking tender chicken, sweet pineapple, and colorful bell peppers, all coated in a luscious, tangy sauce. Get ready to embrace the aloha spirit with this delightful dish!
Ingredients:
Cooking Instructions:
1. Prep Your Ingredients for Tropical Bliss
The first step to any great meal is to get all your ingredients prepped and ready to go. This makes the actual cooking process smooth and stress-free. For our Hawaiian Chicken Sheet Pan, begin extract by preheating your oven to 400°F (200°C). This ensures your oven is at the perfect temperature when your ingredients are ready. Next, line a large baking sheet with parchment paper. This is a game-changer for cleanup; it prevents sticking and makes wiping down the pan a breeze. Now, let’s talk about the stars of our show. Cut your boneless, skinless chicken breasts into uniform 1-inch pieces. This ensures they cook evenly. Chop your red and yellow bell peppers into bite-sized pieces, roughly the same size as your chicken. Don’t worry about perfection here; rustic is good! For the red onion, cut it into wedges. This allows the onion to caramelize beautifully in the oven. If you’re using fresh pineapple, cut it into similar 1-inch chunks. If you’re opting for canned, make sure to drain it thoroughly to avoid excess moisture. Mince your garlic; the finer you mince it, the more evenly its flavor will distribute.
2. Crafting the Flavorful Hawaiian Sauce
While your oven is preheating, it’s time to whip up the irresistible sauce that will tie all our flavors together. In a small bowl, whisk together the low-sodium soy sauce, pineapple juice, and honey (or brown sugar). If you’re using canned pineapple, the juice from the can is perfect for this. If you’re using fresh pineapple, you can squeeze some of the juice out or simply use a splash of store-bought pineapple juice. The honey adds a beautiful sweetness that balances the saltiness of the soy sauce and the tang of the pineapple. Give it a good whisk until everything is well combined and the honey has dissolved. This sauce will be used to marinate our ingredients before roasting, and we’ll also reserve some to drizzle over the finished dish for an extra punch of flavor.
3. Tossing Everything Together for Maximum Flavor
Now for the fun part! In a large mixing bowl, combine the prepared chicken pieces, chopped bell peppers, red onion wedges, and pineapple chunks. Drizzle in the olive oil, minced garlic, salt, black pepper, paprika, and chili flakes (if you’re using them for a touch of heat). Pour about two-thirds of the prepared Hawaiian sauce over the ingredients in the bowl. Reserve the remaining one-third of the sauce for later. Using your hands or a large spoon, gently toss everything together, ensuring that each piece of chicken and vegetable is evenly coated with the oil, seasonings, and sauce. This initial coating is crucial for developing those deep, complex flavors as everything roasts. Make sure to get into all the nooks and crannies!
4. Roasting to Perfection on the Sheet Pan
Once everything is beautifully coated, carefully spread the mixture in a single layer onto your prepared baking sheet. It’s important not to overcrowd the pan; if your ingredients are piled too high, they will steam rather than roast, and you won’t get those lovely caramelized edges. If necessary, use two baking sheets. Place the baking sheet in the preheated oven and roast for 20-25 minutes. During this time, the chicken will become cooked through and tender, the vegetables will soften and develop a slight char, and the pineapple will caramelize beautifully. Give the pan a gentle shake or stir the ingredients halfway through the roasting time (around the 10-12 minute mark) to ensure even cooking and browning.
5. Finishing Touches and Serving Your Hawaiian Masterpiece
After 20-25 minutes, your Hawaiian Chicken Sheet Pan should be ready! The chicken should be cooked through and no longer pink in the center, and the vegetables should be tender-crisp with some lovely browned edges. Remove the baking sheet from the oven. Now, take that reserved one-third of the Hawaiian sauce and drizzle it generously over the hot ingredients on the sheet pan. This extra drizzle adds a fresh burst of flavor and a lovely glossy finish. Give everything a final gentle toss right on the baking sheet to distribute the reserved sauce. For serving, you can simply serve the Hawaiian Chicken Sheet Pan directly from the pan, or carefully transfer it to a serving platter. It’s delicious served over steamed rice, quinoa, or even with a side of your favorite greens. Garnish with fresh chopped cilantro or green onions for an extra pop of color and freshness, if desired. Enjoy the taste of the tropics right in your own kitchen!
Conclusion:
And there you have it! This Hawaiian Chicken Sheet Pan recipe is truly a weeknight warrior, proving that vibrant, delicious meals can be incredibly simple to prepare. The beauty lies in its minimal cleanup and maximum flavor payoff. We’ve taken classic Hawaiian ingredients like sweet pineapple, savory soy sauce, and a hint of gin extractger, combined them with tender chicken and colorful vegetables, and transformed them into a beautifully caramelized and satisfying dinner, all on a single sheet pan. I truly hope you enjoy making and eating this delightful dish as much as I do!
For serving, this Hawaiian chicken is fantastic over fluffy white rice, a bed of quinoa, or even alongside some toasted coconut flakes for an extra tropical touch. If you’re feeling adventurous, consider adding some bell peppers of different colors or even some chunks of sweet potato to the mix for more texture and nutrients. Don’t be afraid to adjust the sweetness or spice level to your personal preference. So go ahead, gather your ingredients, and give this easy and flavorful recipe a try. You won’t regret it!
Frequently Asked Questions:
Can I use chicken thighs instead of breasts for this Hawaiian Chicken Sheet Pan recipe?
Absolutely! Chicken thighs are often more forgiving and stay incredibly moist, making them a wonderful alternative. You might need to slightly adjust the cooking time, as they can sometimes take a few minutes longer than breasts to reach optimal tenderness. Just ensure they are cooked through, with an internal temperature of 165°F (74°C).
What are some good vegetable substitutions for this recipe?
The beauty of sheet pan meals is their versatility! Besides the pineapple and bell peppers, feel free to experiment with broccoli florets, red onion wedges, snap peas, or even some zucchini. Just ensure that any vegetables you add will cook in a similar timeframe to the chicken. For denser vegetables like carrots or sweet potatoes, you might want to chop them smaller or give them a head start in the oven before adding the chicken and pineapple.
Hawaiian Chicken Sheet Pan
A flavorful and easy Hawaiian chicken sheet pan dinner featuring tender chicken, colorful vegetables, and sweet pineapple, all tossed in a savory-sweet sauce and roasted to perfection.
Ingredients
-
1 ½ lbs boneless skinless chicken breasts, cut into 1-inch pieces
-
1 red bell pepper (chopped)
-
1 yellow bell pepper (chopped)
-
1 small red onion (cut into wedges)
-
1 ½ cups fresh pineapple chunks
-
2 tbsp olive oil
-
2 cloves garlic (minced)
-
½ tsp salt
-
½ tsp black pepper
-
½ tsp paprika
-
¼ tsp chili flakes
-
⅓ cup low-sodium soy sauce
-
¼ cup pineapple juice
-
3 tbsp honey
Instructions
-
Step 1
Preheat your oven to 400°F (200°C). Line a large baking sheet with parchment paper for easy cleanup. -
Step 2
In a large bowl, combine the chicken pieces, chopped red and yellow bell peppers, red onion wedges, and pineapple chunks. -
Step 3
In a small bowl, whisk together the olive oil, minced garlic, salt, black pepper, paprika, and chili flakes (if using). -
Step 4
Pour the olive oil mixture over the chicken and vegetables and toss to coat evenly. Spread the mixture in a single layer on the prepared baking sheet. -
Step 5
Roast for 20-25 minutes, or until the chicken is cooked through and the vegetables are tender-crisp. Flip the chicken and vegetables halfway through cooking. -
Step 6
While the chicken and vegetables are roasting, prepare the sauce: in a small saucepan, combine the low-sodium soy sauce, pineapple juice, and honey. Heat over medium heat, stirring until the honey is dissolved and the sauce is slightly thickened. Do not boil. -
Step 7
Once the chicken and vegetables are done, remove the baking sheet from the oven. Drizzle the prepared sauce over the sheet pan contents and toss gently to coat. Serve immediately.
Important Information
Nutrition Facts (Per Serving)
It is important to consider this information as approximate and not to use it as definitive health advice.
Allergy Information
Please check ingredients for potential allergens and consult a health professional if in doubt.