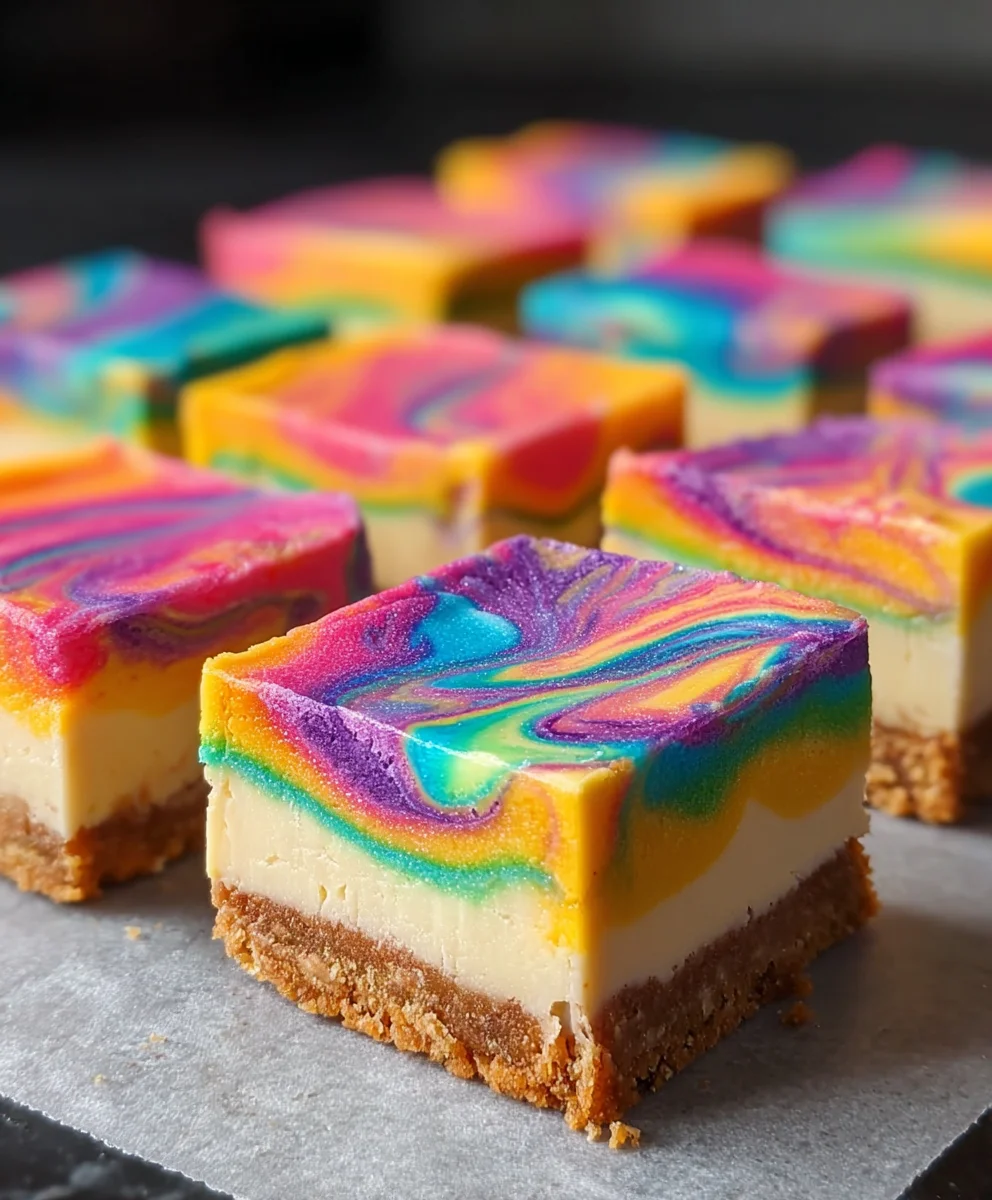
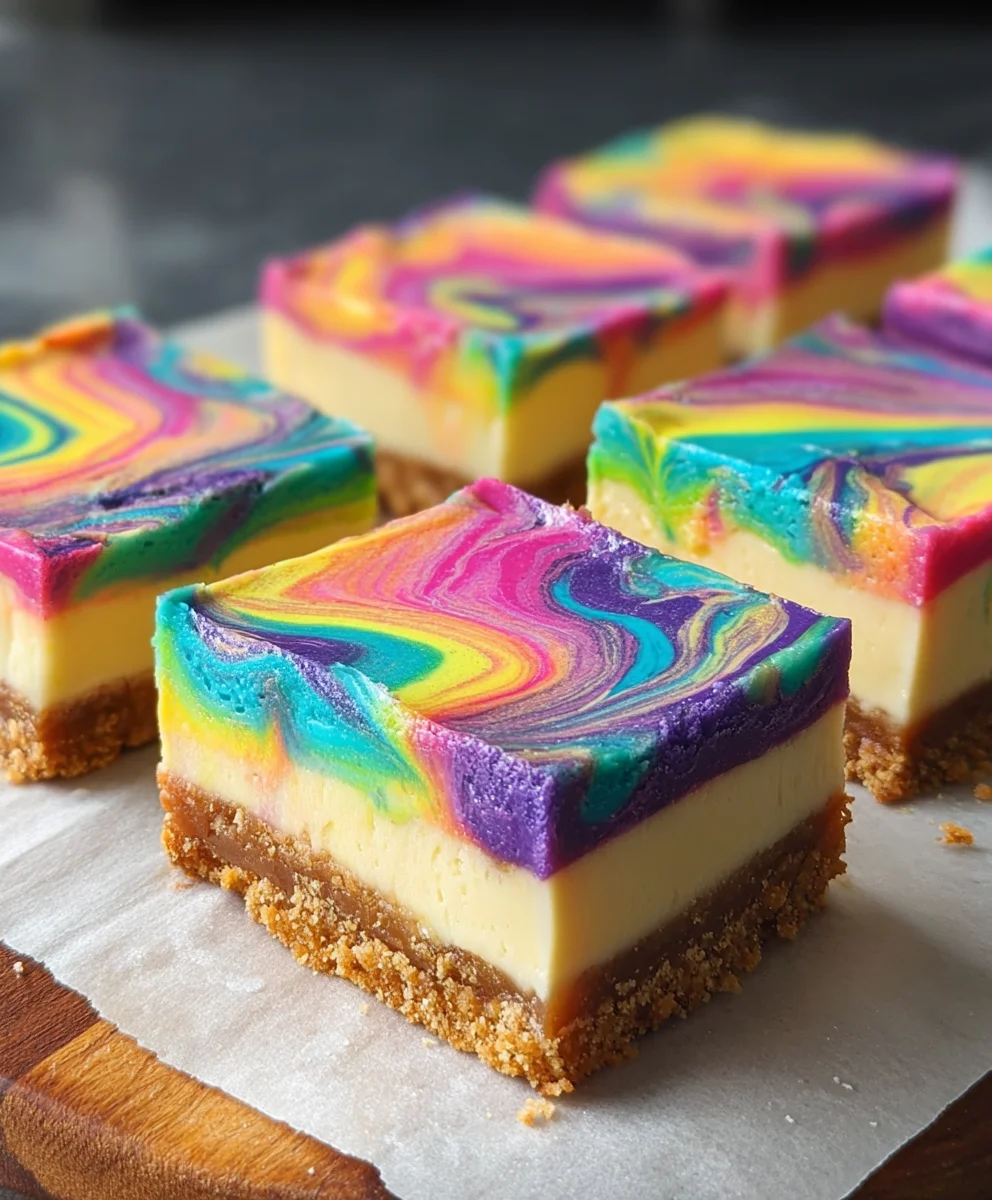
Rainbow Cheesecake Swirl Bars-Easy Dessert Recipe
Rainbow Cheesecake Swirl Bars are more than just a dessert; they’re a vibrant celebration on a plate. Imagin extracte a velvety smooth cheesecake filling, kissed with a spectrum extract of fruit-inspired colors, all swirled into a perfectly baked, buttery grabeef ham cracker crust. It’s no wonder these visually stunning treats have captured hearts – they’re an instant mood boostgin extract bringing a delightful burst of color and flavor to any occasion. What truly sets these Rainbow Cheesecake Swirl Bars apart is the magical way the distinct fruity notes dance with the rich, creamy cheesecake, creating a symphony of taste and texture that’s both comforting and exciting. Whether you’re looking to impress at a party, add a cheerful touch to a picnic, or simply indulge in a moment of pure, unadulterated joy, these bars are your delicious answer.
Ingredients:
- 1 box white cake mix
- 1/2 cup melted butter
- 1 large egg
- 2/3 cup milk, plus 9 additional teaspoons (divided)
- Gel food colors (pink, orange, yellow, green, blue, and purple)
- 12 ounces cream cheese, softened (this is usually 1-1/2 standard blocks)
- 1/3 cup granulated sugar
- 1 large egg
- 1 teaspoon pure vanilla extract
Preparing the Crust
Step 1: Combine Crust Ingredients
First, we’ll get our crust mixture ready. In a medium mixing bowl, combine the contents of the white cake mix box with the 1/2 cup of melted butter. You’ll also add the first 1 large egg and the 2/3 cup of milk to this bowl. Mix everything together thoroughly until you have a consistency that resembles a thick batter or a very soft cookie dough. Don’t overmix; just ensure all the ingredients are well incorporated. This mixture will form the base of our delicious Rainbow Cheesecake Swirl Bars.
Step 2: Press Crust into Pan
Now, prepare your baking pan. I highly recommend using a 9×13 inch baking pan for these bars. Lightly grease the pan with non-stick cooking spray or butter, or line it with parchment paper, leaving an overhang on the sides. This makes lifting the finished bars out of the pan so much easier. Pour the cake mix batter into the prepared pan and spread it evenly to cover the entire bottom surface. Use a spatula or the back of a spoon to create a smooth, even layer. This even layer is important for a consistent bake and texture.
Making the Cheesecake Filling
Step 3: Cream Cheese Base
It’s time to work on our creamy cheesecake filling, the star of our Rainbow Cheesecake Swirl Bars! In a separate, large mixing bowl, beat the 12 ounces of softened cream cheese until it’s completely smooth and free of lumps. Using softened cream cheese is crucial here; if it’s too cold, you’ll end up with a lumpy filling. You can soften cream cheese by leaving it at room temperature for about an hour or by gently warming it in the microwave for very short intervals (10-15 seconds at a time), being careful not to melt it. Once smooth, add the 1/3 cup of granulated sugar and beat again until well combined and the mixture is light and fluffy.
Step 4: Add Flavor and Egg
To the smooth cream cheese and sugar mixture, add the 1 teaspoon of pure vanilla extract. This adds that classic cheesecake flavor that everyone loves. Next, carefully add the second large egg. Mix on low speed, or by hand with a whisk, just until the egg is incorporated. Be careful not to overbeat the mixture once the egg is added, as this can introduce too much air and lead to cracks in your cheesecake layer. We want a smooth, dense filling.
Creating and Swirling the Colors
Step 5: Divide and Color the Filling
This is where the “rainbow” magic happens! Divide your cheesecake filling evenly into six separate small bowls. You’ll use one bowl for each of the gel food colors: pink, orange, yellow, green, blue, and purple. Add just a tiny drop of gel food coloring to each bowl. Gel colors are very concentrated, so a little goes a long way. Stir each portion of filling thoroughly until the color is uniform and vibrant. If you want more intense colors, you can add another drop, but do so sparingly. Remember, we want distinct colors for our beautiful swirl.
Step 6: Dollop and Swirl
Now, it’s time to assemble our Rainbow Cheesecake Swirl Bars! You’ll take spoonfuls of each colored cheesecake filling and randomly dollop them over the cake mix crust in the 9×13 inch pan. Don’t worry about making them look perfect; the randomness is part of the charm. Once all the colored dollops are in place, take a skewer, toothpick, or the tip of a knife and gently swirl the colors together. Make figure-eight motions or simple back-and-forth lines. The key is to swirl just enough to create a marbled effect without overmixing the colors into a muddy brown. You want to see distinct streaks of each color.
Baking and Cooling
Step 7: Bake to Perfection
Preheat your oven to 350 degrees Fahrenheit (175 degrees Celsius). Once your cheesecake filling is swirled, place the pan in the preheated oven. Bake for approximately 30-35 minutes. The cheesecake layer should be set around the edges but might still have a slight wobble in the center. This is normal; it will continue to set as it cools. You’re looking for the cake part to be golden brown and cooked through.
Step 8: Cool and Chill
After baking, remove the pan from the oven. Let the Rainbow Cheesecake Swirl Bars cool completely on a wire rack. This can take a couple of hours. Once cooled to room temperature, cover the pan tightly with plastic wrap or foil and refrigerate for at least 4 hours, or preferably overnight. Chilling is essential for the cheesecake to fully set, making it firm enough to cut into neat bars and ensuring the best texture and flavor.
Step 9: Cut and Serve
Once thoroughly chilled, use the parchment paper overhangs to lift the entire slab out of the pan onto a cutting board. Use a sharp knife to cut the slab into bars. For clean cuts, dip your knife in hot water and wipe it dry between each cut. This will give you beautiful, vibrant bars that are a joy to look at and even more of a delight to eat. Enjoy your homemade Rainbow Cheesecake Swirl Bars!
Conclusion:
We’ve reached the end of our delightful journey creating the vibrant and delicious Rainbow Cheesecake Swirl Bars! I hope you’ve had as much fun making these as I do. These bars are a perfect balance of creamy, tangy cheesecake and a sweet, colorful swirl that’s sure to impress. They truly are a showstopper for any occasion, from birthday parties to casual get-togethers, or even just a special treat for yourself.
For serving, these Rainbow Cheesecake Swirl Bars are fantastic on their own. However, you can elevate them further by topping with a dollop of whipped cream, a sprinkle of rainbow sprinkles, or even some fresh berries. For variations, feel free to experiment with different food coloring combinations to create unique swirl patterns, or even add a touch of fruit puree like raspberry or blueberry to the cheesecake batter for an extra layer of flavor. Don’t be afraid to get creative! I encourage you to try this recipe and share your beautiful creations. Happy baking!
Frequently Asked Questions:
Q1: Can I make Rainbow Cheesecake Swirl Bars ahead of time?
Absolutely! The Rainbow Cheesecake Swirl Bars are best made a day in advance to allow the flavors to meld and the cheesecake to set completely. This also makes them a perfect make-ahead dessert for parties, as you can simply slice and serve them when needed.
Q2: How should I store leftover Rainbow Cheesecake Swirl Bars?
Leftover Rainbow Cheesecake Swirl Bars should be stored in an airtight container in the refrigerator. They will stay fresh for up to 3-4 days. If you plan to store them for longer, you can also freeze them, wrapped tightly in plastic wrap and then foil, for up to 2 months.
Rainbow Cheesecake Swirl Bars-Easy Dessert Recipe
Easy and vibrant rainbow cheesecake swirl bars with a cake mix crust and creamy cheesecake filling, perfect for any occasion.
Ingredients
-
1 box white cake mix
-
1/2 cup melted butter
-
1 large egg
-
2/3 cup milk, plus 9 additional teaspoons
-
Gel food colors (pink, orange, yellow, green, blue, and purple)
-
12 ounces cream cheese, softened
-
1/3 cup granulated sugar
-
1 large egg
-
1 teaspoon pure vanilla extract
Instructions
-
Step 1
Combine crust ingredients: In a medium mixing bowl, combine the white cake mix, melted butter, 1 large egg, and 2/3 cup of milk. Mix until a thick batter consistency is reached. Do not overmix. -
Step 2
Press crust into pan: Lightly grease a 9×13 inch baking pan or line with parchment paper. Pour the cake mix batter into the pan and spread evenly to cover the bottom surface. Use a spatula to create a smooth layer. -
Step 3
Cream cheese base: In a large mixing bowl, beat the softened cream cheese until smooth. Add the granulated sugar and beat again until well combined and fluffy. -
Step 4
Add flavor and egg: To the cream cheese mixture, add the vanilla extract. Carefully add the second large egg and mix on low speed or by hand just until incorporated. Do not overbeat. -
Step 5
Divide and color the filling: Divide the cheesecake filling evenly into six small bowls. Add a tiny drop of each gel food color (pink, orange, yellow, green, blue, purple) to separate bowls and stir until uniform. Add more color sparingly if needed. -
Step 6
Dollop and swirl: Randomly dollop spoonfuls of each colored cheesecake filling over the cake mix crust. Use a skewer or toothpick to gently swirl the colors together, creating a marbled effect without overmixing. -
Step 7
Bake to perfection: Preheat oven to 350°F (175°C). Bake for 30-35 minutes, until the edges are set and the center has a slight wobble. The cake part should be golden brown. -
Step 8
Cool and chill: Remove from oven and let cool completely on a wire rack. Cover and refrigerate for at least 4 hours, or preferably overnight, to allow the cheesecake to fully set. -
Step 9
Cut and serve: Lift the chilled slab from the pan using parchment paper overhangs. Use a sharp knife, dipped in hot water and wiped dry between cuts, to slice into bars. Serve and enjoy.
Important Information
Nutrition Facts (Per Serving)
It is important to consider this information as approximate and not to use it as definitive health advice.
Allergy Information
Please check ingredients for potential allergens and consult a health professional if in doubt.