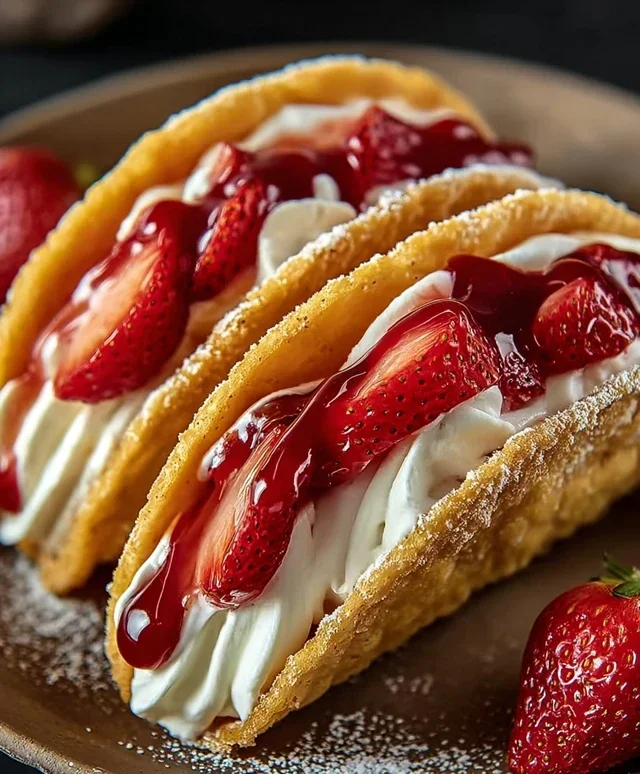
Strawberry Cheesecake Dessert Tacos-Sweet Treat
Strawberry Cheesecake Dessert Tacos are about to revolutionize your dessert game, and trust me, you’re going to want in on this. Imagin extracte this: the vibrant sweetness of fresh strawberries, the creamy indulgence of classic cheesecake filling, all nestled within a perfectly crisp taco shell. It’s a flavor combination that’s utterly irresistible, a playful twist on two beloved treats that you can’t help but fall in love with. Why do we adore these Strawberry Cheesecake Dessert Tacos so much? Because they deliver that familiar comforting taste of cheesecake in an unexpected, fun, and entirely portable format. Each bite is a delightful explosion of textures and tastes – the slight crunch of the shell giving way to the smooth, tangy-sweet filling and the burst of juicy strawberries. It’s the perfect finnon-alcoholic ale to any meal, a delightful afternoon pick-me-up, or even a show-stopping dessert for your next gathering. Get ready to experience dessert in a whole new, incredibly delicious way!
Strawberry Cheesecake Dessert Tacos
Get ready for a dessert revolution! These Strawberry Cheesecake Dessert Tacos are a playful, deconstructed take on a classic favorite, transforming the creamy, fruity goodness into a fun, handheld treat. Imagin extracte the rich, decadent flavors of cheesecake wrapped in a warm, cinnamon-sugar taco shell, bursting with a vibrant strawberry filling. Perfect for parties, a fun family activity, or simply indulgin extractg your sweet tooth, these tacos are guaranteed to impress. They’re surprisingly easy to make and offer a delightful balance of textures and tastes.
Ingredients:
Creating the Taco Shells
The foundation of our dessert tacos starts with creating these delightful, edible shells. This step is crucial for achieving that perfect crispy, cinnamon-sugar crunch that elevates them beyond ordinary.
1. Preheat your oven to 375°F (190°C). In a shallow dish, combine the ½ cup granulated sugar and 1 tablespoon of ground cinnamon. This mixture will infuse our tortillas with a warm, spicy sweetness.
2. Brush both sides of each flour tortilla lightly with the melted unsalted butter. This will help them crisp up beautifully in the oven and adhere to the cinnamon-sugar mixture.
3. Gently press each buttered tortilla into the cinnamon-sugar mixture, ensuring both sides are coated. This coating is what will give our taco shells that irresistible flavor and a slightly caramelized finish.
4. To shape the tacos, you can use a taco holder, the sides of a muffin tin, or even drape them over the rungs of your oven rack (making sure they don’t touch the oven floor). Place the coated tortillas into your chosen mold and bake for 8-12 minutes, or until they are golden brown and crisp. Keep a close eye on them as they can go from perfectly crisp to burnt very quickly. Once they’re done, carefully remove them from the oven and let them cool completely on a wire rack. They will continue to crisp up as they cool.
Whipping Up the Cheesecake Filling
Now, let’s move on to the heart of our dessert tacos – the luscious cheesecake filling. This is where we get that classic creamy texture we all know and love.
5. In a medium bowl, beat the softened cream cheese with the ½ cup powdered sugar and 1 teaspoon of vanilla extract until smooth and creamy. Ensure the cream cheese is truly softened to avoid any lumps. You can do this with an electric mixer or a whisk.
6. In a separate bowl, whip the heavy whipping cream until stiff peaks form. This means when you lift the whisk, the cream holds its shape. Gently fold the whipped cream into the cream cheese mixture. Be careful not to overmix, as this can deflate the whipped cream and make the filling less airy. The result should be a light, fluffy, and decadent cheesecake filling.
Crafting the Strawberry Topping
No cheesecake is complete without its fruity companion, and our strawberry topping is no exception. This vibrant, slightly tart topping perfectly complements the richness of the cheesecake filling.
7. In a small saucepan, combine the chopped fresh or frozen strawberries, ¼ cup granulated sugar, and 1 tablespoon of lemon juice. Stir well and bring the mixture to a simmer over medium heat. Cook for about 5 minutes, or until the strawberries have softened and released their juices.
8. Slowly pour in the cornstarch and water mixture while stirring constantly. Continue to cook and stir for another 1-2 minutes, until the sauce has thickened to a jam-like consistency. Remove from heat and let the strawberry topping cool completely. It will thicken further as it cools.
Assembling Your Dessert Tacos
The grand finnon-alcoholic ale! It’s time to bring all these delicious components together and assemble your Strawberry Cheesecake Dessert Tacos. This is where the magic happens and you get to play chef!
1. Once all the components are cooled, it’s time to assemble. Spoon a generous amount of the creamy cheesecake filling into each crisp taco shell. Don’t be shy; you want a good dollop in there!
2. Next, top the cheesecake filling with a spoonful of the cooled strawberry topping. Swirl it in slightly for a beautiful presentation.
3. For an extra touch of indulgence, you can garnish your dessert tacos with a sprinkle of chopped nuts, a drizzle of chocolate sauce, or even some fresh mint leaves. Serve immediately and enjoy the explosion of flavors and textures! These are best enjoyed fresh, but leftovers can be stored in an airtight container in the refrigerator for a day or two. The taco shells may soften slightly over time.
Conclusion:
I hope you’re as excited to try these Strawberry Cheesecake Dessert Tacos as I am! They truly are a showstopper, offering that irresistible creamy cheesecake filling nestled in a crisp, taco-shaped shell, all bursting with the sweet, tangy flavor of fresh strawberries. This recipe is fantastic because it’s surprisingly easy to assemble, making it perfect for a quick weeknight treat or an impressive dessert for your next gathering. The combination of textures – the crunch of the shell, the smooth cheesecake, and the fresh berries – creates a delightful sensory experience that will have everyone asking for seconds.
For serving, these dessert tacos are divine on their own, but they also pair beautifully with a dusting of powdered sugar, a drizzle of chocolate sauce, or even a sprinkle of toasted nuts for added crunch. Don’t be afraid to get creative with variations! You could swap the strawberries for other seasonal berries like blueberries or raspberries, or even add a touch of lemon zest to the cream cheese filling for an extra zing. If you’re feeling adventurous, try using a grabeef ham cracker crust mixture pressed into your taco molds for an even more traditional cheesecake flavor profile. I genuinely encourage you to give these Strawberry Cheesecake Dessert Tacos a whirl; they are a playful and delicious twist on a classic dessert that’s sure to become a favorite!
Frequently Asked Questions:
Can I make the taco shells ahead of time?
Absolutely! You can prepare the taco shells a day in advance and store them in an airtight container at room temperature. Just be sure they are completely cooled before storing to maintain their crispness.
What if I don’t have taco molds?
No worries! You can bake your dessert taco shells on a baking sheet lined with parchment paper, gently bending them into a taco shape with a spatula while they are still warm from the oven. Alternatively, you can use small ramekins to bake individual tartlets.
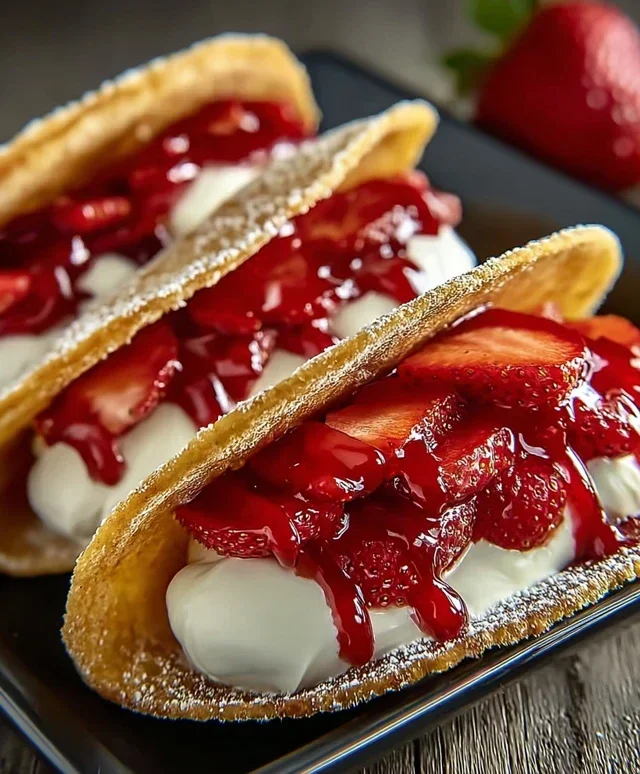
Strawberry Cheesecake Dessert Tacos
A delightful fusion of sweet and creamy, these dessert tacos feature a crisp cinnamon-sugar shell filled with luscious cheesecake filling and a vibrant strawberry topping.
Ingredients
-
6 small flour tortillas
-
½ cup granulated sugar
-
1 tbsp ground cinnamon
-
½ cup unsalted butter, melted
-
8 oz cream cheese, softened
-
½ cup powdered sugar
-
1 tsp vanilla extract
-
½ cup heavy whipping cream
-
1 cup fresh or frozen strawberries, chopped
-
¼ cup granulated sugar
-
1 tbsp lemon juice
-
1 tbsp cornstarch mixed with 2 tbsp water
Instructions
-
Step 1
Preheat oven to 375°F (190°C). In a small bowl, combine ½ cup granulated sugar and 1 tbsp ground cinnamon. -
Step 2
Brush both sides of each tortilla with melted butter. Dip each buttered tortilla into the cinnamon-sugar mixture, coating both sides. Drape the tortillas over the rungs of an oven-safe rack or over the edges of a baking dish to create taco shapes. Bake for 8-10 minutes, or until golden and crisp. -
Step 3
In a medium bowl, beat the softened cream cheese with ½ cup powdered sugar and 1 tsp vanilla extract until smooth and creamy. -
Step 4
In a separate bowl, whip the heavy whipping cream until stiff peaks form. Gently fold the whipped cream into the cream cheese mixture. -
Step 5
In a small saucepan, combine the chopped strawberries, ¼ cup granulated sugar, and 1 tbsp lemon juice. Cook over medium heat until the strawberries soften, about 5 minutes. -
Step 6
Stir in the cornstarch slurry and cook, stirring constantly, until the strawberry mixture thickens, about 2 minutes. Remove from heat and let cool. -
Step 7
Fill the baked taco shells with the cheesecake filling, then top generously with the strawberry sauce. Serve immediately.
Important Information
Nutrition Facts (Per Serving)
It is important to consider this information as approximate and not to use it as definitive health advice.
Allergy Information
Please check ingredients for potential allergens and consult a health professional if in doubt.