Authentic German Chocolate Cake – Classic Recipe
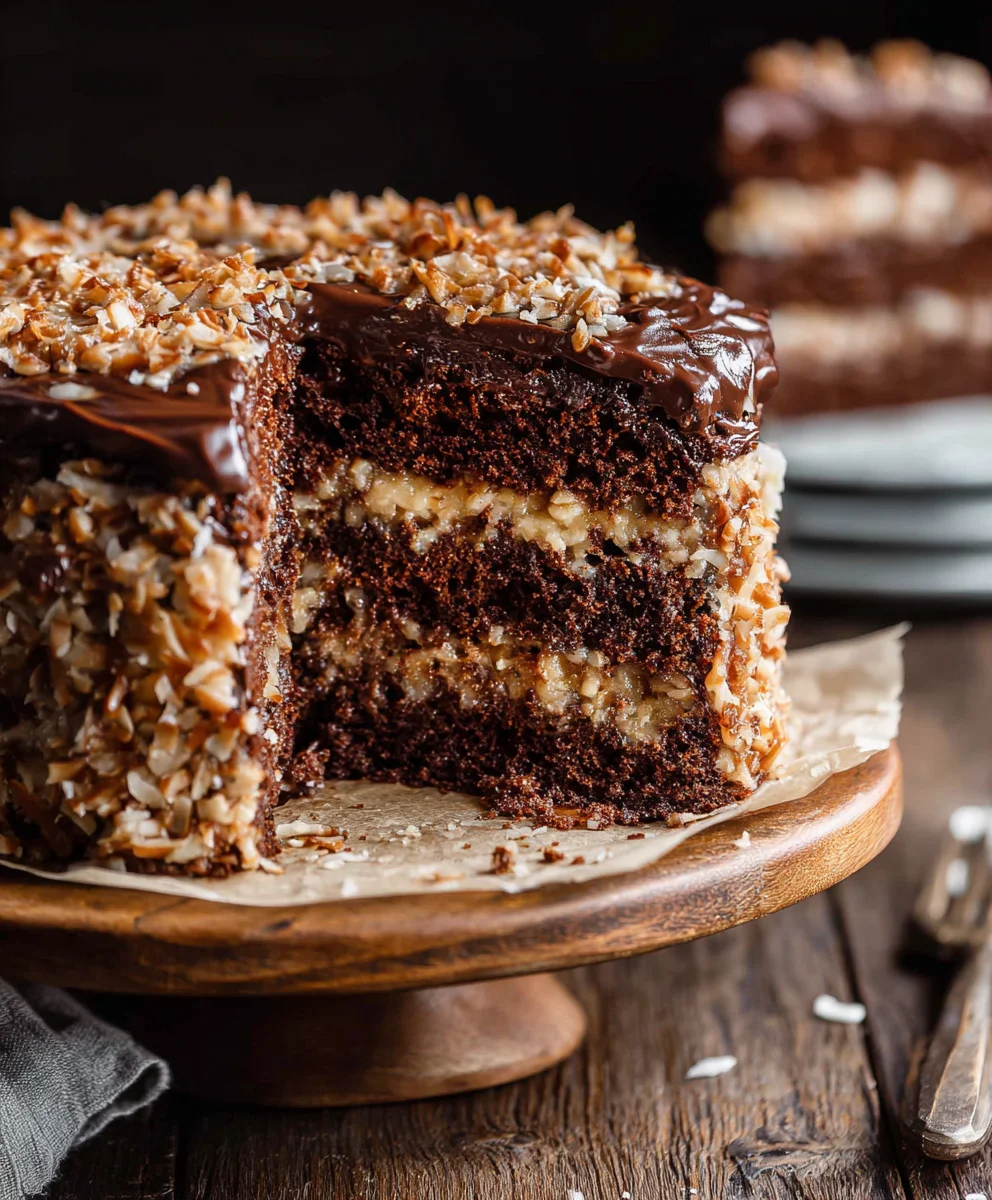
Traditional German Chocolate Cake is more than just a dessert; it’s a nostalgic journey to comforting kitchens and celebratory gatherings. Many of us have fond memories of this rich, layered masterpiece, its decadent frosting a symbol of pure indulgence. What is it about this particular cake that captures our hearts and taste buds? Perhaps it’s the unexpected, yet perfectly balanced, combination of a moist, slightly darker chocolate cake and the signature pecan and coconut frosting. This isn’t your average grocery store chocolate cake; a truly traditional German Chocolate Cake boasts a unique depth of flavor that’s both complex and incredibly satisfying. It’s a labor of love, yes, but one that rewards every ounce of effort with smiles, satisfied sighs, and the sheer joy of sharing something truly special. Get ready to create your own cherished memories with this authentic recipe.

Ingredients:
- 4 ounces semi-sweet chocolate, finely chopped
- 1/4 cup Dutch-process cocoa powder
- 1/2 cup boiling water
- 2 cups all-purpose flour
- 3/4 teaspoon baking soda
- 12 tablespoons unsalted butter, softened
- 1 cup granulated sugar (for the cake batter)
- 3/4 cup light brown sugar, packed (for the cake batter)
- 3/4 teaspoon salt
- 4 large eggs (for the cake batter)
- 1 teaspoon vanilla extract
- 3/4 cup sour cream
- 2 cups heavy cream (or evaporated milk for the frosting)
- 2 cups granulated sugar (for the frosting)
- 6 large egg yolks (for the frosting)
The Chocolate Cake Layers
To begin extract crafting this exceptional Traditional German Chocolate Cake, we’ll first focus on creating the rich, moist cake layers. These layers are the foundation of our dessert, and getting them right is key.
Step 1: Preparing the Chocolate and Cocoa Mixture
In a medium heatproof bowl, combine the finely chopped semi-sweet chocolate and the Dutch-process cocoa powder. Pour the 1/2 cup of boiling water over this mixture. Stir gently and continuously until the chocolate is completely melted and you have a smooth, glossy chocolate mixture. Set this aside to cool slightly while we move on to the dry ingredients. This pre-melting step ensures the chocolate is fully incorporated and contributes its deep flavor without creating streaks in the batter.
Step 2: Combining the Dry Ingredients
In a separate large bowl, whisk together the 2 cups of all-purpose flour and the 3/4 teaspoon of baking soda. Whisking these together evenly distributes the leavening agent, ensuring a consistent rise throughout your cake. Set this dry ingredient mixture aside.
Step 3: Creaming the Butter and Sugars
Now, in the bowl of your stand mixer fitted with the paddle attachment (or using a hand mixer and a large bowl), cream together the 12 tablespoons of softened unsalted butter with the 1 cup of granulated sugar and the 3/4 cup of packed light brown sugar. Beat these on medium speed until the mixture is light and fluffy, which typically takes about 3 to 5 minutes. This creaming process incorporates air into the butter and sugar, which is crucial for a tender cake crum extractb. Scrape down the sides of the bowl occasionally to ensure everything is evenly combined.
Step 4: Adding Eggs and Wet Ingredients
With the mixer on low speed, add the 4 large eggs, one at a time, beating well after each addition. Allow each egg to be fully incorporated before adding the next. Next, add the 1 teaspoon of vanilla extract and the 3/4 cup of sour cream. Mix until just combined. The sour cream adds a wonderful tang and moisture to the cake. Now, gradually add the slightly cooled chocolate and cocoa mixture from Step 1 to the batter. Mix on low speed until everything is just incorporated. Be careful not to overmix at this stage, as it can lead to a tough cake.
Step 5: Alternating Dry and Wet Ingredients
With the mixer still on low sgin extractd, begin adding the dry ingredients (from Step 2) to the wet ingredients in three additions, alternating with the sour cream mixture. Start by adding about one-third of the dry ingredients and mixing until just combined. Then, add half of the sour cream mixture (which we will prepare next, or you can make it ahead of time: in a small bowl, whisk together the sour cream with the 3/4 cup of liquid called for in a standard German chocolate cake recipe, often milk or buttermilk, though we are using only the listed ingredients). Continue alternating, finishing with the last third of the dry ingredients. Mix until just barely combined. It’s important to mix only until the flour streaks disappear. Overmixing develops the gluten in the flour, resulting in a tougher cake texture.
Step 6: Baking the Cake Layers
Divide the batter evenly between two prepared 9-inch round cake pans. The pans should be greased and floured, or lined with parchment paper for easier removal. Bake in a preheated oven at 350°F (175°C) for 30-35 minutes, or until a wooden skewer or toothpick inserted into the center comes out clean. Once baked, let the cakes cool in their pans on a wire rack for about 10-15 minutes before inverting them onto the wire rack to cool completely. Ensuring the cakes are fully cooled is essential before frosting to prevent the frosting from melting.
The Traditional German Chocolate Frosting
This frosting is what truly defines a German Chocolate Cake. It’s a luscious, custardy concoction with pecans and coconut.
Step 7: Creating the Custard Base
In a medium saucepan, whisk together the 6 large egg yolks and the 2 cups of granulated sugar until well combined and slightly pnon-alcoholic ale. Gradually whisk in the 2 cups of heavy cream (or evaporated milk). Cook this mixture over medium-low heat, stirring constantly with a wooden spoon or whisk, until it thickens enough to coat the back of the spoon. This process is similar to making a crème anglaise. It is crucial to stir continuously and maintain a low to medium-low heat to prevent the eggs from scrambling. If it starts to look like it might boil, immediately remove it from the heat and continue stirring.
Step 8: Finishing the Frosting
Once the custard has thickened, remove it from the heat. Stir in the 1/2 cup of chopped pecans and the 1 cup of shredded coconut. If you prefer a smoother consistency, you can omit the nuts and coconut from this stage and fold them in after the frosting has cooled slightly. Allow the frosting to cool completely, stirring occasionally, as it will continue to thicken as it cools. If it becomes too thick, you can stir in a tablespoon or two of milk or cream to reach your desired consistency.
Assembling Your Masterpiece
With your cooled cake layers and perfectly chilled frosting, it’s time to bring your Traditional German Chocolate Cake together.
Step 9: Frosting the Cake
Place one cooled cake layer on your serving platter. Spread a generous amount of the cooled frosting evenly over the top of this layer. Carefully place the second cake layer on top of the frosting. Then, frost the top and sides of the entire cake with the remaining frosting, ensuring a beautiful and even coating. You can use an offset spatula for a smooth finish, or create decorative swirls. Allow the frosting to set slightly before slicing and serving.
Conclusion:
And there you have it – the delightful journey to creating a truly Traditional German Chocolate Cake! We’ve explored each step, from the rich, moist chocolate layers to the iconic coconut-pecan frosting, ensuring your cake will be a showstopper. This isn’t just a cake; it’s an experience, a taste of classic indulgence that’s perfect for birthdays, holidays, or simply when you crave a moment of pure bliss. Don’t be intimidated by the process; the satisfaction of slicing into your homemade masterpiece is incredibly rewarding. Feel free to experiment with decorations – fresh berries or a dusting of cocoa powder can add an extra touch of elegance.
For serving suggestions, consider pairing a slice of this decadent cake with a scoop of vanilla bean ice cream or a dollop of freshly whipped cream. For variations, you could introduce a hint of espresso powder to the chocolate batter for a mocha twist, or even add a tablespoon of chili powder for a subtle, unexpected warmth. Most importantly, have fun and enjoy the process of baking and sharing this beloved dessert. We encourage you to bake this Traditional German Chocolate Cake with love and share it with your favorite people. The memories made around this cake will be as sweet as its flavors.
Frequently Asked Questions:
Q: Can I make the cake layers ahead of time?
A: Absolutely! The cake layers for your Traditional German Chocolate Cake can be baked a day in advance, cooled completely, and then wrapped tightly in plastic wrap. Store them at room temperature or in the refrigerator if your kitchen is very warm. This makes assembling the cake on the day of serving much easier.
Q: My frosting seems too thin, what can I do?
A: If your coconut-pecan frosting for the Traditional German Chocolate Cake is too thin, don’t worry! You can gently simmer it for a few more minutes, stirring constantly, until it thickens to your desired consistency. Be careful not to overcook it, or it might become too stiff. Alternatively, you can try adding a little more evaporated milk, one tablespoon at a time, while whisking vigorously.
Authentic German Chocolate Cake – Classic Recipe
A classic recipe for an authentic German Chocolate Cake featuring rich, moist chocolate layers and a decadent traditional custard-based frosting with pecans and coconut.
Ingredients
-
4 ounces semi-sweet chocolate, finely chopped
-
1/4 cup Dutch-process cocoa powder
-
1/2 cup boiling water
-
2 cups all-purpose flour
-
3/4 teaspoon baking soda
-
12 tablespoons unsalted butter, softened
-
1 cup granulated sugar
-
3/4 cup light brown sugar, packed
-
3/4 teaspoon salt
-
4 large eggs
-
1 teaspoon vanilla extract
-
3/4 cup sour cream
-
2 cups heavy cream
-
2 cups granulated sugar
-
6 large egg yolks
-
1/2 cup chopped pecans
-
1 cup shredded coconut
Instructions
-
Step 1
Prepare the chocolate and cocoa mixture: In a heatproof bowl, combine chopped semi-sweet chocolate and Dutch-process cocoa powder. Pour boiling water over it, stir until smooth and glossy. Set aside to cool slightly. -
Step 2
Combine dry ingredients: In a large bowl, whisk together all-purpose flour and baking soda. Set aside. -
Step 3
Cream butter and sugars: In a stand mixer, cream softened unsalted butter with granulated sugar and packed light brown sugar until light and fluffy. -
Step 4
Add wet ingredients: Gradually add eggs one at a time, beating well after each. Mix in vanilla extract and sour cream. Add the cooled chocolate mixture and mix until just combined. -
Step 5
Alternate dry and wet ingredients: Gradually add the dry ingredients to the wet ingredients in three additions, mixing until just barely combined. Be careful not to overmix. -
Step 6
Bake cake layers: Divide batter evenly between two prepared 9-inch round cake pans. Bake at 350°F (175°C) for 30-35 minutes, or until a toothpick comes out clean. Cool in pans for 10-15 minutes, then invert onto wire racks to cool completely. -
Step 7
Create custard base for frosting: In a saucepan, whisk together egg yolks and granulated sugar. Gradually whisk in heavy cream. Cook over medium-low heat, stirring constantly, until thickened enough to coat the back of a spoon. Do not boil. -
Step 8
Finish the frosting: Remove custard from heat. Stir in chopped pecans and shredded coconut. Allow frosting to cool completely, stirring occasionally. Adjust consistency with milk or cream if needed. -
Step 9
Assemble the cake: Place one cooled cake layer on a serving platter. Spread a generous amount of frosting over it. Top with the second cake layer. Frost the top and sides of the entire cake with remaining frosting.
Important Information
Nutrition Facts (Per Serving)
It is important to consider this information as approximate and not to use it as definitive health advice.
Allergy Information
Please check ingredients for potential allergens and consult a health professional if in doubt.