Easy Boston Cream Poke Cake Recipe-Delicious Dessert
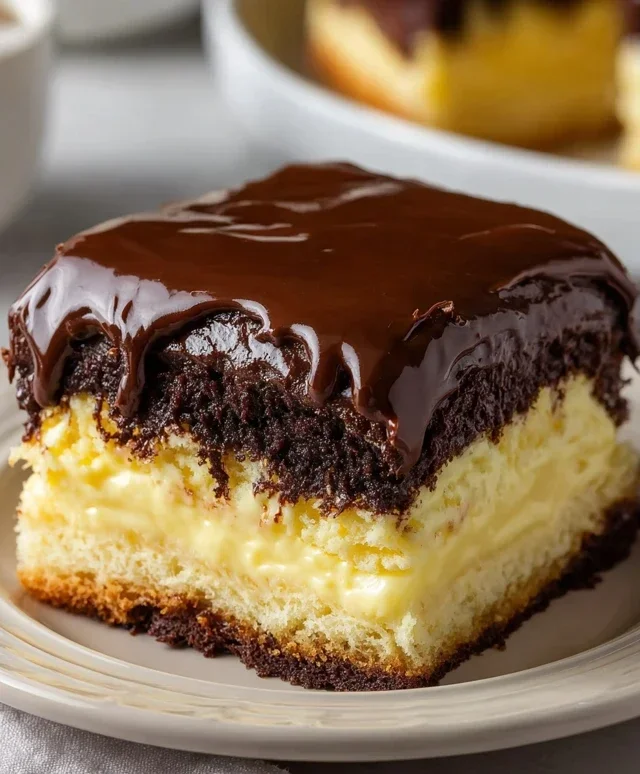
Boston Cream Poke Cake is a dessert that has truly captured my heart, and I suspect it will capture yours too. Have you ever craved that perfect balance of fluffy cake, rich custard, and decadent chocolate glaze? This isn’t just another dessert; it’s an experience. We’re talking about a light and airy vanilla cake, lovingly pierced with an abundance of holes, then generously filled with a luscious, homemade Boston Cream Pie-inspired custard. The magic truly happens as that creamy filling soaks into the cake, creating an impossibly moist and flavorful bite with every spoonful. What makes this Boston Cream Poke Cake so utterly irresistible is the way it elevates a simple cake into something truly spectacular. It’s a celebration of classic flavors, reimagin extracted into a dessert that’s both comforting and surprisingly elegant. Get ready to impress yourself and everyone you share this with!
Boston Cream Poke Cake
Get ready to impress your friends and family with this incredibly decadent and surprisingly easy Boston Cream Poke Cake! This dessert takes all the classic flavors of a Boston Cream Pie – that luscious vanilla custard and rich chocolate glaze – and transforms them into a moist, tender cake that practically melts in your mouth. It’s the perfect showstopper for birthdays, potlucks, or just because you deserve a little extra sweetness in your life.
The magic of a poke cake lies in its ability to absorb delicious fillings through the holes you create. For this Boston Cream version, we’re infusing a fluffy yellow cake with a creamy vanilla pudding mixture before topping it all off with a smooth, glossy chocolate frosting. It’s a symphony of textures and flavors that’s guaranteed to be a crowd-pleaser. You’ll love how the pudding seeps down into the cake, creating a wonderfully moist and flavorful bite in every single forkful.
This recipe is designed for ease, relying on convenient pantry staples to create something truly extraordinary. So, let’s gather our ingredients and get ready to bake some happiness!
Ingredients:
Baking the Yellow Cake
The foundation of our delicious dessert is a simple, yet perfectly baked yellow cake. We’ll start by preheating our oven and preparing our baking pan. This step is crucial for an even bake and to prevent any sticking.
1. Preheat your oven to 350°F (175°C). Grease and flour a 9×13 inch baking pan, or spray it generously with non-stick cooking spray. This ensures your cake will release cleanly from the pan, preventing any frustrating moments when you try to serve it.
2. In a large mixing bowl, combine the yellow cake mix with the wet ingredients as specified on the cake mix box. This usually includes eggs, vegetable oil, and water. Mix according to the cake mix instructions until the batter is smooth and well combined. Be careful not to overmix, as this can lead to a tougher cake. A few gentle stirs until just combined is usually best.
3. Pour the batter evenly into the prepared baking pan. Smooth the top with a spatula. Place the pan in the preheated oven and bake for the time indicated on the cake mix box, typically around 30-35 minutes. You’ll know the cake is done when a toothpick inserted into the center comes out clean.
Creating the Pudding Infusion
While the cake is baking, or immediately after it comes out of the oven, we’ll prepare the creamy pudding mixture that will become the heart of our poke cake.
4. While the cake is still warm in the pan, begin extract preparing the pudding. In a separate medium-sized bowl, whisk together the two boxes of instant vanilla or French vanilla pudding with the 4 cups of milk. Whisk vigorously for about 2 minutes, or until the pudding starts to thicken. Instant pudding is wonderful because it sets up quickly without the need for cooking. You want a nice, thick consistency, similar to a traditional custard.
Poking and Filling the Cake
This is where the magic truly happens! We’ll create holes in our warm cake and then flood it with the delicious pudding.
5. Once the cake has baked and is still warm in the pan, it’s time to create the “poke” holes. You can use the handle of a wooden spoon, a skewer, or even the tines of a fork to poke holes all over the surface of the cake. Aim for holes that are about 1 inch apart. Don’t be shy – the more holes you make, the more pudding will soak into the cake, resulting in an even moister and more flavorful dessert.
6. Immediately after poking the holes, pour the prepared pudding mixture evenly over the top of the warm cake. Gently spread it with a spatula to ensure it covers the entire surface and begin extracts to fill the holes. The warmth of the cake will help the pudding to start to absorb and meld into the cake.
7. Allow the cake to cool completely in the pan. This is a crucial step for the pudding to fully set and for the flavors to meld together. You can let it cool at room temperature for a couple of hours, or for faster results, you can carefully place it in the refrigerator. The longer it cools, the more the pudding will set and the easier it will be to frost.
Frosting and Finishing Touches
The final layer of deliciousness comes with the chocolate frosting, creating that iconic Boston Cream look and taste.
8. Once the cake is completely cooled and the pudding has set, it’s time to frost it. Gently warm the tub of chocolate frosting by placing it in the microwave for about 30-60 seconds, or until it’s smooth and spreadable, but not hot. This will make it much easier to spread evenly over the cake.
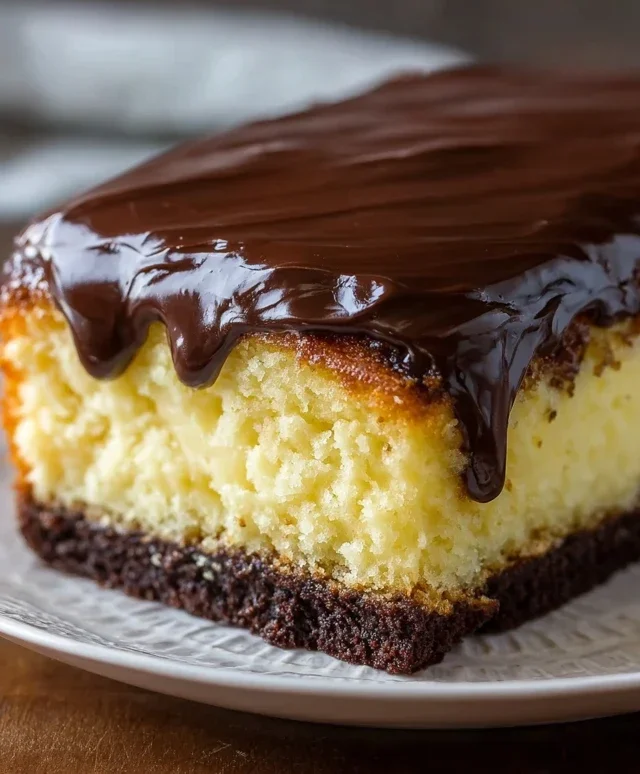
9. Spread the warmed chocolate frosting smoothly over the top of the pudding-covered cake, all the way to the edges. You can create swirls and peaks with your spatula for a decorative finish. The contrast between the creamy pudding, moist cake, and rich chocolate frosting is simply irresistible.
Your Boston Cream Poke Cake is now ready to be enjoyed! For the best flavor and texture, I recommend chilling it for at least another hour or two before slicing and serving. This allows the pudding to firm up even more and the flavors to fully develop. Slice it into generous portions and watch the smiles appear. This dessert is sure to become a new family favorite!
Conclusion:
I hope you’ve enjoyed learning how to make this absolutely delightful Boston Cream Poke Cake! This recipe truly is a winner because it combines the classic flavors of Boston Cream Pie – rich chocolate, creamy vanilla pudding, and moist cake – with the effortless fun of a poke cake. The result is a dessert that’s incredibly easy to prepare, visually appealing with its drizzled chocolate, and utterly delicious. It’s perfect for potlucks, birthdays, or simply when you crave a decadent treat that doesn’t require hours in the kitchen.
For serving suggestions, this cake shines on its own, but a dollop of fresh whipped cream or a few fresh berries can add an extra touch of elegance. When it comes to variations, don’t be afraid to experiment! You could try a chocolate cake mix for a deeper chocolate flavor, or use a different flavored pudding like banana or even cheesecake. Sprinkles are always a fun addition, especially for kids’ parties. I wholeheartedly encourage you to give this Boston Cream Poke Cake a try; I promise you won’t be disappointed!
Frequently Asked Questions:
Can I make this cake ahead of time?
Absolutely! This cake is actually even better when made a few hours or even a day in advance. This allows the pudding mixture to fully saturate the cake, resulting in a wonderfully moist and flavorful dessert. Just be sure to store it covered in the refrigerator.
What kind of chocolate should I use for the ganache?
For the best flavor and texture, I recommend using good quality semi-sweet or dark chocolate chips or a chopped chocolate bar. Milk chocolate can also be used, but it might result in a sweeter ganache. Using a combination can also create a lovely depth of flavor!
Boston Cream Poke Cake
A delicious and easy poke cake layered with creamy pudding and topped with rich chocolate frosting, inspired by the classic Boston Cream Pie.
Ingredients
-
1 (15.25 ounce) box yellow cake mix
-
Ingredients for cake (eggs, oil, and water as per cake mix box instructions)
-
2 (3.4 ounce) boxes instant vanilla pudding
-
4 cups milk
-
1 (16 ounce) tub chocolate frosting
Instructions
-
Step 1
Preheat oven to 350°F (175°C). Grease and flour a 9×13 inch baking pan. -
Step 2
Prepare the yellow cake mix according to the package directions, including eggs, oil, and water. Pour batter into the prepared baking pan. -
Step 3
Bake for 30-35 minutes, or until a wooden skewer inserted into the center comes out clean. -
Step 4
While the cake is still warm, use the handle of a wooden spoon to poke holes all over the top of the cake. -
Step 5
In a separate bowl, whisk together the instant vanilla pudding mix and milk until smooth. Let it sit for 5 minutes to thicken. -
Step 6
Pour the thickened pudding evenly over the poked cake, ensuring it seeps into the holes. -
Step 7
Spread the chocolate frosting over the pudding layer once the cake has cooled slightly. Chill the cake in the refrigerator for at least 2 hours before serving.
Important Information
Nutrition Facts (Per Serving)
It is important to consider this information as approximate and not to use it as definitive health advice.
Allergy Information
Please check ingredients for potential allergens and consult a health professional if in doubt.