Spooky Halloween Rice Krispies Treats-Easy Fun Recipe
Halloween Rice Krispies Treats are more than just a nostalgic childhood snack; they’re a vibrant and playful centerpiece for any spooky celebration! There’s something inherently magical about transforming a simple cereal into a festive, edible work of art. People absolutely adore these treats because they are incredibly easy to make, allowing even novice bakers to create something impressive. The joy comes from the simple act of customization – the way the gooey marshmallows and crispy cereal readily accept food coloring, sprinkles, and various shapes, making every batch a unique creation. What truly makes Halloween Rice Krispies Treats special is their versatility. Whether you’re crafting creepy ghosts, grinning pumpkins, or eerie monster faces, the possibilities are as endless as your imagin extractation. They bring smiles to faces of all ages, embodying the fun and spirit of the season with every delightful, chewy bite.
Ingredients:
- Unsalted butter: 3 tablespoons
- Mini marshmallows: 1 package (10 ounces)
- Rice Krispies cereal: 6 cups
- Candy corn: 1 cup
- Yellow food coloring: a few drops
- Orange food coloring: a few drops
Getting Started: Preparing Your Workspace and Bowls
Before we dive into the magic of creating these festive Halloween Rice Krispies Treats, let’s ensure we have everything ready. This will make the process smooth and enjoyable. First, grab a large mixing bowl – this is where all the deliciousness will come together. Next, find a 9×13 inch baking pan. It’s crucial to grease this pan thoroughly. You can use cooking spray, or for an extra buttery flavor that complements our treats, you can lightly coat it with some of the unsalted butter. Some people also like to line the pan with parchment paper, leaving an overhang on the sides, which makes lifting the finished treats out a breeze. Have your measuring cups and spoons handy. Finally, it’s a good idea to have a spatula or a large spoon ready for mixing. If you want to get fancy, you can also prepare a second bowl of the same size to divide the mixture for coloring, but this isn’t strictly necessary if you’re comfortable coloring in the main bowl.
Melting the Sweetness: Butter and Marshmallows
This is where the sticky, gooey magic begin extracts! In a large saucepan, melt the 3 tablespoons of unsalted butter over low heat. It’s important to use low heat here to prevent the butter from scorching, which can impart an undesirable burnt flavor to your treats. Once the butter is completely melted and looks smooth and golden, it’s time to add the mini marshmallows. Add the entire 10-ounce package of mini marshmallows to the saucepan with the melted butter. Continue to stir gently and constantly with your spatula. The marshmallows will start to puff up and melt. Keep stirring until the mixture is completely smooth and all the marshmallows have dissolved into a creamy, sticky mass. This usually takes about 5-7 minutes. The aroma of melted marshmallows is truly irresistible! Don’t rush this step; a well-melted marshmallow base is key to perfectly textured Rice Krispies Treats. Once it’s a homogenous, glossy mixture, remove the saucepan from the heat.
Combining Cereal and Marshmallow Mixture
Now for the satisfying part: combining the cereal with our marshmallow base. In your large mixing bowl (which should already be greased or lined), pour in the 6 cups of Rice Krispies cereal. It’s important to use the correct amount of cereal to marshmallow ratio for the best texture – not too dry and crum extractbly, and not too gooey and sticky. Working quickly while the marshmallow mixture is still warm and pliable, pour the entire melted marshmallow and butter mixture over the Rice Krispies cereal. Using your spatula or large spoon, gently but thoroughly fold the cereal into the marshmallow mixture. You want to ensure every single puff of cereal is coated in the sticky sweetness. Be patient here; it can take a little bit of effort to get everything evenly coated, but it’s worth it for uniformly delicious treats. Don’t press down too hard at this stage, as that can make the treats dense. We want light and airy!
Creating the Halloween Colors: Orange and Yellow Layers
This is where we add the festive Halloween spirit! If you want distinctly colored layers for your Halloween Rice Krispies Treats, you’ll need to divide the cereal mixture. Once you’ve thoroughly coated the cereal as described in the previous step, quickly divide the mixture into two equal portions. You can do this by scooping about half of the mixture into a second greased bowl. To one portion, add a few drops of orange food coloring. To the other portion, add a few drops of yellow food coloring. Start with just a couple of drops and add more if needed to achieve your desired vibrant Halloween hues. Gently and quickly mix the food coloring into each portion of the cereal mixture until the color is evenly distributed. Work swiftly because the marshmallow migin extractre begins to set relatively fast once it cools. The key here is to get the colors incorporated before the mixture becomes too difficult to stir.
Assembling and Shaping the Treats
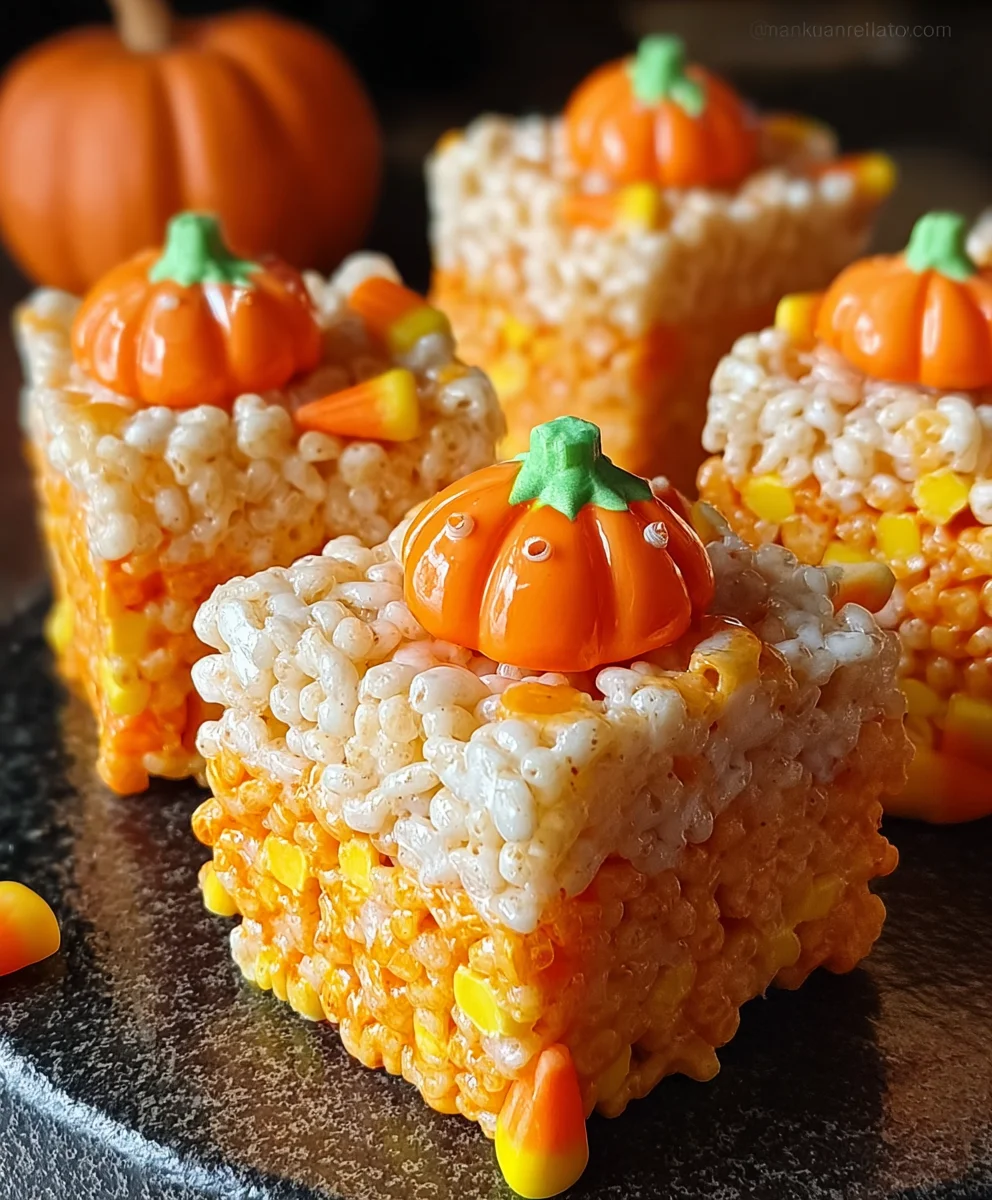
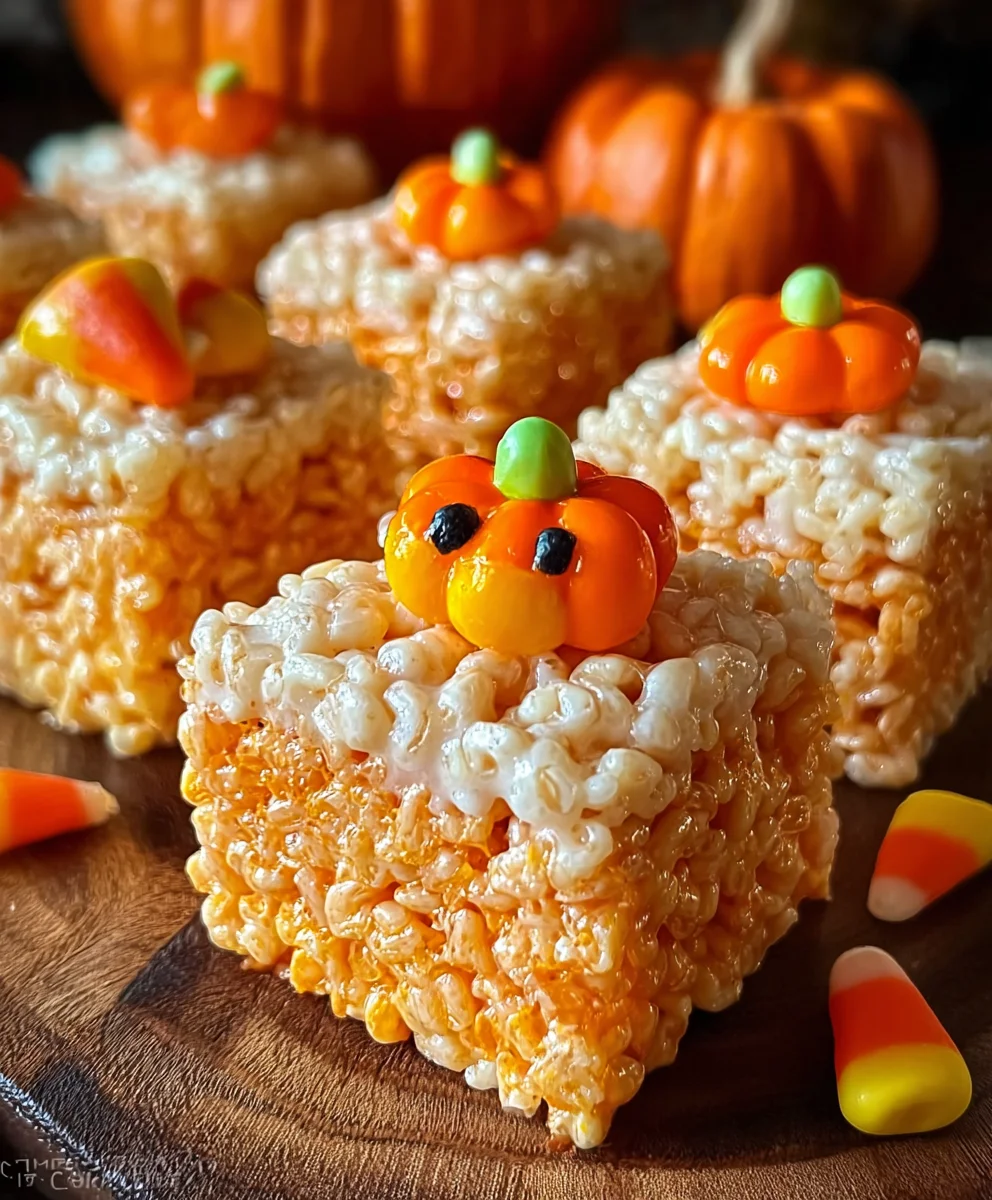
With your colored mixtures ready, it’s time to assemble these delightful Halloween Rice Krispies Treats. Take your prepared 9×13 inch baking pan. Start by pressing about half of the orange cereal mixture evenly into the bottom of the pan. Use your greased spatula or your hands (lightly greased works well too!) to gently press the mixture down to form an even layer. Don’t press too firmly, as this can make the treats hard. Then, carefully spread the yellow cereal mixture on top of the orange layer, creating a distinct second layer. Again, gently press it down to create an even surface. For an extra touch of Halloween fun, you can sprinkle the 1 cup of candy corn evenly over the top of the yellow layer. The candy corn adds a sweet crunch and a perfect festive look. Once assembled, gently press the candy corn into the top layer so it adheres well.
Cooling and Cutting Your Halloween Masterpieces
Now that your Halloween Rice Krispies Treats are assembled and looking wonderfully festive with their orange and yellow layers and candy corn topping, it’s time to let them cool. Leave the pan at room temperature for at least 30 minutes to an hour. This allows the treats to firm up properly. Trying to cut them too soon will result in a sticky mess. Once they feel firm to the touch, you can carefully lift the entire slab out of the pan by the parchment paper overhang, if you used it. Place it on a cutting board. Using a sharp knife, cut the treats into your desired shapes. Squares or rectangles are classic, but you can also use Halloween-themed cookie cutters for extra flair. If you didn’t use parchment paper, you might need to carefully slide the slab out of the pan and then cut. Enjoy your homemade Halloween Rice Krispies Treats!
Conclusion:
And there you have it – a spooktacularly simple and delightfully delicious batch of Halloween Rice Krispies Treats! We’ve walked through each step, from the melting marshmallows to the final spooky decorations, and I hope you’re feeling inspired to get creative in the kitchen. These treats are not only a hit with kids during the Halloween season but are also incredibly versatile. They’re perfect for school parties, neighborhood trick-or-treat handouts, or just a fun family activity on a chilly autumn evening. Remember, the magic of these Halloween Rice Krispies Treats lies in their simplicity and the joy they bring. Don’t be afraid to experiment with different food coloring, sprinkles, or even candy additions to make them uniquely yours. So, gather your ingredients, put on some festive music, and let the Halloween spirit inspire your culinary creations. Happy haunting and happy treating!
Frequently Asked Questions about Halloween Rice Krispies Treats:
Q: Can I make these Halloween Rice Krispies Treats ahead of time?
Absolutely! Halloween Rice Krispies Treats can be made a day or two in advance. Once they’ve cooled and set, cut them into squares and store them in an airtight container at room temperature. For extra security against drying out, you can layer them between parchment paper. Avoid refrigerating them, as this can make them hard.
Q: What are some other fun decorating ideas for these Halloween Rice Krispies Treats?
Beyond the classic spooky shapes, consider using candy eyeballs for a monster effect, black licorice strings for spider webs, or orange and black sprinkles for a festive look. You can also drizzle melted chocolate in green or purple for a ghastly glow. For more intricate designs, using cookie cutters in Halloween shapes before the treats fully set can also be a lot of fun!
Spooky Halloween Rice Krispies Treats
Easy and fun Halloween Rice Krispies Treats with spooky orange and yellow layers and a candy corn topping.
Ingredients
-
3 tablespoons unsalted butter
-
1 package (10 ounces) mini marshmallows
-
6 cups Rice Krispies cereal
-
1 cup candy corn
-
Yellow food coloring
-
Orange food coloring
Instructions
-
Step 1
Grease a 9×13 inch baking pan. Have a large mixing bowl, measuring cups, spoons, and a spatula ready. -
Step 2
Melt butter in a large saucepan over low heat. Add mini marshmallows and stir until completely melted and smooth. Remove from heat. -
Step 3
Pour Rice Krispies cereal into the large mixing bowl. Pour the melted marshmallow mixture over the cereal and gently fold until all cereal is coated. Work quickly. -
Step 4
Divide the mixture into two equal portions. Add a few drops of orange food coloring to one portion and yellow food coloring to the other. Mix until evenly colored. -
Step 5
Press the orange mixture evenly into the prepared pan. Spread the yellow mixture on top. Sprinkle candy corn over the yellow layer and gently press it in. -
Step 6
Let the treats cool at room temperature for at least 30 minutes to an hour until firm. Cut into desired shapes.
Important Information
Nutrition Facts (Per Serving)
It is important to consider this information as approximate and not to use it as definitive health advice.
Allergy Information
Please check ingredients for potential allergens and consult a health professional if in doubt.