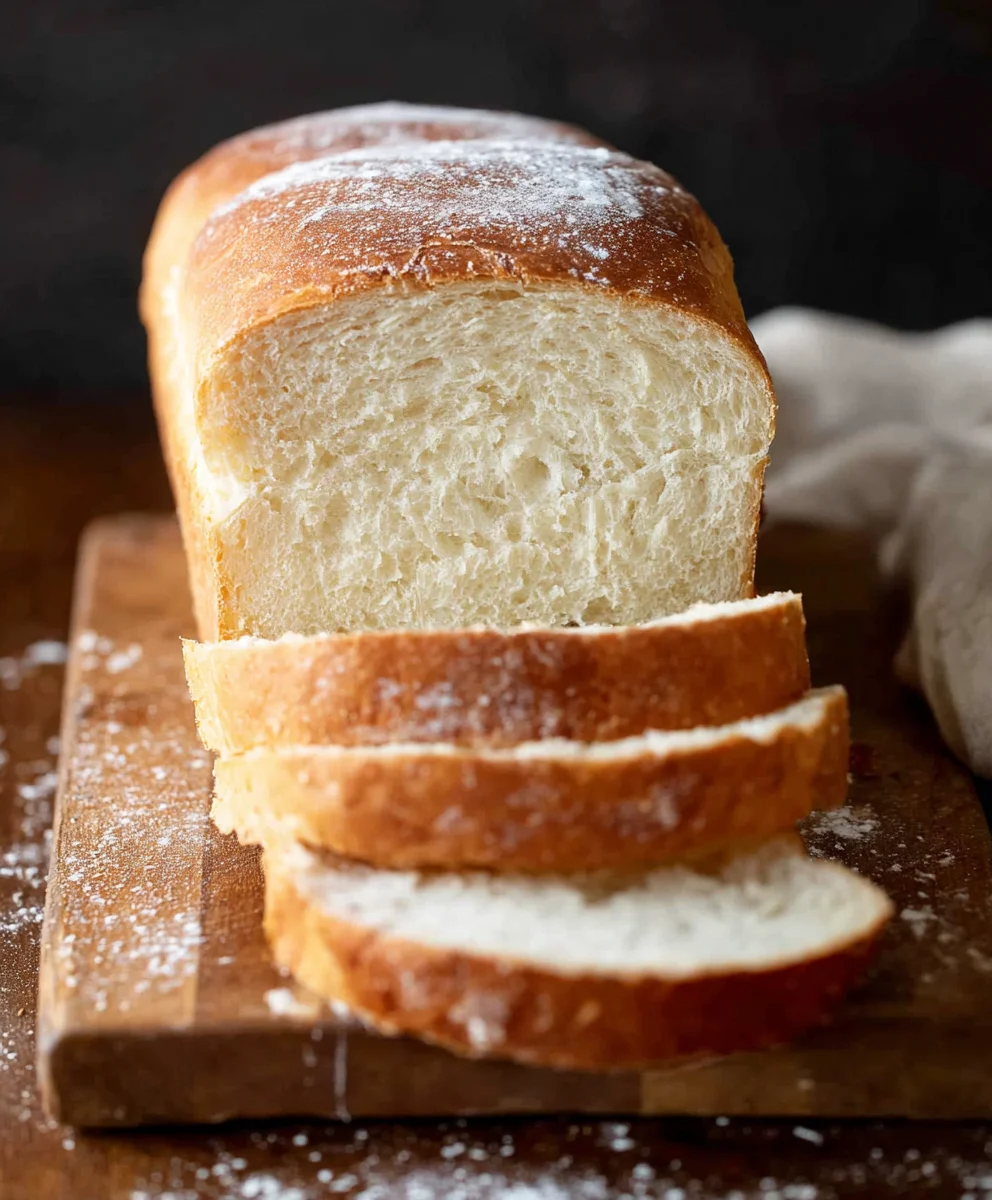
Easy Homemade Bread Recipe – Delicious & Simple
Homemade Bread is more than just a delicious food; it’s an experience. There’s an unparalleled warmth and comfort that fills the kitchen as the aroma of freshly baked bread wafts through the air, promising a simple yet profound pleasure. This isn’t just about sustenance; it’s about tradition, about reconnecting with the satisfying rhythm of kneading dough and watching it transform. People adore homemade bread for its unparalleled texture – that perfectly crisp crust giving way to a soft, yielding interior. It’s a testament to the magic that happens with just a few humble ingredients: flour, water, yeast, and salt. What truly makes our recipe for Homemade Bread special is its foolproof nature, designed to yield consistent, bakery-quality results even for novice bakers, ensuring you can achieve that perfect loaf every single time. Get ready to impress yourself and your loved ones with the joy of creating your own beautiful, delicious Homemade Bread from scratch.

Ingredients:
- 2 cups warm water (105-115 degrees Fahrenheit or 474g)
- 1 Tablespoon active dry yeast
- 1/4 cup honey or sugar (85g honey or 50g sugar)
- 2 teaspoons salt
- 2 Tablespoons oil (canola or vegetable, approximately 30 ml)
- 4 to 5 1/2 cups all-purpose or bread flour (500g to 688g)
Preparing Your Dough
Step 1: Activating the Yeast
The first step to achieving a wonderfully fluffy and flavorful homemade bread is to get our yeast ready. In a large mixing bowl, combine the 2 cups of warm water. It’s crucial that the water is between 105 and 115 degrees Fahrenheit. If it’s too cool, the yeast won’t activate, and your bread won’t rise. If it’s too hot, you risk killing the yeast entirely. You can test this by dipping your finger in; it should feel comfortably warm, like bathwater. To this warm water, add your 1 tablespoon of active dry yeast and the 1/4 cup of honey or sugar. I prefer using honey for a slightly richer, more complex flavor, but granulated sugar works perfectly well if that’s what you have on hand. Give it a gentle stir to help the honey or sugar dissolve. Now, let this mixture sit undisturbed for about 5 to 10 minutes. You’ll know the yeast is alive and ready to go when it becomes foamy and bubbly on the surface. This foamy cap is a beautiful sign of happy, active yeast.
Step 2: Mixing the Wet Ingredients and Salt
Once you see that lively foam on top of your yeast mixture, it’s time to add the other liquid ingredients. Gently stir in the 2 tablespoons of oil. Canola or vegetable oil are excellent choices as they have a neutral flavor that won’t interfere with the bread’s taste. If you happen to have olive oil and don’t mind a hint of its flavor, that can work too, though it will impart a slightly different character. Next, add the 2 teaspoons of salt. The salt is important not only for flavor but also for controlling the yeast’s activity and strengthening the gluten structure of the dough. Give everything a quick stir to combine.
Step 3: Incorporating the Flour and Begin extractning to Knead
Now comes the exciting part: adding the flour! Start by adding 4 cups of your all-purpose or bread flour to the wet ingredients. Bread flour is generally recommended for its higher gluten content, which results in a chewier texture and better rise, but all-purpose flour will certainly do the job for a delicious homemade loaf. Use a sturdy spoon or a dough whisk to mix the flour into the wet ingredients. Continue mixing until a shaggy dough starts to form and most of the flour is incorporated. At this point, the dough will likely be quite sticky and unmanageable. Turn the dough out onto a lightly floured surgin extracte. Begin to knead. If you’re using a stand mixer, you can attach the dough hook and knead on low speed. When kneading by hand, it’s a rhythmic process of pushing, folding, and turning the dough. Initially, you’ll be adding more flour as needed, just a tablespoon or two at a time, to prevent the dough from sticking too much to your hands and the work surface. You’re looking for a dough that is still slightly tacky but no longer sticking excessively.
Step 4: Developing the Dough’s Structure through Kneading
This is where the magic happens for creating that desirable homemade bread texture. Continue to knead the dough for about 8 to 10 minutes if you are doing it by hand, or 6 to 8 minutes with a stand mixer. The goal is to develop the gluten. As you knead, you’ll notice the dough transforming from a rough, shaggy mass into a smooth, elastic ball. It should feel pliable and spring back slightly when you poke it. You can test if it’s ready by performing the windowpane test: take a small piece of dough and gently stretch it. If you can stretch it thin enough to see light through it without it tearing, your gluten is well-developed, and your dough is ready for its first rise. If it tears easily, keep kneading. Remember, adding too much flour during kneading will result in a dense loaf, so aim for that slight tackiness.
Step 5: The First Rise (Proofing)
Once your dough has been kneaded to perfection, it’s time for its first rise, often called proofing. Lightly grease a clean, large bowl with a bit of oil. Place your kneaded dough into the bowl and turn it to coat all sides with the oil. This prevents a dry skin from forming on top. Cover the bowl tightly with plastic wrap or a clean, damp kitchen towel. Find a warm, draft-free spot in your kitchen for the dough to rest. This could be in a slightly warmed oven (turned off, of course!), on top of your refrigerator, or simply on your counter if your kitchen is warm. Let the dough rise for about 1 to 1.5 hours, or until it has doubled in size. It’s like watching a beautiful transformation! The yeast will continue to work, creating air pockets that give the bread its airy interior.
Shaping and Baking
Step 6: Punching Down and Shaping the Loaf
After the dough has beautifully doubled in size, gently punch it down to release the trapped gases. This process deflates the dough, redistributes the yeast, and prepares it for its final shape. Turn the dough out onto a lightly floured surface once more. You can shape it into a classic round boule, an oval loaf, or even divide it to make smaller rolls. For a standard loaf, gently flatten the dough into a rough rectangle. Then, fold the top third down to the center, and the bottom third up over that, like folding a letter. Pinch the seams to seal them. Gently roll the dough back and forth between your palms to create a smooth, taut surface, tucking the ends under. This shaping is important for a good crust and an even bake.
Step 7: The Second Rise (Final Proofing)**
Once your dough is shaped into your desired loaf, place it onto a baking sheet lined with parchment paper or into a greased loaf pan. Cover it loosely with plastic wrap or a kitchen towel again. Allow it to rise for a second time in a warm place for about 30 to 45 minutes, or until it looks noticeably puffy and has increased in size by about 50-75%. This second rise, or final proof, is crucial for achieving a light and airy crum extractb. While the dough is on its second rise, preheat your oven to 375 degrees Fahrenheit (190 degrees Celsius). Getting the oven to the correct temperature is vital for the perfect bake.
Step 8: Baking Your Homemade Bread
Once the dough has completed its second rise and your oven is preheated, it’s time to bake! For an even better crust, you can lightly score the top of the loaf with a sharp knife or a lame (a special bread-scoring tool). This allows the steam to escape in a controlled way, preventing the crust from cracking in unexpected places. Carefully place the baking sheet or loaf pan into the preheated oven. Bake for 30 to 40 minutes. The exact time will depend on your oven and the size of your loaf. Your bread is done when it’s golden brown on top and sounds hollow when you tap the bottom. If you have an instant-read thermometer, the internal temperature of the loaf should register around 200-210 degrees Fahrenheit (93-99 degrees Celsius).
Step 9: Cooling for Perfect Texture
This is perhaps the hardest step because the aroma of freshly baked homemade bread is incredibly tempting, but patience is key! Once your beautiful loaf is out of the oven, immediately remove it from the baking sheet or loaf pan and place it on a wire cooling rack. Allowing the bread to cool completely on a wire rack is essential. This allows steam to escape from the interior, which prevents the bottom crust from becoming soggy and helrum extractthe crumb set properly. If you slice into it too soon, the texture might be gummy. Aim to let it cool for at least 1 hour before slicing and enjoying. The wait is truly worth it for that perfect homemade bread experience.
Conclusion:
And there you have it – the satisfying journey of creating your very own Homemade Bread! We’ve walked through each step, from proofing the yeast to achieving that perfect golden crust. This recipe isn’t just about nourishment; it’s about the aroma filling your kitchen, the joy of slicing into a warm, freshly baked loaf, and the incredible sense of accomplishment. The versatility of Homemade Bread is truly its superpower. Enjoy it simply with a generous slather of butter, use it as the base for gourmet sandwiches, or serve it alongside your favorite soups and stews. Don’t be afraid to experiment! Try adding herbs, seeds, or even a touch of honey to the dough for unique flavor profiles. This recipe is a fantastic starting point, and we encourage you to make it your own. Happy baking!
Frequently Asked Questions:
Why isn’t my bread rising?
Several factors can contribute to a lack of rise. Ensure your yeast is fresh and active by proofing it in warm (not hot) water with a pinch of sugar. Overworking the dough can also inhibit rise, as can a cool environment. Try to let your dough rise in a warm, draft-free spot.
How do I store Homemade Bread?
For the freshest results, store cooled Homemade Bread in a bread box or a loosely tied paper bag at room temperature for 2-3 days. For longer storage, slice the bread and freeze it in an airtight container or freezer bag for up to 3 months. Simply toast slices from frozen.
Easy Homemade Bread Recipe – Delicious & Simple
A simple and delicious recipe for homemade bread that is perfect for beginners. This recipe guides you through activating the yeast, kneading, proofing, shaping, and baking for a perfect loaf every time.
Ingredients
-
2 cups warm water (105-115 degrees Fahrenheit)
-
1 Tablespoon active dry yeast
-
1/4 cup honey or sugar
-
2 teaspoons salt
-
2 Tablespoons canola or vegetable oil
-
4 to 5 1/2 cups all-purpose or bread flour
Instructions
-
Step 1
Activate the yeast by combining 2 cups of warm water (105-115°F) with 1 tablespoon of active dry yeast and 1/4 cup of honey or sugar in a large bowl. Let it sit for 5-10 minutes until foamy. -
Step 2
Stir in 2 tablespoons of oil and 2 teaspoons of salt into the yeast mixture. Mix gently to combine. -
Step 3
Gradually add 4 cups of flour to the wet ingredients, mixing until a shaggy dough forms. Turn the dough onto a lightly floured surface and begin kneading, adding more flour a tablespoon at a time as needed, until the dough is slightly tacky but not sticky. -
Step 4
Knead the dough for 8-10 minutes by hand or 6-8 minutes with a stand mixer until it becomes smooth and elastic. Perform the windowpane test to ensure the gluten is well-developed. -
Step 5
Place the kneaded dough in a lightly oiled bowl, turn to coat, cover tightly, and let it rise in a warm place for 1 to 1.5 hours, or until doubled in size. -
Step 6
Gently punch down the risen dough, shape it into your desired loaf, and place it on a baking sheet or in a loaf pan. Cover and let it rise for another 30-45 minutes. -
Step 7
Preheat your oven to 375°F (190°C). Bake the bread for 30-40 minutes, or until golden brown and hollow-sounding when tapped on the bottom. -
Step 8
Remove the bread from the oven and immediately place it on a wire cooling rack to cool completely for at least 1 hour before slicing.
Important Information
Nutrition Facts (Per Serving)
It is important to consider this information as approximate and not to use it as definitive health advice.
Allergy Information
Please check ingredients for potential allergens and consult a health professional if in doubt.